Love this? Save it for later!
Share the inspiration with your friends
There used to be a little bakery on the corner of Maple and 3rd in my old neighborhood that made a chocolate cookie sandwich I still dream about. When they closed two summers ago—just a handwritten sign in the window one day and gone the next—I honestly felt a little lost. That cookie was my Tuesday afternoon ritual, my little pocket of joy in the middle of a chaotic week. After maybe seven or eight tries, with some batches that were too dry, too crumbly, or just plain sad, I finally got it. And then I got a little carried away.
I turned that beloved chocolate cookie crunch into something even more fun: these Easy Spider Cookies. They’ve got that same deep cocoa flavor and satisfying snap, but now they come with a creepy-crawly makeover that’s perfect for Halloween. I mean, who doesn’t want a cookie that’s both delicious and a little bit spooky? The best part is, they’re so simple to throw together that you can make a batch after work and still have time to hand out candy.
Honestly, the first time I made these, I got chocolate all over my fingers trying to pipe the spider legs, and my kids laughed so hard they almost fell off their stools. But you know what? Those messy, imperfect spiders were the ones everyone grabbed first. There’s something about a cookie that looks like it might scuttle away that just makes people smile. And that’s why I keep making them—they bring that same little pocket of joy, just with eight legs and a whole lot of personality.
Why You’ll Love This Recipe
These Easy Spider Cookies aren’t just another Halloween treat. They’re the kind of cookie that disappears before you even get a chance to arrange them nicely on the platter. Here’s why I think you’ll fall for them too:
- Quick & Easy : From start to finish, you’re looking at about 25 minutes. No chilling, no complicated techniques—just mix, bake, and decorate. Perfect for those nights when you realize Halloween is tomorrow and you have nothing for the school party.
- Simple Ingredients : You probably have most of this stuff in your pantry right now. No hunting down specialty stores or ordering weird candy online. Just good, basic baking staples.
- Perfect for Halloween : Whether it’s a classroom party, a neighborhood gathering, or just a fun night in with the kids, these cookies scream Halloween without being too scary for the little ones.
- Crowd-Pleaser : I’ve brought these to three different Halloween events now, and they’re always the first plate to empty. Kids love the spider look, and adults love that they taste like a real cookie, not just a gimmick.
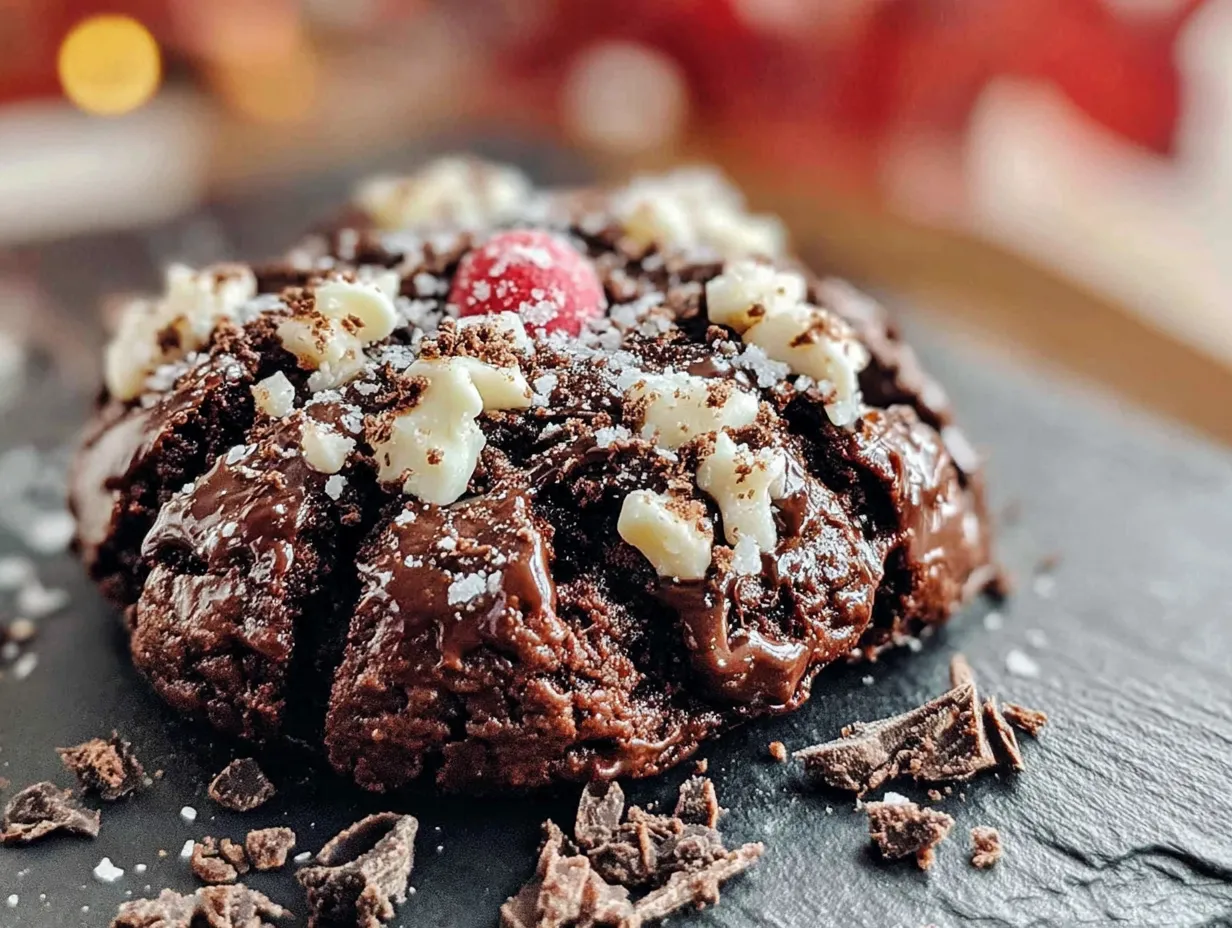
- Unbelievably Delicious : The chocolate cookie base is rich and slightly crunchy, with little bits of Oreo-like crunch throughout. Then you add the creamy frosting and the candy eyes staring up at you—it’s next-level comfort food with a spooky twist.
What makes these different from every other Halloween cookie out there? It’s the texture, honestly. Most spider cookies use a soft, cakey base that crumbles when you try to poke the legs in. This one has structure. It holds its shape, it holds its crunch, and it holds those pretzel legs like a champ. After testing four different recipes, this is the one that finally worked without falling apart. It’s not just another version—it’s your best version.
This recipe is the kind that makes you close your eyes after the first bite. It’s comfort food reimagined—healthier than a store-bought treat, faster than a complicated dessert, but with the same soul-soothing satisfaction. Perfect for impressing guests without stress, or turning a simple October evening into something memorable.
What Ingredients You Will Need
This recipe uses simple, wholesome ingredients to deliver bold chocolate flavor and that satisfying crunch without the fuss. Most of these are pantry staples, which means you can whip up a batch on a whim.
- For the Cookies:
- 1 ½ cups all-purpose flour (spooned and leveled)
- ½ cup unsweetened cocoa powder (I prefer Ghirardelli for the deepest color)
- ½ teaspoon baking soda
- ¼ teaspoon salt
- ½ cup unsalted butter, softened (let it sit out for 30 minutes)
- ¾ cup granulated sugar
- ¼ cup packed light brown sugar
- 1 large egg, room temperature
- 1 teaspoon vanilla extract
- 1 cup crushed chocolate sandwich cookies (about 8 Oreos, crushed into small pieces—not dust)
- For the Spider Decorations:
- ½ cup milk or dark chocolate chips (for melting)
- 1 tablespoon coconut oil or vegetable shortening (helps the chocolate stay smooth)
- 24 thin pretzel sticks (broken in half to make 48 legs)
- 48 small candy eyes (you can find these at any craft store or online)
A few notes on ingredients: For the cocoa powder, don’t use Dutch-process here. Natural cocoa gives these cookies that classic, slightly tangy chocolate flavor that pairs so well with the sweet frosting. If you only have Dutch-process, add an extra ¼ teaspoon of baking soda to help them spread properly.
For the crushed cookies, you want chunks, not powder. I put mine in a zip-top bag and give them a few gentle whacks with a rolling pin. Some bigger pieces are fine—they add to the texture. If you’re gluten-free, use gluten-free sandwich cookies and a 1:1 gluten-free flour blend. The texture will be slightly different, but still delicious.
For the pretzel legs, look for thin pretzel sticks, not the thick ones. The thin ones break cleanly and look more spider-like. If you can’t find pretzel sticks, you can use chow mein noodles for a totally different look, or even licorice strings cut into pieces.
Equipment Needed
You don’t need much fancy gear for these cookies, which is part of their charm. Here’s what you’ll want to have on hand:
- Baking Sheets: Two large baking sheets lined with parchment paper or silicone baking mats. I’ve used both, and honestly, the silicone mats give a slightly more even bottom on the cookies.
- Mixing Bowls: One medium bowl for the dry ingredients and one large bowl for the wet ingredients. A small microwave-safe bowl for melting the chocolate.
- Electric Mixer: A hand mixer works great, but you can absolutely do this by hand with a wooden spoon if you need a little arm workout.
- Cookie Scoop: A 1 ½ tablespoon scoop makes perfectly uniform cookies. If you don’t have one, just use a regular spoon and try to make them roughly the same size.
- Piping Bag or Zip-Top Bag: For the melted chocolate. A small zip-top bag with the corner snipped off works perfectly and costs nothing.
- Cooling Rack: Essential for letting the cookies cool completely before decorating. If you decorate while they’re warm, the chocolate will slide right off.
I’ve made these in a tiny apartment kitchen with nothing but a fork and a baking sheet, and they turned out just fine. Don’t let equipment stop you from making these spiders.
Preparation Method
- Preheat and Prep: Preheat your oven to 350°F (175°C). Line two baking sheets with parchment paper or silicone mats. This recipe makes about 24 cookies, so you’ll need space for two batches.
- Mix Dry Ingredients: In a medium bowl, whisk together the flour, cocoa powder, baking soda, and salt. Set this aside. Make sure there are no lumps in the cocoa—nobody wants a pocket of bitter powder in their cookie.
- Cream Butter and Sugars: In a large bowl, beat the softened butter, granulated sugar, and brown sugar together until light and fluffy, about 2-3 minutes. Scrape down the sides of the bowl halfway through. The mixture should look pale and slightly increased in volume.
- Add Egg and Vanilla: Beat in the egg and vanilla extract until fully combined. The mixture might look a little separated at this point—that’s totally normal. Don’t overmix here, just get it incorporated.
- Combine Wet and Dry: Gradually add the dry ingredients to the wet mixture, mixing on low speed or stirring by hand until just combined. You should see a few streaks of flour remaining—that’s your cue to stop. Overmixing makes tough cookies.
- Fold in the Crunch: Gently fold in the crushed chocolate sandwich cookies using a spatula. Don’t stir too vigorously; you want those cookie chunks to stay intact for texture.
- Scoop and Bake: Scoop rounded tablespoons of dough (about 1 ½ tablespoons each) onto the prepared baking sheets, spacing them about 2 inches apart. Bake for 10-12 minutes. The cookies will look slightly puffed and the edges will be set, but the centers will still look soft. That’s exactly what you want. Let them cool on the baking sheet for 5 minutes, then transfer to a wire rack to cool completely.
- Make the Spider Legs: While the cookies cool, prepare the pretzel legs. Break each pretzel stick in half to create two legs. You’ll need 48 half-sticks total for 24 spiders. Set them aside.
- Melt the Chocolate: In a small microwave-safe bowl, combine the chocolate chips and coconut oil. Microwave in 20-second intervals, stirring between each, until smooth and fully melted. Let it cool for 2-3 minutes—if it’s too hot, it will run right off the cookies.
- Assemble the Spiders: Once the cookies are completely cool, use a small piping bag or a zip-top bag with a tiny corner snipped off to pipe a small dot of melted chocolate in the center of each cookie. Press four pretzel half-sticks on each side to create the legs. Then pipe a slightly larger chocolate circle in the center to cover the pretzel ends. Press two candy eyes into the wet chocolate. Let the chocolate set completely, about 15-20 minutes at room temperature, or pop them in the fridge for 5 minutes to speed things up.
Here’s a tip I learned the hard way: Don’t try to press all eight legs into the cookie at once. Do four on one side, then rotate the cookie and do the other four. Your hands will thank you, and the legs will be more evenly spaced.
Cooking Tips & Techniques
After making these cookies more times than I care to count, I’ve picked up a few tricks that make the process smoother and the results better. Let me share what I’ve learned.
The Butter Temperature Trap: I cannot stress this enough—your butter needs to be softened, not melted. If you microwave it to soften it and accidentally melt it, just start over. Melted butter will make these cookies spread into flat, greasy puddles. I’ve done it. It’s not pretty. Let your butter sit out for at least 30 minutes, or if you’re in a rush, cut it into small cubes and let it sit for 15 minutes.
The Crush Consistency: When you’re crushing the Oreos, aim for a mix of small crumbs and pea-sized chunks. If you crush them too fine, you lose that textural contrast that makes these cookies special. If you leave them too big, they’ll create weak spots in the cookie that can break when you add the legs. I use a rolling pin and stop when I can see pieces about the size of chocolate chips.
The Cooling Rule: This is probably the most important tip of all: Do not decorate warm cookies. I know, I know, you’re excited. But warm cookies will melt the chocolate into a puddle, and your spider legs will slide right off. I once decorated a slightly warm cookie and ended up with a spider that looked like it was doing the splits. Wait until they’re completely cool to the touch.
The Leg Strategy: When you’re inserting the pretzel legs, think about spider anatomy. Spiders have four legs on each side, and they’re usually curved. I like to angle the front two legs slightly forward and the back two legs slightly backward, with the middle ones pointing straight out. It gives them a more natural, creepy-crawly look. And if a leg breaks while you’re inserting it, just eat it and grab another one. That’s the cook’s tax.
Timing Your Multitasking: While the first batch of cookies bakes, I crush the pretzels and set up my decorating station. While the second batch bakes, I melt the chocolate. Then by the time all the cookies are cool, everything is ready to go. It makes the whole process feel like a well-oiled machine instead of a chaotic mess.
Variations & Adaptations
These spider cookies are surprisingly versatile. Here are a few ways I’ve adapted them over the years:
Gluten-Free Version: Substitute the all-purpose flour with a 1:1 gluten-free baking flour blend. Use gluten-free chocolate sandwich cookies for the crunch. The texture will be slightly more tender, but they hold together beautifully. I’ve made these for my gluten-sensitive friends, and they couldn’t tell the difference.
Vegan Adaptation: Use vegan butter (I like Miyoko’s), a flax egg (1 tablespoon ground flaxseed mixed with 3 tablespoons water, let sit for 5 minutes), and vegan chocolate chips. The cookies will be a bit more delicate, so handle them gently when inserting the legs. Use dairy-free chocolate for the decoration.
Peanut Butter Spider Cookies: Replace ¼ cup of the butter with creamy peanut butter. Omit the crushed sandwich cookies and add ½ cup of chopped peanuts instead. The peanut butter flavor pairs surprisingly well with the chocolate, and the peanuts add a nice crunch. Just be aware that these are not nut-free, so keep them away from anyone with allergies.
Spider Color Variations: Instead of chocolate cookies, try a vanilla or sugar cookie base and use purple or orange gel food coloring to tint the dough. Use white chocolate for the decorations. They look less like real spiders and more like cartoon Halloween characters, which is perfect for younger kids.
Air Fryer Method: Yes, you can make these in an air fryer. Preheat to 325°F (160°C) and line the basket with parchment. Cook in batches of 6-8 cookies for 6-8 minutes, checking at the 6-minute mark. They won’t spread as much, so flatten them slightly with the back of a spoon before baking.
My personal favorite variation? I made a batch with dark chocolate cookies, white chocolate spider bodies, and red candy eyes. They looked like something out of a horror movie, and my teenage nephew declared them “the coolest cookies ever made.” High praise from a kid who barely looks up from his phone.
Serving & Storage Suggestions
These spider cookies are best served at room temperature, which lets the chocolate set properly and keeps the pretzel legs crunchy. I like to arrange them on a black or orange platter for maximum Halloween effect. A few fake spiderwebs draped around the plate really sells the theme.
For a Halloween party, I set them out on a cake stand with some candy corn scattered around. They’re also fantastic packaged up in cellophane bags tied with orange ribbon as party favors. Kids love getting their own little spider to take home.
As for beverages, these cookies pair beautifully with a cold glass of milk (obviously), but I also love them with a hot cup of coffee or a pumpkin spice latte. The rich chocolate and the salty pretzel contrast is just divine with something warm to drink.
Storage Instructions: Store these cookies in an airtight container at room temperature for up to 5 days. Here’s the thing though—the pretzel legs will start to soften after about 24 hours. They’ll still taste great, but they won’t have that satisfying snap. If you want to keep them crunchy, store the undecorated cookies separately and add the legs and eyes the day you plan to serve them.
Freezer Tips: You can freeze the undecorated cookies for up to 3 months. Just place them in a single layer in a freezer-safe container with parchment between layers. When you’re ready to serve, thaw them at room temperature for about 30 minutes, then decorate as directed. Do not freeze decorated cookies—the chocolate will bloom and the pretzels will get soggy.
One thing I’ve noticed: These cookies actually taste better the next day. The flavors meld together overnight, and the chocolate cookie gets this deep, almost fudgy quality. If you can resist eating them all on day one, you’re in for a treat on day two.
Nutritional Information & Benefits
Let’s be real—these are cookies, not health food. But here’s the good news: they’re made with real ingredients, no preservatives, and you control exactly what goes into them. That counts for something.
Per cookie (based on 24 servings):
- Calories: 165
- Fat: 8g
- Carbohydrates: 22g
- Fiber: 1g
- Sugar: 12g
- Protein: 2g
The cocoa powder in these cookies is actually a decent source of antioxidants—specifically flavonoids, which are good for heart health. The pretzels add a little sodium, which helps balance the sweetness. And if you use dark chocolate for the decorations instead of milk chocolate, you’ll get even more of those antioxidant benefits.
For anyone watching their sugar intake, you can reduce the granulated sugar to ½ cup and use sugar-free chocolate chips. The cookies won’t spread as much, so flatten them slightly before baking. They’ll be a little less sweet but still satisfying.
These cookies are vegetarian and can easily be made vegan or gluten-free with the substitutions I mentioned earlier. They contain dairy, eggs, gluten, and soy (from the chocolate), so be mindful of allergies if you’re bringing them to a party.
My personal take? I think there’s room for treats in a balanced diet. These spider cookies are a once-a-year Halloween indulgence, and honestly, the joy they bring is worth every calorie. Life’s too short to skip the good stuff.
Conclusion
These Easy Spider Cookies with Chocolate Cookie Crunch are everything I want in a Halloween treat: fun to make, fun to eat, and fun to share. They bring back that bakery memory every time I bite into one, but they’ve also created new memories—my kids covered in chocolate, my friends laughing at the wonky spiders, the neighbor who asked for the recipe before she even tried one.
I hope you’ll give these a try, whether you’re making them for a party, a classroom, or just a quiet October evening with a cup of tea. Don’t be afraid to make them your own—use different candies, change up the colors, let your kids go wild with the decorating. The imperfect ones are always the best ones.
If you make these, I’d love to hear about it! Drop a comment below and tell me how your spiders turned out. Did your kids love them? Did they disappear too fast? Share a photo on Pinterest and tag me—I want to see your creepy-crawly creations. Happy Halloween, friends. Go make some spiders.
FAQs
Can I use a different type of cookie for the crunch?
Absolutely. While chocolate sandwich cookies give the best color and flavor, you can use any crunchy cookie you like. Vanilla wafers, shortbread, or even chocolate graham crackers work well. Just crush them to the same consistency.
How do I keep the pretzel legs from falling off?
The key is to use enough melted chocolate to anchor them. Pipe a small dot of chocolate first, press the pretzels in, then cover the ends with more chocolate. Let the chocolate set completely before moving the cookies. If they’re still falling off, try chilling the cookies for 10 minutes before serving.
Can I make these cookies ahead of time?
Yes! You can bake the cookies up to 3 days in advance and store them in an airtight container. Add the legs and eyes the day you plan to serve them for the best texture. The undecorated cookies also freeze beautifully for up to 3 months.
My cookies spread too much. What went wrong?
This usually happens for one of three reasons: your butter was too soft or melted, your dough wasn’t chilled before baking, or you used too much sugar. Next time, make sure your butter is just softened (not melted) and chill the scooped dough for 15 minutes before baking if your kitchen is warm.
Can I use white chocolate instead of dark chocolate for the decorations?
Definitely. White chocolate gives a nice contrast against the dark cookies and looks especially spooky. Just be careful not to overheat it—white chocolate burns more easily than dark. Use the same melting method with 20-second intervals in the microwave.
Pin This Recipe!

Easy Spider Cookies with Oreo Crunch (Best Halloween Treat)
These Easy Spider Cookies are a fun and delicious Halloween treat featuring a rich chocolate cookie base with Oreo crunch, topped with pretzel legs and candy eyes. They’re quick to make, perfect for parties, and sure to be a crowd-pleaser.
- Prep Time: 15 minutes
- Cook Time: 12 minutes
- Total Time: 27 minutes
- Yield: 24 cookies 1x
- Category: Dessert
- Cuisine: American
Ingredients
- 1 ½ cups all-purpose flour (spooned and leveled)
- ½ cup unsweetened cocoa powder (natural, not Dutch-process)
- ½ teaspoon baking soda
- ¼ teaspoon salt
- ½ cup unsalted butter, softened
- ¾ cup granulated sugar
- ¼ cup packed light brown sugar
- 1 large egg, room temperature
- 1 teaspoon vanilla extract
- 1 cup crushed chocolate sandwich cookies (about 8 Oreos, crushed into small pieces)
- ½ cup milk or dark chocolate chips (for melting)
- 1 tablespoon coconut oil or vegetable shortening
- 24 thin pretzel sticks (broken in half to make 48 legs)
- 48 small candy eyes
Instructions
- Preheat oven to 350°F (175°C). Line two baking sheets with parchment paper or silicone mats.
- In a medium bowl, whisk together flour, cocoa powder, baking soda, and salt. Set aside.
- In a large bowl, beat softened butter, granulated sugar, and brown sugar together until light and fluffy, about 2-3 minutes. Scrape down sides halfway through.
- Beat in egg and vanilla extract until fully combined. Do not overmix.
- Gradually add dry ingredients to wet mixture, mixing on low speed or stirring by hand until just combined. A few streaks of flour should remain.
- Gently fold in crushed chocolate sandwich cookies using a spatula. Do not overmix.
- Scoop rounded tablespoons of dough (about 1 ½ tablespoons each) onto prepared baking sheets, spacing 2 inches apart. Bake for 10-12 minutes. Cookies should look slightly puffed with set edges and soft centers.
- Let cookies cool on baking sheet for 5 minutes, then transfer to a wire rack to cool completely.
- While cookies cool, break each pretzel stick in half to create 48 legs. Set aside.
- In a small microwave-safe bowl, combine chocolate chips and coconut oil. Microwave in 20-second intervals, stirring between each, until smooth and fully melted. Let cool for 2-3 minutes.
- Once cookies are completely cool, pipe a small dot of melted chocolate in the center of each cookie. Press four pretzel half-sticks on each side to create legs. Pipe a slightly larger chocolate circle in the center to cover pretzel ends. Press two candy eyes into the wet chocolate.
- Let chocolate set completely, about 15-20 minutes at room temperature, or refrigerate for 5 minutes to speed up.
Notes
Do not decorate warm cookies; let them cool completely. For best texture, store undecorated cookies separately and add legs and eyes the day of serving. The cookies taste even better the next day.
Nutrition
- Serving Size: 1 cookie
- Calories: 165
- Sugar: 12
- Sodium: 120
- Fat: 8
- Saturated Fat: 4
- Carbohydrates: 22
- Fiber: 1
- Protein: 2
Keywords: spider cookies, Halloween cookies, chocolate cookies, Oreo crunch, easy Halloween treat, spider cookies with pretzels


