Love this? Save it for later!
Share the inspiration with your friends
My sister swore she hated pumpkin pie for thirty-two years. Thirty-two years of Thanksgiving dinners where she’d load up every other dessert plate but leave the pie dish untouched. Then last October, I caught her standing at my kitchen counter, spoon in hand, digging into one of these custard cups straight from the fridge at 11 PM. She froze when she saw me, like a kid caught sneaking cookies. “This is different,” she mumbled, mouth half-full. “This doesn’t taste like… pie.”
That’s the thing about these Cozy Crustless Pumpkin Pie Custard Cups. They somehow capture everything wonderful about pumpkin pie—that velvety texture, that warm spice blend, that deep autumn flavor—without any of the things that turn people off. No crust to fuss with. No cracking on top. No weird gelatinous texture that some pumpkin pies get. Honestly, I stumbled onto this recipe by accident when I realized I had a can of pumpkin but no pie crust and zero desire to go to the store. It was one of those Tuesday nights where the air had that first real chill of fall, and I needed something warm and comforting, but I wasn’t about to make a whole production of it.
These little custard cups became my fall obsession overnight. They’re the kind of dessert that makes you slow down, take small bites, and actually taste what you’re eating. The first time I made them, I ate two before dinner even started. Maybe you’ve been there—when a recipe just clicks, and you know immediately it’s going to become part of your regular rotation. That’s this one. It’s simple enough for a random weeknight but special enough to serve at a dinner party. And it might just convert a few pumpkin pie skeptics along the way.
Why You’ll Love This Recipe
Let me tell you why these custard cups have earned a permanent spot in my fall baking lineup. I’ve tested this recipe at least a dozen times, tweaking the spice ratios, adjusting the baking time, even trying different milk alternatives. What I landed on is the version that delivers the most consistent, dreamy results every single time.
- No Crust, No Stress : Skip the rolling, pressing, and blind baking. These come together in about 10 minutes of active prep time. Perfect for those evenings when you want something homemade but don’t want to wrestle with dough.
- Simple Pantry Ingredients : You probably have everything already. Canned pumpkin, eggs, milk, sugar, and basic fall spices. No special trips to the store for obscure ingredients.
- Perfect for Cozy Nights In : When the weather turns cold and you need something warm and soothing, these custard cups deliver. They’re comfort food in its purest form—smooth, spiced, and deeply satisfying.
- Naturally Gluten-Free : Since there’s no crust, these are naturally gluten-free. Everyone at the table can enjoy them without worry.
- Portion-Controlled Indulgence : Individual servings mean you get your own little cup of happiness. No fighting over the last slice, no pressure to cut perfect pieces.
What makes this recipe different from other pumpkin desserts is the texture. I use a specific ratio of eggs to pumpkin that creates this incredibly silky, almost creamy consistency. It’s not too dense like some pumpkin pies, and it’s not too loose like pudding. It’s that perfect middle ground—a custard that holds its shape but melts on your tongue. Plus, the spice blend is balanced so the pumpkin flavor shines through without being overwhelmed by cinnamon or nutmeg.
This is the kind of dessert that makes you close your eyes after the first bite. It’s fall in a cup, honestly. And the best part? You can make them ahead of time, which means less stress when you’re hosting.
What Ingredients You Will Need
This recipe uses simple, wholesome ingredients that work together to create something truly special. Most of these are pantry staples, which makes this an easy last-minute dessert option when fall cravings hit.
- Canned Pumpkin Puree (15 oz / 425g) : Make sure you’re getting 100% pumpkin puree, not pumpkin pie filling. I prefer Libby’s for consistent texture and flavor. The puree should be smooth with no added spices or sugar.
- Large Eggs (3, room temperature) : Room temperature eggs blend more smoothly into the custard, creating that silky texture we’re after. If you forget to take them out ahead of time, place them in a bowl of warm water for 5 minutes.
- Sweetened Condensed Milk (14 oz / 397g) : This is the secret to the rich, creamy sweetness without having to mess with separate sugar and cream. I’ve tried Eagle Brand and store brands—they all work, but Eagle Brand gives the smoothest result.
- Vanilla Extract (1 teaspoon) : Pure vanilla extract makes a noticeable difference here. The artificial stuff can leave a weird aftertaste in custards.
- Pumpkin Pie Spice (1 tablespoon) : You can use store-bought or make your own blend. I actually prefer making my own—mix 2 teaspoons cinnamon, 1 teaspoon ginger, ½ teaspoon nutmeg, ½ teaspoon allspice, and ¼ teaspoon cloves. It’s fresher and you can adjust to your taste.
- Salt (¼ teaspoon) : Don’t skip this. Salt enhances all the other flavors and balances the sweetness. I use fine sea salt for even distribution.
For the topping (optional but highly recommended):
- Heavy Whipping Cream (1 cup / 240ml) : Cold cream whips up best. Make sure your bowl and beaters are chilled too for maximum volume.
- Powdered Sugar (2 tablespoons) : Just enough to sweeten the cream without making it heavy.
- Ground Cinnamon (for dusting) : A light sprinkle on top makes these look bakery-worthy.
If you want to switch things up, you can use coconut milk instead of sweetened condensed milk for a dairy-free version, but the texture will be slightly less creamy. I’ve also tried using maple syrup instead of condensed milk, and while it’s delicious, the custard doesn’t set quite as firmly. For the best results, stick with the sweetened condensed milk—it really does make a difference in both texture and flavor.
Equipment Needed
You don’t need fancy equipment for these custard cups, which is part of their charm. Here’s what you’ll need:
- 6 Oven-Safe Ramekins (6 oz / 180ml each) : I use classic white ceramic ramekins. They’re inexpensive and available at most kitchen stores. If you don’t have ramekins, you can use a standard muffin tin—just grease the cups well.
- Large Mixing Bowl : Any medium-to-large bowl works. I prefer glass so I can see that everything is fully combined.
- Whisk : A good whisk helps incorporate the eggs smoothly without overbeating. A balloon whisk works best.
- Measuring Cups and Spoons : Accurate measurements matter in custard recipes. Use dry measuring cups for the pumpkin and liquid measuring cups for the milk.
- 9×13 Baking Dish : This holds the ramekins for the water bath. It needs to be large enough to fit all six ramekins without touching.
- Kettle or Pot for Hot Water : You’ll need boiling water for the water bath. An electric kettle makes this step effortless.
- Fine-Mesh Strainer (optional but helpful) : Straining the custard mixture removes any egg bits that didn’t fully incorporate, ensuring an ultra-smooth texture.
My first time making these, I used mismatched teacups and a small casserole dish. It worked fine—the custards didn’t care what they were baked in. So don’t stress if you don’t have the perfect equipment. A muffin tin with paper liners works in a pinch, though the edges won’t be as smooth.
Preparation Method
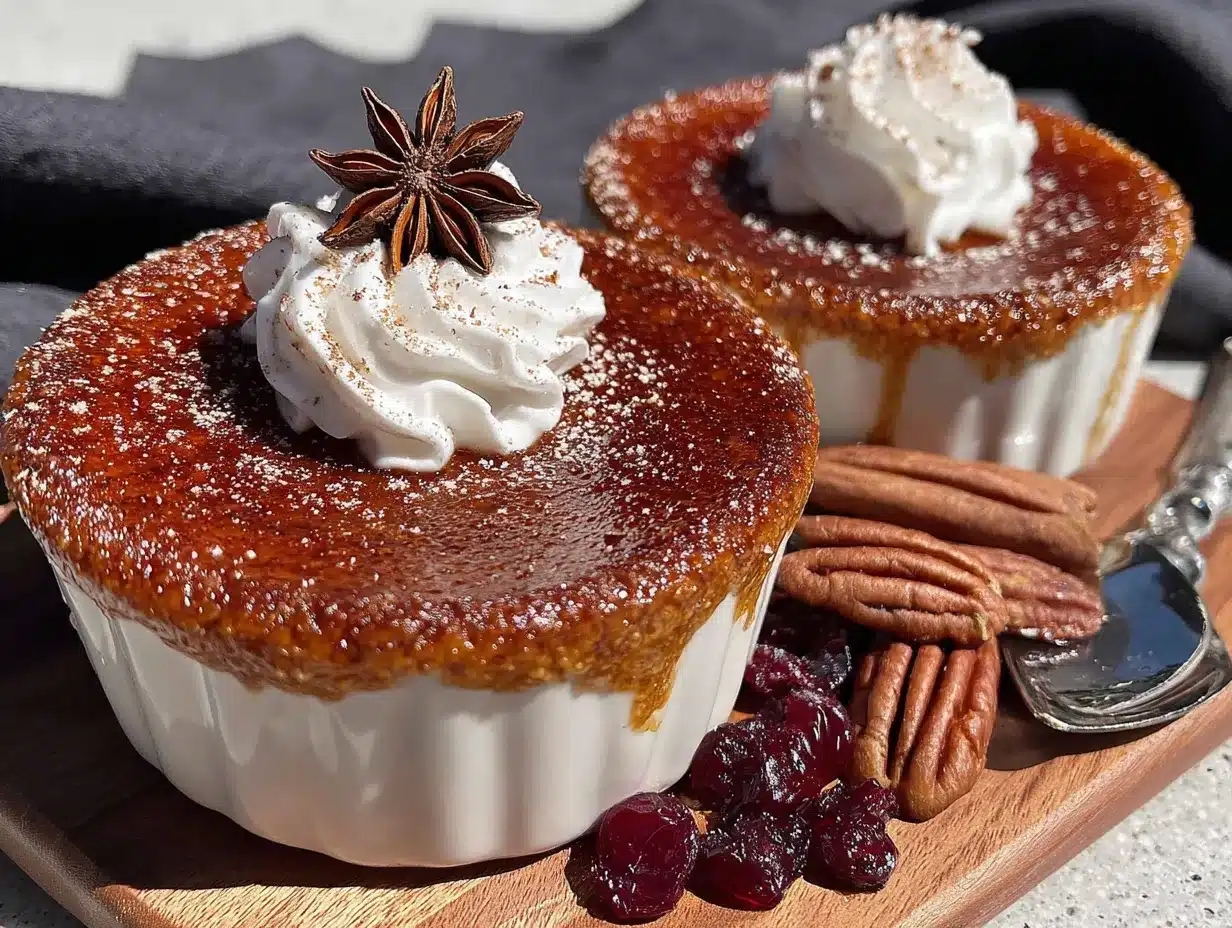
Let’s walk through this step by step. I’ve included all the little details I wish someone had told me the first time I made custards.
- Preheat your oven to 350°F (175°C) . Place your ramekins in the 9×13 baking dish. Don’t fill them yet—you’ll do that after the water bath is ready.
- In your large mixing bowl, whisk the eggs until they’re light and frothy . This takes about 30 seconds of vigorous whisking. You want the yolks and whites fully combined. I usually do this while the eggs are still slightly cold—they whisk up fluffier that way.
- Add the pumpkin puree, sweetened condensed milk, vanilla extract, pumpkin pie spice, and salt . Whisk everything together until smooth. Don’t overmix—you just want everything incorporated. Overmixing can incorporate too much air, which creates bubbles on the surface of your custards.
- Pour the mixture through a fine-mesh strainer into a clean bowl or large measuring cup . This step catches any stray bits of egg white that didn’t break up. Trust me, this makes a difference. The first time I skipped this step, I ended up with little cooked egg white bits in my custard. Not the end of the world, but not as smooth as it could be.
- Divide the mixture evenly among your six ramekins . Each should be about ¾ full. I use a ⅓ cup measuring scoop to get consistent portions. If you’re using a muffin tin, fill each cup about ¾ full as well.
- Carefully pour hot water into the baking dish , being careful not to splash water into the ramekins. Fill the water until it reaches about halfway up the sides of the ramekins. This water bath insulates the custards, helping them cook gently and evenly. The first time I forgot the water bath, my custards came out tough and rubbery. Don’t skip this step.
- Bake for 35-40 minutes . The custards are done when the edges are set but the centers still jiggle slightly when you gently shake the pan. They’ll continue to set as they cool. If you insert a knife near the center, it should come out mostly clean with just a tiny bit of custard clinging to it.
- Carefully remove the baking dish from the oven . Use tongs or an oven mitt to lift the ramekins out of the water bath. Place them on a wire rack to cool for about 30 minutes.
- Refrigerate for at least 2 hours before serving . Chilled custard has the best texture. The flavors also meld and deepen as they sit. I actually think these are even better the next day.
If you’re making these for a dinner party, you can prepare them up to two days in advance. Just cover each ramekin with plastic wrap once they’re fully chilled.
Cooking Tips & Techniques
After making these custard cups more times than I can count, I’ve learned a few things the hard way. Here are my best tips for perfect results every time.
Don’t skip the water bath. I know it’s an extra step, and it can be a little fussy getting the ramekins in and out of the hot water. But it’s non-negotiable for silky custards. The water bath creates a gentle, even heat that prevents the eggs from scrambling. Without it, you’ll end up with a texture that’s more like a pumpkin frittata than a creamy custard.
Watch your baking time carefully. Every oven runs differently. My old oven took exactly 35 minutes, but my current one needs 38. Start checking at 30 minutes. The custards should still have a slight jiggle in the center when you pull them out. They’ll continue cooking from residual heat after they’re removed from the oven.
Use room temperature ingredients. Cold eggs or cold pumpkin can cause the mixture to seize up or create lumps. If you forgot to set things out ahead of time, you can warm the pumpkin in the microwave for 15 seconds and place the eggs in warm water for 5 minutes.
Strain the mixture. I mentioned this in the method, but it’s worth repeating. That one extra step transforms good custards into great ones. The strainer catches any little bits that would otherwise create a grainy texture.
Let them cool completely before refrigerating. Hot custards going straight into the fridge can develop condensation on top, which makes the surface watery. Let them cool on the counter for at least 30 minutes, then cover and refrigerate.
One mistake I made early on was overbaking because I wanted the centers completely set. Don’t do that. A slight jiggle is your friend. Overbaked custards are dry and have that weird cracked surface. If you see cracks forming on top, you’ve gone too far.
Variations & Adaptations
One of the best things about this recipe is how adaptable it is. Here are some variations I’ve tried and loved:
Dairy-Free Version : Substitute the sweetened condensed milk with a can of full-fat coconut milk mixed with ½ cup maple syrup or honey. The texture won’t be quite as creamy, but it’s still delicious. I’ve also used oat milk with good results, though you’ll need to add an extra egg for structure.
Spice It Up : For a more complex flavor profile, try adding ¼ teaspoon of cardamom or a pinch of black pepper to the spice blend. The pepper sounds weird, I know, but it actually enhances the pumpkin flavor in a subtle way. I discovered this by accident when I grabbed the wrong spice jar one night.
Chocolate Pumpkin Version : Melt ½ cup of dark chocolate chips and swirl it into the custard mixture before baking. The chocolate pairs surprisingly well with the pumpkin spices. My nephew requests this version every time he visits.
Maple Pecan Twist : Substitute the vanilla extract with maple extract and top each custard with a few chopped pecans before baking. The nuts get slightly toasted in the oven, adding a nice crunch against the smooth custard.
Savory Option : Reduce the sugar to 2 tablespoons, omit the pumpkin pie spice, and add 1 teaspoon of sage, ½ teaspoon of garlic powder, and a pinch of cayenne. Bake as directed. This makes an unexpected but wonderful side dish for roasted meats.
If you’re feeding a crowd, you can double the recipe and bake it in a 9-inch pie dish. Just increase the baking time to 45-50 minutes. The texture will be slightly different since it’s one large custard, but it’s still fantastic.
Serving & Storage Suggestions
These custard cups are versatile when it comes to serving. Here’s how I like to present them:
Serve cold or at room temperature . I prefer them straight from the fridge, but some people like them slightly warmer. If you want to serve them warm, just let them sit on the counter for 15 minutes after removing from the fridge.
Top with whipped cream . A dollop of freshly whipped cream is the classic pairing. The light, airy cream contrasts beautifully with the dense custard. I like to add a sprinkle of cinnamon or nutmeg on top for a finished look.
Drizzle with caramel sauce . For an extra indulgent treat, warm up some store-bought or homemade caramel sauce and drizzle it over the top. The combination of pumpkin and caramel is heavenly.
Pair with coffee or tea . These custard cups are perfect alongside a hot cup of coffee or chai tea. The spices in the custard complement the warm beverages beautifully.
Storage : Cover each ramekin with plastic wrap or transfer the custards to an airtight container. They’ll keep in the refrigerator for up to 5 days. The texture actually improves after a day or two as the flavors meld together.
Freezing : You can freeze these for up to 3 months. Wrap each ramekin tightly in plastic wrap, then foil. Thaw overnight in the refrigerator before serving. The texture might be slightly softer after freezing, but it’s still delicious.
One thing I love about these is that they’re perfect for meal prep. Make a batch on Sunday, and you have individual desserts ready to grab all week. They’re also great for taking to potlucks or holiday gatherings since they travel well in their ramekins.
Nutritional Information & Benefits
While these custard cups are definitely a treat, they do offer some nutritional benefits thanks to the pumpkin. Here’s the estimated breakdown per serving (one custard cup without whipped cream):
- Calories : 285
- Total Fat : 8g
- Saturated Fat : 4g
- Cholesterol : 115mg
- Sodium : 210mg
- Total Carbohydrates : 45g
- Dietary Fiber : 3g
- Sugars : 38g
- Protein : 8g
Pumpkin is packed with vitamin A, which supports eye health and immune function. It’s also a good source of fiber, which helps with digestion and keeps you feeling full. The eggs provide high-quality protein and essential nutrients like choline, which is important for brain health.
If you’re watching your sugar intake, you can reduce the sweetened condensed milk by half and add an extra egg. The custard won’t be as sweet, but it’ll still have that lovely pumpkin flavor. For a lower-calorie option, skip the whipped cream topping and enjoy the custard as is.
These are also naturally gluten-free, making them a safe dessert option for anyone with celiac disease or gluten sensitivity. Just make sure your pumpkin pie spice blend doesn’t contain any hidden gluten.
Conclusion
These Cozy Crustless Pumpkin Pie Custard Cups have become my go-to fall dessert for good reason. They capture everything I love about autumn—the warmth, the spices, the feeling of slowing down and savoring something simple and good. Whether you’re a lifelong pumpkin lover or a skeptic like my sister, I think you’ll find something to love in these little cups of comfort.
I’d love to hear how they turn out for you. Did you try any variations? Did you serve them with something unexpected? Drop a comment below and let me know. And if you’re looking for more fall dessert ideas, you might enjoy my classic apple crisp or these easy pecan pie bars for your next cozy gathering.
Until next time, happy baking—and don’t forget the whipped cream!
Frequently Asked Questions
Can I use fresh pumpkin instead of canned?
Yes, you can! Just make sure to roast and puree the pumpkin until it’s very smooth. Fresh pumpkin has more water content than canned, so you might need to cook the puree down a bit to remove excess moisture. I recommend straining it through cheesecloth for about 30 minutes before using.
Why did my custard turn out watery?
Watery custard usually means it was underbaked or the water bath was too shallow. Make sure the water comes halfway up the sides of the ramekins and bake until the edges are set but the center still jiggles slightly. Also, check that your pumpkin puree isn’t too watery—some brands have more liquid than others.
Can I make these in a slow cooker?
Absolutely! Pour the custard mixture into a greased slow cooker and cook on low for 2-3 hours, or until set. The texture will be slightly different since there’s no water bath, but it’s a great hands-off method. Just keep an eye on it so it doesn’t overcook.
How do I prevent a skin from forming on top?
A skin forms when the surface of the custard dries out during baking. To prevent this, cover the ramekins with foil for the first 20 minutes of baking, then remove for the last 15-20 minutes. You can also brush the tops with a little melted butter before baking.
Can I use a different milk instead of sweetened condensed milk?
You can, but the texture and sweetness will change. If you use regular milk, you’ll need to add about ½ cup of sugar and an extra egg to compensate. Coconut milk or oat milk work well, but you’ll need to adjust the sweetness. I recommend sticking with sweetened condensed milk for the best results.
PrintCozy Crustless Pumpkin Pie Custard Cups: Easy Fall Dessert
These individual custard cups capture everything wonderful about pumpkin pie—velvety texture, warm spice blend, deep autumn flavor—without any crust to fuss with. They’re simple enough for a weeknight but special enough for a dinner party.
- Prep Time: 10 minutes
- Cook Time: 35-40 minutes
- Total Time: 2 hours 45 minutes (includes chilling)
- Yield: 6 servings 1x
- Category: Dessert
- Cuisine: American
Ingredients
- 15 oz (425g) canned pumpkin puree (100% pumpkin, not pie filling)
- 3 large eggs, room temperature
- 14 oz (397g) sweetened condensed milk
- 1 teaspoon vanilla extract
- 1 tablespoon pumpkin pie spice (or homemade blend: 2 tsp cinnamon, 1 tsp ginger, ½ tsp nutmeg, ½ tsp allspice, ¼ tsp cloves)
- ¼ teaspoon fine sea salt
- For the topping (optional): 1 cup (240ml) heavy whipping cream, 2 tablespoons powdered sugar, ground cinnamon for dusting
Instructions
- Preheat oven to 350°F (175°C). Place 6 oven-safe ramekins (6 oz/180ml each) in a 9×13 baking dish.
- In a large mixing bowl, whisk eggs until light and frothy, about 30 seconds.
- Add pumpkin puree, sweetened condensed milk, vanilla extract, pumpkin pie spice, and salt. Whisk until smooth; do not overmix.
- Pour mixture through a fine-mesh strainer into a clean bowl or large measuring cup to remove any egg bits.
- Divide mixture evenly among the 6 ramekins, filling each about ¾ full.
- Carefully pour hot water into the baking dish until it reaches halfway up the sides of the ramekins (water bath).
- Bake for 35-40 minutes, until edges are set but centers still jiggle slightly when shaken.
- Carefully remove ramekins from water bath and place on a wire rack to cool for 30 minutes.
- Refrigerate for at least 2 hours before serving. Custards are best chilled.
Notes
Don’t skip the water bath—it ensures silky custards. Use room temperature ingredients for best results. Custards can be made up to 2 days in advance and stored covered in the refrigerator. For dairy-free, substitute sweetened condensed milk with full-fat coconut milk mixed with ½ cup maple syrup or honey (texture will be less creamy).
Nutrition
- Serving Size: 1 custard cup (witho
- Calories: 285
- Sugar: 38
- Sodium: 210
- Fat: 8
- Saturated Fat: 4
- Carbohydrates: 45
- Fiber: 3
- Protein: 8
Keywords: pumpkin custard, crustless pumpkin pie, fall dessert, gluten-free dessert, easy pumpkin recipe, individual desserts, pumpkin pie cups


