Love this? Save it for later!
Share the inspiration with your friends
The woman at the farmer’s market booth watched me eyeing her black sesame cookies for a solid minute before she finally spoke. “You’re trying to figure out how to make something black that isn’t full of artificial dye, aren’t you?” she asked, and I laughed because she had absolutely nailed it. I’d been standing there thinking about Halloween treats for my kids’ school party, feeling stuck between wanting something fun and not wanting to feed them a chemistry experiment. She reached under her table and handed me a tiny bag of black cocoa powder. “Try this,” she said. “It’s the secret to dark treats that actually taste like something.” I thanked her, bought three bags of her cookies, and went home to experiment. That chance encounter at the market led me down a rabbit hole of natural coloring options, and honestly, I messed up quite a few batches before I got it right. One batch turned out gray instead of black—my kids called them “ghost truffles” and ate them anyway. But this version? These Wholesome Black Cat Oreo Truffles for Halloween are the ones that finally worked. They’re dark, they’re cute, and they use real ingredients that make me feel good about handing them out. Maybe you’ve been looking for that same balance—something holiday-themed that doesn’t sacrifice your standards. Let me show you what I figured out.
Why You’ll Love This Recipe
These aren’t your average Halloween candy. After testing this recipe six times (and eating way too many test batches), I can tell you exactly why these truffles stand out from the crowd of sugary holiday treats.
- Naturally Dark Coloring : Black cocoa powder gives these truffles their deep, spooky color without any artificial dyes. Your kids will love the look, and you’ll love what’s actually in them.
- Simple Whole-Food Ingredients : Cream cheese, black cocoa, and dates create a base that’s actually nourishing. No hydrogenated oils or high-fructose corn syrup here.
- No-Bake and Quick : These come together in about 30 minutes of active time. Perfect for busy Halloween week when you’re juggling costumes and school events.
- Kid-Friendly to Make : My seven-year-old helped roll these into balls and stick on the candy eyes. It’s a fun kitchen project that builds Halloween excitement.
- Surprisingly Satisfying : The rich, dark chocolate flavor combined with the creamy center hits that sweet tooth spot without sending you into a sugar crash.
What makes these different from every other Oreo truffle recipe out there? Most versions use whole Oreos with the filling, which means a ton of added sugar and processed ingredients. I swapped in black cocoa powder, medjool dates for sweetness, and kept the cream cheese for that signature truffle texture. The result is a treat that tastes indulgent but leaves you feeling good—not guilty.
This is the kind of recipe that makes you close your eyes after the first bite. It’s Halloween fun reimagined—wholesome, simple, and full of the same soul-soothing satisfaction as the classic version. Perfect for impressing at the school party or turning a regular Tuesday into something special.
What Ingredients You Will Need
This recipe uses simple, wholesome ingredients to deliver that deep, dark chocolate flavor and creamy texture without the processed stuff. Most of these are pantry staples or easy to find at any grocery store.
- Black cocoa powder, ¼ cup (25g) – This is the star ingredient for color. I prefer the King Arthur brand for its deep, rich hue. Look for it in the baking aisle or order online—regular cocoa powder won’t give you that true black color.
- Cream cheese, 8 ounces (226g), softened – Full-fat works best for texture. Let it sit out for 30 minutes before starting so it blends smoothly.
- Medjool dates, 1 cup (about 10 dates), pitted – These provide natural sweetness and help bind the truffles. Make sure they’re soft and sticky; if they’re dry, soak them in warm water for 10 minutes first.
- Almond flour, ½ cup (56g) – Adds structure without grains. I use Bob’s Red Mill super-fine almond flour for the smoothest texture.
- Vanilla extract, 1 teaspoon – Pure vanilla makes a difference here. Skip the imitation stuff if you can.
- Pinch of sea salt – Just a tiny bit to balance the sweetness and deepen the chocolate flavor.
- For the coating: Additional black cocoa powder for dusting, or melted dark chocolate (about ½ cup chips) if you want a shiny shell.
- For decoration: Candy eyes (found at craft stores or online), black licorice strings cut into small pieces for whiskers, and a tiny bit of melted white chocolate for attaching everything.
If you can’t find black cocoa powder, you can substitute regular Dutch-process cocoa powder—the truffles will just be a dark brown instead of black. For a dairy-free version, use vegan cream cheese—I’ve tried Kite Hill and it works well, though the texture is slightly softer. You can swap almond flour for oat flour if you have nut allergies, just note the texture will be a bit more dense.
Equipment Needed
You don’t need fancy tools for these truffles, which is part of why I love making them. Here’s what you’ll want on hand:
- Food processor – This is essential for breaking down the dates and combining everything smoothly. I use a 7-cup Cuisinart, but any size works.
- Mixing bowls – One medium bowl for the truffle mixture, one small bowl for the coating.
- Baking sheet – To hold the truffles as they chill. Line it with parchment paper for easy cleanup.
- Measuring cups and spoons – Accurate measurements matter with cocoa powder since it can be clumpy.
- Small cookie scoop – A 1-tablespoon scoop makes perfectly uniform truffles. If you don’t have one, use a regular spoon and eyeball it.
- Piping bag or small zip-top bag – For attaching the candy eyes and whiskers with melted chocolate.
If you don’t have a food processor, you can finely chop the dates by hand and mash everything together—it just takes more elbow grease and the texture won’t be as smooth. I’ve done it that way when my food processor was in the dishwasher, and it still worked fine.
Preparation Method
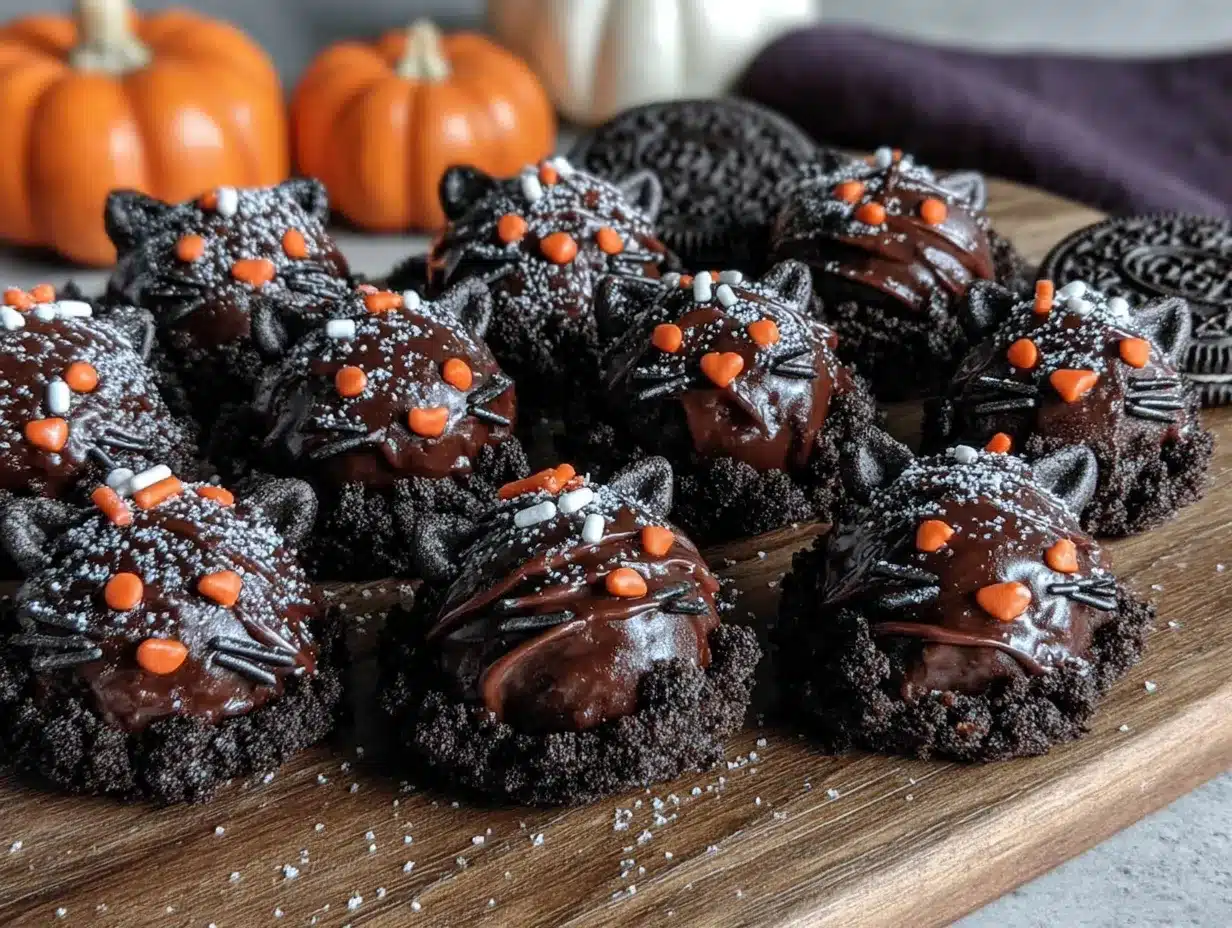
Let me walk you through this step by step. I’ve included all the little details I wish someone had told me the first time.
- Soften the dates if needed. If your medjool dates feel firm or dry, place them in a bowl and cover with hot water for 10 minutes. Drain well before using. This makes them blend into a smooth paste instead of leaving chewy chunks.
- Combine the base ingredients. In your food processor, add the pitted dates, softened cream cheese, almond flour, black cocoa powder, vanilla extract, and sea salt. Pulse a few times to break everything down, then process continuously for about 60 seconds. Stop and scrape down the sides with a spatula halfway through. The mixture should come together into a thick, fudge-like dough that holds together when pressed between your fingers.
- Check the consistency. If the mixture seems too sticky to roll, add another tablespoon of almond flour and pulse again. If it’s too dry and crumbly, add a teaspoon of water or a splash of milk. You want it pliable but not wet.
- Chill the mixture. Transfer the dough to a bowl, cover with plastic wrap, and refrigerate for 30 minutes. This step is non-negotiable—chilled dough is infinitely easier to roll into smooth balls. I learned this the hard way after my first batch turned into a sticky mess on my hands.
- Roll the truffles. Line your baking sheet with parchment. Using your cookie scoop or a spoon, portion out tablespoon-sized amounts of the chilled dough. Roll each portion between your palms into a smooth ball. Place each ball on the prepared sheet. You should get about 18 to 20 truffles.
- Shape the cat ears. For each truffle, take a tiny piece of dough (about the size of a pea) and roll it into a small triangle or point. Gently press two of these onto the top of each truffle ball to form cat ears. Don’t press too hard or they’ll flatten—just enough to stick.
- Chill again. Place the sheet of shaped truffles back in the refrigerator for another 20 minutes. This helps the ears set and makes the coating step much cleaner.
- Apply the coating. If you’re using the cocoa powder dusting method, put a few tablespoons of black cocoa powder in a small bowl. Roll each chilled truffle gently in the powder until evenly coated. If you’re using melted dark chocolate, dip each truffle using a fork, letting excess drip off, then place back on the parchment.
- Add the faces. While the coating is still tacky (or before the chocolate sets), press two candy eyes onto each truffle. Use a tiny dab of melted white chocolate to secure them if needed. For whiskers, cut black licorice strings into 1-inch pieces and press three on each side of the face.
- Final chill. Refrigerate the finished truffles for at least 15 minutes to let everything set completely before serving.
The truffles should feel firm but give slightly when you bite into them. The texture should be creamy, not crumbly—if they’re falling apart, you may have over-processed the dates or used too much almond flour.
Cooking Tips & Techniques
After making these truffles more times than I care to count, here are the things I wish I’d known from the start.
Temperature matters more than you think. Cream cheese that’s too cold won’t blend smoothly, leaving white streaks in your dark truffle mixture. But cream cheese that’s too warm makes the dough sticky and impossible to roll. Aim for that Goldilocks zone—leave it on the counter for exactly 30 minutes before starting.
Don’t over-process the dates. I made this mistake on batch number three. If you process the dates too long, they heat up from the friction and release too much moisture, turning your truffle dough into a sticky, unworkable paste. Pulse in short bursts and stop as soon as everything comes together.
Wet hands are your friend. When rolling the truffles, lightly dampen your palms with water. This prevents the dough from sticking to your hands without adding extra almond flour that could dry out the texture. Keep a small bowl of water nearby and re-wet your hands every few truffles.
The ears are fiddly—embrace imperfection. My first batch of cat ears looked more like rabbit ears. Some fell off during coating. I learned to press them on firmly but gently, and to handle the truffles by the bottom when coating. If an ear falls off, just press it back on—no one will notice once the eyes are on.
Work in small batches. Keep the truffle dough in the refrigerator while you’re rolling and shaping. Take out only a few tablespoons at a time. This prevents the dough from warming up and becoming too soft to work with.
Variations & Adaptations
One of the best things about this recipe is how flexible it is. Here are some ways I’ve adapted it for different needs and occasions.
Vegan version: Swap the cream cheese for a plant-based alternative like Kite Hill or Miyoko’s. The texture will be slightly softer, so add an extra tablespoon of almond flour to compensate. I’ve made this for a friend’s vegan Halloween party and they disappeared faster than the candy corn.
Nut-free option: Replace the almond flour with oat flour (just grind rolled oats in your food processor until fine). The texture becomes a bit more cake-like but still delicious. Perfect for school classrooms with nut-free policies.
Pumpkin spice twist: Add 1 teaspoon of pumpkin pie spice and 2 tablespoons of pumpkin puree to the mixture. Reduce the cream cheese by 2 tablespoons to balance the moisture. This turns your black cats into little Halloween pumpkins—adorable and seasonal.
Ghost version: Skip the black cocoa coating and dust the truffles with powdered sugar instead. Shape them into slightly irregular ovals and add two candy eyes. Instant ghosts that take half the time to make.
Spider variation: Instead of cat ears and whiskers, press eight thin pretzel sticks into each truffle for spider legs. Use a dab of chocolate to attach four legs on each side. My kids went absolutely wild for these.
Serving & Storage Suggestions
These truffles are best served chilled, straight from the refrigerator. The cold temperature keeps them firm and the flavors taste more pronounced—the black cocoa really shines when it’s cold.
For presentation, arrange them on a black or orange platter to make the candy eyes pop. I like to place them on a bed of shredded coconut that I’ve tinted green with a drop of food coloring to look like grass. A few plastic spiders scattered around complete the Halloween vibe.
Storage is simple: keep them in an airtight container in the refrigerator for up to a week. Layer them between sheets of parchment paper so the eyes and whiskers don’t get smushed. I’ve also frozen them successfully for up to three months—just place them in a single layer on a baking sheet, freeze until solid, then transfer to a freezer bag. Thaw in the refrigerator overnight before serving.
The flavors actually deepen after a day in the fridge. The black cocoa mellows and the dates’ sweetness becomes more integrated. So if you’re making these for a party, prepare them a day ahead—they’ll taste even better.
Nutritional Information & Benefits
Each truffle (based on 20 servings) contains approximately: 95 calories, 6g fat, 10g carbohydrates, 2g fiber, 7g sugar, and 2g protein. These numbers will vary slightly depending on your exact ingredients and coating choice.
The real win here is what these truffles don’t have—no refined sugar, no artificial colors, no hydrogenated oils. The medjool dates provide natural sweetness along with fiber, potassium, and antioxidants. Black cocoa powder is rich in flavonoids, the same compounds that make dark chocolate heart-healthy. And the almond flour adds healthy fats and vitamin E that help stabilize blood sugar.
This recipe is naturally gluten-free and can be made dairy-free or vegan with simple swaps. The only potential allergen is tree nuts from the almond flour, but that’s easily replaced with oat flour. For anyone watching their sugar intake, these are a far better choice than traditional Halloween candy.
Conclusion
These Wholesome Black Cat Oreo Truffles for Halloween prove that holiday treats don’t have to be a choice between fun and wholesome. You can have both—spooky little cats that make kids smile and ingredients that make you feel good about what you’re serving. The black cocoa gives them that dramatic Halloween look without any artificial dyes, and the dates and cream cheese create a texture that’s honestly more satisfying than the original.
I love this recipe because it captures everything I want from Halloween baking: it’s creative enough to feel special, simple enough to make on a busy weeknight, and wholesome enough that I don’t mind my kids having two. Plus, the faces always come out slightly different, which gives each truffle its own little personality.
I’d love to see your versions! Tag me in your photos or drop a comment below telling me what variations you tried. Did you make ghosts instead of cats? Add pumpkin spice? Let me know—I’m always looking for new ideas to test out in my kitchen.
Frequently Asked Questions
Can I use regular cocoa powder instead of black cocoa?
Yes, but the color will be dark brown instead of black. The flavor will also be slightly different—black cocoa has a milder, almost Oreo-like taste, while regular cocoa is more intense and slightly bitter. If using regular cocoa, you might want to add an extra tablespoon of dates for sweetness.
How far in advance can I make these truffles?
You can make them up to five days ahead and store them in the refrigerator. They actually taste better after a day or two as the flavors meld together. You can also freeze them for up to three months—just thaw overnight in the fridge before serving.
My truffle mixture is too sticky. What did I do wrong?
This usually happens when the dates are too moist or the cream cheese was too warm. Try chilling the mixture for an extra 15 minutes, then roll with slightly wet hands. If it’s still too sticky, add another tablespoon of almond flour and mix well.
Can I make these without a food processor?
Absolutely! Finely chop the dates by hand, then mash everything together with a fork or potato masher. The texture won’t be as smooth, but they’ll still taste delicious. It takes a bit more elbow grease, but it’s totally doable.
How do I keep the candy eyes from falling off?
Use a tiny dab of melted white chocolate or coconut oil as “glue” to attach the eyes. Press them on gently but firmly while the coating is still tacky. If you’re using the cocoa powder dusting method, chill the truffles first, then use melted chocolate to attach the eyes after dusting.
Pin This Recipe!

Wholesome Black Cat Oreo Truffles: Easy Halloween Treat

These Wholesome Black Cat Oreo Truffles are a naturally dark, no-bake Halloween treat made with black cocoa powder, cream cheese, and dates. They’re fun to make with kids and use real ingredients without artificial dyes.
- Prep Time: 30 minutes
- Cook Time: 0 minutes
- Total Time: 1 hour 5 minutes (includes chilling)
- Yield: 18-20 truffles 1x
- Category: Dessert
- Cuisine: American
Ingredients
- ¼ cup (25g) black cocoa powder
- 8 ounces (226g) cream cheese, softened
- 1 cup (about 10) Medjool dates, pitted
- ½ cup (56g) almond flour
- 1 teaspoon vanilla extract
- Pinch of sea salt
- Additional black cocoa powder for dusting (or ½ cup dark chocolate chips for coating)
- Candy eyes for decoration
- Black licorice strings for whiskers
- Melted white chocolate for attaching decorations
Instructions
- If dates are firm, soak in hot water for 10 minutes, then drain well.
- In a food processor, combine pitted dates, softened cream cheese, almond flour, black cocoa powder, vanilla extract, and sea salt. Pulse to break down, then process for about 60 seconds until a thick, fudge-like dough forms. Scrape down sides halfway through.
- Check consistency: if too sticky, add 1 tablespoon almond flour; if too dry, add 1 teaspoon water or milk.
- Transfer dough to a bowl, cover, and refrigerate for 30 minutes.
- Line a baking sheet with parchment. Using a 1-tablespoon scoop, portion dough and roll into smooth balls. Place on prepared sheet (makes 18-20).
- For cat ears, roll tiny pieces of dough into triangles and gently press two onto each truffle.
- Refrigerate shaped truffles for 20 minutes.
- For coating: roll chilled truffles in black cocoa powder, or dip in melted dark chocolate.
- While coating is tacky, press on candy eyes and licorice whiskers using melted white chocolate as glue if needed.
- Refrigerate finished truffles for at least 15 minutes before serving.
Notes
Temperature matters: cream cheese should be at room temperature for 30 minutes. Don’t over-process dates. Wet hands help prevent sticking when rolling. Keep dough chilled while working. Truffles taste better after a day in the fridge.
Nutrition
- Serving Size: 1 truffle
- Calories: 95
- Sugar: 7
- Sodium: 50
- Fat: 6
- Saturated Fat: 3
- Carbohydrates: 10
- Fiber: 2
- Protein: 2
Keywords: Halloween truffles, black cat truffles, no-bake dessert, black cocoa, healthy Halloween treat, gluten-free, dairy-free option


