Love this? Save it for later!
Share the inspiration with your friends
My older brother, Mark, had claimed to hate birthday cake for about fifteen years. Fifteen years of watching him politely push slices around his plate at parties, insisting he was just “more of a pie person.” Then, last July at my niece’s backyard barbecue, I caught him standing alone by the kitchen counter, eating a slice of this cake with his fingers. Not even on a plate. Just hunched over, grabbing chunks of crumb and buttercream like he hadn’t seen food in a week. I didn’t say a word. I just leaned against the doorway and let him finish. He caught me watching, wiped his mouth with the back of his hand, and said, “Okay. This one’s different.” That was the closest I’ve ever gotten to a victory lap.
Honestly, I get it. Most birthday cakes are dry, cloyingly sweet, or so dense they sit in your stomach like a brick. The buttercream is either gritty with powdered sugar or slides off the cake like it’s trying to escape. I’ve been there, standing over a store-bought sheet cake at 10 PM, wondering why we accept mediocrity on someone’s special day. So when I set out to create this version, I had one goal: make a cake so good that even the self-proclaimed cake haters would get caught with their hands in the crumb. The secret is in the buttermilk—it keeps the crumb tender and tangy, balancing the sweetness—and a buttercream technique that actually whips the butter until it’s pale and fluffy before you even think about adding sugar. It took me six tries to get it right. The first batch was a disaster, a soupy, separated mess that I almost threw across the kitchen. But I kept going, because this cake deserved to exist.
Maybe you’ve been there too. Maybe you’re tired of bringing a mediocre cake to the party, or you want something that feels special without requiring a pastry degree. This is that cake. It’s the one that gets requested for every birthday, the one that disappears before the candles are even blown out. Let me show you how to make it.
Why You’ll Love This Recipe
I’ve tested this cake more times than I care to admit, and I can tell you with confidence: it’s the best classic birthday cake you’ll ever make. Here’s why it stands out from every other recipe you’ve tried:
- Foolproof Texture: The buttermilk and oil create a crumb that’s moist, tender, and never dry. I’ve baked it in three different ovens, and it comes out perfect every time.
- Simple Pantry Ingredients: You don’t need any weird specialty items. Butter, sugar, flour, eggs, buttermilk—the kind of stuff you probably already have on hand.
- Perfect for Hosting: This cake is designed to impress a crowd. It slices cleanly, stacks beautifully, and the sprinkle buttercream is a guaranteed conversation starter. Your guests will think you spent hours on it.
- Crowd-Pleaser: I’ve served this to toddlers, teenagers, grandparents, and that one uncle who claims he “doesn’t do sweets.” Every single person went back for seconds. It’s the ultimate party dessert.
- Unbelievably Delicious: The flavor is nostalgic but elevated. It tastes like the birthday cake you remember from childhood, but better. Richer. More satisfying. The kind of cake that makes you close your eyes after the first bite.
What makes this recipe different from the rest? It’s the technique. Most buttercream recipes tell you to dump everything in at once and hope for the best. I spent months perfecting the method: whipping the butter until it’s truly pale and fluffy, then adding the sugar slowly, then finishing with a splash of cream to get that silky, spreadable consistency. It’s not just a recipe—it’s a system. And it works every single time.
This cake is comfort food reimagined. It’s the cake you make when you want to show someone you care, without spending two days in the kitchen. It’s perfect for impressing guests without stress, or turning a simple birthday dinner into something truly memorable.
What Ingredients You Will Need
This recipe uses simple, wholesome ingredients to deliver a cake that’s tender, flavorful, and absolutely gorgeous. Most of these are pantry staples, so you won’t need a special trip to the store.
For the Cake
- 2 ½ cups (315g) all-purpose flour – I use King Arthur Flour for consistent results. Spoon and level your flour; don’t scoop it directly from the bag or you’ll end up with a dense cake.
- 2 ½ teaspoons baking powder – Make sure it’s fresh. If you’re not sure, test it by dropping a little into hot water—it should bubble immediately.
- ½ teaspoon baking soda – Helps the cake brown and rise evenly.
- 1 teaspoon salt – Don’t skip this. Salt balances the sweetness and enhances the vanilla flavor.
- 1 cup (226g) unsalted butter, softened – Let it sit at room temperature for at least an hour. Cold butter won’t cream properly.
- 1 ½ cups (300g) granulated sugar – Regular white sugar works best. Don’t substitute with brown sugar here; it will change the texture.
- 3 large eggs, room temperature – If you forgot to take them out, place them in a bowl of warm water for 5 minutes.
- 1 tablespoon vanilla extract – Use pure vanilla extract, not imitation. It makes a real difference.
- 1 cup (240ml) buttermilk, room temperature – This is the secret ingredient. Buttermilk adds tenderness and a subtle tang that makes the cake taste more complex. If you don’t have buttermilk, add 1 tablespoon of lemon juice to regular milk and let it sit for 5 minutes.
For the Sprinkle Buttercream
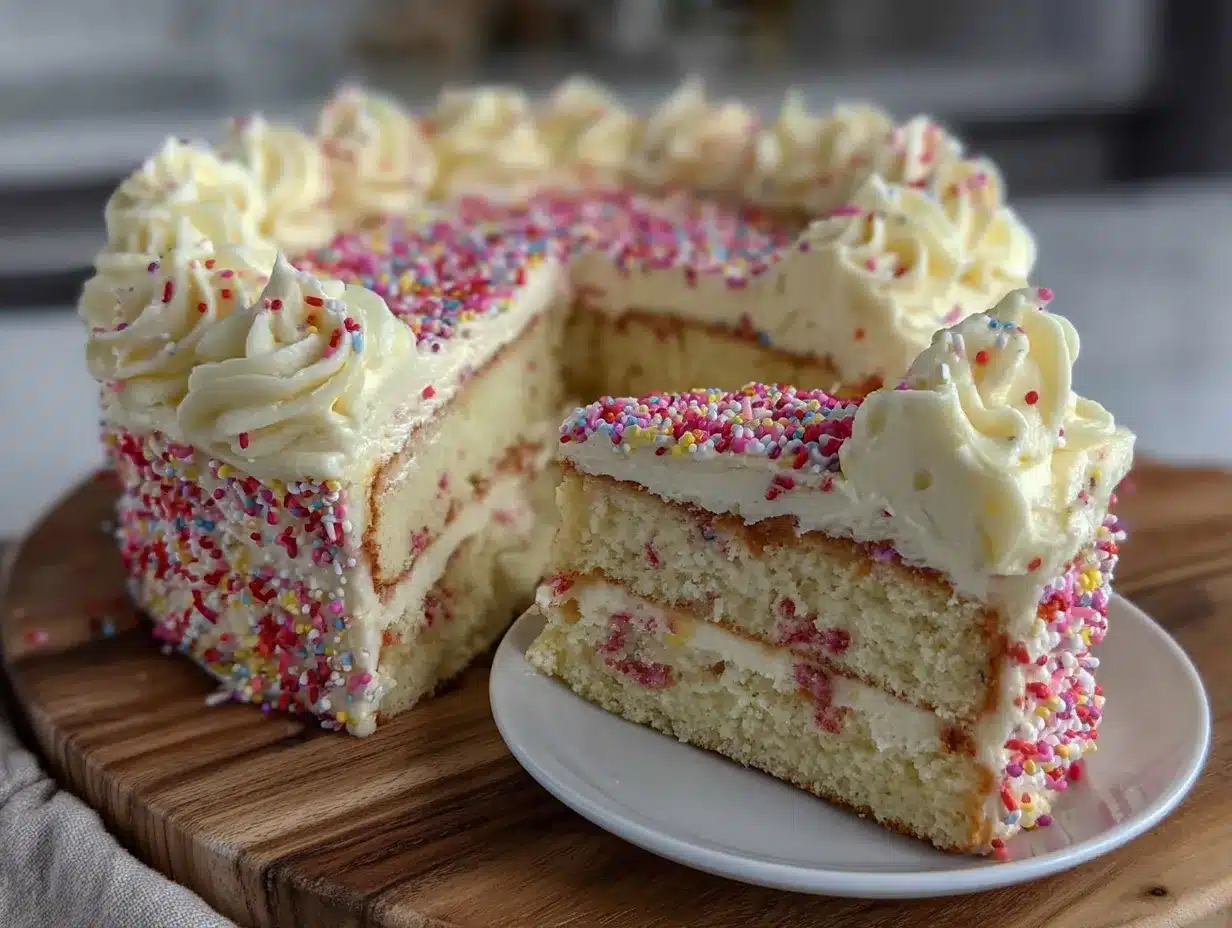
- 1 ½ cups (339g) unsalted butter, softened – Yes, a lot of butter. This is a celebration cake, after all.
- 5 cups (600g) powdered sugar, sifted – Sifting is non-negotiable here. Lumps in the sugar mean lumps in the frosting.
- 3 tablespoons heavy cream – Or whole milk, but cream gives a richer texture.
- 2 teaspoons vanilla extract – Pure vanilla, always.
- ¼ teaspoon salt – To cut the sweetness.
- ½ cup (80g) rainbow sprinkles – Use jimmies (the long, rod-shaped sprinkles), not nonpareils (the tiny round ones). Nonpareils bleed their color into the frosting and turn it into a muddy mess. Learned that one the hard way.
For the Garnish
- Extra rainbow sprinkles – For decorating the sides and top of the cake.
- Optional: Fresh berries or edible flowers – Adds a nice pop of color for parties.
Equipment Needed
You don’t need a professional bakery setup to make this cake, but having the right tools makes the process much smoother.
- Two 9-inch round cake pans – I prefer light-colored aluminum pans. Dark pans can cause the edges to brown too quickly.
- Electric stand mixer or hand mixer – You can mix by hand, but your arm will get tired. A stand mixer is worth the investment if you bake often.
- Parchment paper – Cut circles to line the bottom of your pans. This guarantees the cake won’t stick.
- Cooling rack – Essential for even cooling. Don’t skip this or the bottom of your cake will get soggy.
- Offset spatula – Makes frosting the cake so much easier. A butter knife works in a pinch, but an offset spatula gives you that smooth, professional finish.
- Cake turntable (optional) – Not required, but it makes frosting a two-layer cake much less frustrating. You can find budget-friendly ones online for under $20.
- Large piping bag with a star tip (optional) – For a decorative border. If you don’t have one, just spread the frosting with a spatula—it’ll still look beautiful.
Preparation Method
Let’s walk through this step by step. I’ve included time estimates and sensory cues so you know exactly what to look for.
Step 1: Preheat and Prep Your Pans (10 minutes)
Preheat your oven to 350°F (175°C). Grease two 9-inch round cake pans with butter or non-stick spray, then line the bottoms with parchment paper circles. Grease the parchment too. Dust the pans lightly with flour, tapping out the excess. This double-layer protection ensures your cakes release perfectly.
Step 2: Mix the Dry Ingredients (5 minutes)
In a medium bowl, whisk together the flour, baking powder, baking soda, and salt. Whisk for about 20 seconds to aerate the flour and distribute the leavening agents evenly. Set aside.
Step 3: Cream the Butter and Sugar (5-7 minutes)
In the bowl of your stand mixer fitted with the paddle attachment, beat the softened butter on medium speed until smooth and creamy, about 1 minute. Add the granulated sugar and beat on medium-high speed for 3 to 5 minutes. The mixture should become pale, fluffy, and almost double in volume. Scrape down the sides of the bowl halfway through. This step is crucial—proper creaming creates air pockets that help the cake rise.
Step 4: Add the Eggs and Vanilla (3 minutes)
Add the eggs one at a time, beating well after each addition (about 30 seconds per egg). The mixture should look smooth and glossy. Add the vanilla extract and beat until combined. If the mixture looks curdled, don’t panic—it will come together once you add the flour.
Step 5: Alternate the Dry and Wet Ingredients (5 minutes)
With the mixer on low speed, add one-third of the flour mixture. Mix until just combined. Add half of the buttermilk, mixing until just combined. Repeat with another third of the flour, then the remaining buttermilk, then the final third of the flour. Mix until you see the last streaks of flour disappear. Do not overmix—overmixing develops gluten and makes the cake tough. Stop the mixer as soon as the batter comes together. The batter should be thick, smooth, and slightly glossy.
Step 6: Bake the Cakes (25-30 minutes)
Divide the batter evenly between the two prepared pans. Smooth the tops with a spatula. Bake for 25 to 30 minutes, or until a toothpick inserted into the center comes out clean or with a few moist crumbs. The cakes should be golden brown and spring back when lightly touched. Let the cakes cool in the pans for 10 minutes, then turn them out onto a cooling rack. Peel off the parchment paper and let them cool completely. Do not frost a warm cake—the frosting will melt and slide right off.
Step 7: Make the Sprinkle Buttercream (15 minutes)
While the cakes cool, make the frosting. In the bowl of your stand mixer fitted with the paddle attachment, beat the softened butter on medium-high speed for 5 minutes. Yes, five full minutes. The butter should become pale, almost white, and very fluffy. This is the secret to light, non-greasy buttercream. Reduce the speed to low and gradually add the sifted powdered sugar, one cup at a time. Mix until combined. Add the heavy cream, vanilla extract, and salt. Increase the speed to medium-high and beat for another 3 to 4 minutes, until the frosting is light, fluffy, and spreadable. Fold in the rainbow sprinkles by hand with a spatula.
Step 8: Assemble and Frost the Cake (20 minutes)
Place one cooled cake layer on your serving plate or cake stand. Spread about 1 cup of buttercream evenly over the top. Place the second cake layer on top, flat side up. Apply a thin layer of frosting all over the cake (this is the crumb coat). Refrigerate for 15 minutes to set the crumb coat. Then apply the final layer of frosting, smoothing it with your offset spatula. Decorate the top and sides with extra sprinkles. If you’re using a piping bag, pipe a border around the top edge for a polished look.
Cooking Tips & Techniques
I’ve made every mistake in the book so you don’t have to. Here are the lessons I learned the hard way.
Room temperature ingredients matter. I know, I know, it’s annoying to wait. But cold butter won’t cream properly, and cold eggs can cause the batter to separate. Take everything out of the fridge at least an hour before you start baking. If you’re in a rush, cut the butter into small cubes and let it sit for 15 minutes. For eggs, place them in a bowl of warm water for 5 minutes.
Don’t overmix the batter. This is the number one mistake I see. Once you add the flour, mix only until the streaks disappear. Overmixing develops gluten, which gives you a tough, dense cake instead of a tender, fluffy one. I’ve done it myself—I was distracted by my phone and kept mixing, and the cake came out like a rubber brick.
Use a kitchen scale for accuracy. Measuring flour by volume is notoriously inconsistent. A cup of flour can weigh anywhere from 120 to 150 grams depending on how you scoop it. A $15 kitchen scale will transform your baking. Trust me on this one.
Chill your cake before frosting. Warm cake + buttercream = disaster. The frosting melts, the layers slide around, and you end up with a lopsided mess. Let the cakes cool completely, then pop them in the fridge for 20 minutes before you start frosting. The crumb coat also needs a chill before the final layer.
Toast the sprinkles for extra flavor. This is a weird tip, but hear me out. If you spread the sprinkles on a baking sheet and toast them in a 350°F oven for 2-3 minutes, they become slightly crunchy and more flavorful. Just watch them closely—they burn fast.
Variations & Adaptations
This cake is incredibly versatile. Here are some ways to make it your own.
Chocolate Birthday Cake
Replace ½ cup (60g) of the flour with ½ cup (40g) of unsweetened cocoa powder. Add an extra ¼ cup of buttermilk to compensate for the dry cocoa. The result is a rich, fudgy chocolate cake that pairs beautifully with the sprinkle buttercream.
Gluten-Free Version
Substitute the all-purpose flour with a high-quality gluten-free flour blend that contains xanthan gum (I like Bob’s Red Mill 1-to-1). The texture will be slightly more delicate, so handle the cakes gently when frosting. It still tastes amazing.
Lemon Sprinkle Cake
Add the zest of two lemons to the butter-sugar mixture during creaming. Replace 2 tablespoons of the buttermilk with fresh lemon juice. The bright citrus flavor cuts through the sweetness and makes the cake feel lighter.
Dairy-Free Option
Use a plant-based butter stick (not margarine) and substitute the buttermilk with 1 cup of unsweetened almond milk mixed with 1 tablespoon of lemon juice. For the frosting, use vegan butter and a dairy-free cream alternative. The texture will be slightly different, but still delicious.
Cupcake Version
This batter makes about 24 cupcakes. Bake at 350°F (175°C) for 18-20 minutes. The frosting recipe will be enough to pipe a generous swirl on each cupcake.
Serving & Storage Suggestions
This cake is best served at room temperature. If you’ve refrigerated it, let it sit out for about 30 minutes before serving. The buttercream softens and becomes luscious, and the cake crumb relaxes.
For presentation, I like to place the cake on a simple white cake stand and let the sprinkles do the talking. It looks beautiful on a dessert table next to fresh fruit or a bowl of whipped cream. If you’re serving at a party, slice the cake with a sharp knife dipped in hot water and wiped dry between cuts. This gives you clean, photogenic slices.
This cake pairs wonderfully with a cold glass of milk, a scoop of vanilla ice cream, or a cup of coffee. For a grown-up twist, serve it with a side of fresh berries and a drizzle of caramel sauce.
Storage: Store the cake in an airtight container at room temperature for up to 3 days. If your kitchen is warm, refrigerate it to prevent the buttercream from softening too much. The cake actually tastes better on day two—the flavors meld together and the crumb becomes even more tender.
Freezing: You can freeze the unfrosted cake layers for up to 3 months. Wrap each layer tightly in plastic wrap, then aluminum foil. Thaw overnight in the refrigerator before frosting. The frosted cake can also be frozen, but the sprinkles may lose their crunch. I prefer to freeze the layers and frost fresh.
Nutritional Information & Benefits
Let’s be honest—this is a celebration cake, not a health food. But here’s what you should know:
Per serving (1/12 of cake): Approximately 520 calories, 28g fat, 65g carbohydrates, 4g protein, 45g sugar. These are estimates and will vary based on your specific ingredients.
The buttermilk adds calcium and probiotics (if using traditional cultured buttermilk). The butter provides vitamin A, and the eggs contribute protein and choline. The sprinkles? They’re purely for joy, and that counts for something.
This recipe is vegetarian and can be made gluten-free or dairy-free with the substitutions listed above. It contains wheat, dairy, and eggs, so it’s not suitable for vegan diets or those with allergies to these ingredients.
My personal philosophy: food should nourish us, but it should also delight us. This cake is a celebration of joy, connection, and the simple pleasure of sharing something delicious with the people you love. One slice won’t derail your wellness goals, but it might just make your day.
Conclusion
This is the birthday cake you’ve been looking for. It’s tender, flavorful, and absolutely covered in rainbow sprinkles. The buttercream is silky and smooth, the crumb is moist and light, and the whole thing comes together with ingredients you probably already have in your kitchen. It’s the cake that converts cake haters, the cake that gets requested year after year, the cake that makes you look like a hero without spending all day in the kitchen.
I want you to make this cake your own. Add extra sprinkles. Swap the vanilla for almond extract. Top it with fresh strawberries. The beauty of this recipe is that it’s a perfect canvas for your creativity. Don’t be afraid to experiment—that’s how the best recipes are born.
I love this cake because it reminds me of the joy of celebrating. The laughter around the table, the off-key singing, the moment when someone takes that first bite and their eyes light up. That’s what this cake is really about. It’s not just dessert. It’s a memory in the making.
So go ahead. Bake this cake for your next birthday, your next potluck, your next Tuesday. I promise you won’t regret it. And when you make it, come back and tell me how it went. Leave a comment below, tag me in your photos, share your variations. I can’t wait to see what you create!
Frequently Asked Questions
Can I make this cake ahead of time?
Absolutely. You can bake the cake layers up to 2 days in advance. Wrap them tightly in plastic wrap and store at room temperature. The frosting can be made up to 5 days ahead and stored in the refrigerator. Let it come to room temperature and re-whip before using.
Why did my buttercream turn out greasy?
This usually happens when the butter is too soft or you overbeat it. Make sure your butter is softened but still cool to the touch. If your kitchen is hot, pop the frosting in the fridge for 10 minutes, then re-whip on low speed.
Can I use a different type of sprinkle?
Yes, but stick with jimmies or quins (the flat disc-shaped sprinkles). Avoid nonpareils (the tiny round ones) as they bleed color into the frosting. I learned this the hard way when my “rainbow” buttercream turned a sad shade of gray.
How do I get clean slices?
Use a sharp, non-serrated knife. Dip it in hot water, wipe it dry, and slice with one smooth motion. Wipe the blade clean between each cut. This gives you those beautiful, photogenic slices that look like they came from a bakery.
Can I make this into a sheet cake?
Definitely. Pour the batter into a greased 9×13-inch pan and bake at 350°F (175°C) for 30-35 minutes. The frosting recipe makes enough for a single-layer sheet cake with a generous layer on top. Perfect for feeding a crowd at a potluck or party.
PrintThe Best Classic Birthday Cake with Sprinkle Buttercream
This classic birthday cake features a tender, moist crumb thanks to buttermilk and a silky sprinkle buttercream. It’s the ultimate celebration dessert that converts even self-proclaimed cake haters.
- Prep Time: 30 minutes
- Cook Time: 30 minutes
- Total Time: 1 hour 30 minutes
- Yield: 12 servings 1x
- Category: Dessert
- Cuisine: American
Ingredients
- 2 ½ cups (315g) all-purpose flour
- 2 ½ teaspoons baking powder
- ½ teaspoon baking soda
- 1 teaspoon salt
- 1 cup (226g) unsalted butter, softened
- 1 ½ cups (300g) granulated sugar
- 3 large eggs, room temperature
- 1 tablespoon vanilla extract
- 1 cup (240ml) buttermilk, room temperature
- 1 ½ cups (339g) unsalted butter, softened (for buttercream)
- 5 cups (600g) powdered sugar, sifted
- 3 tablespoons heavy cream
- 2 teaspoons vanilla extract (for buttercream)
- ¼ teaspoon salt (for buttercream)
- ½ cup (80g) rainbow sprinkles (jimmies)
- Extra rainbow sprinkles for garnish
- Optional: fresh berries or edible flowers for garnish
Instructions
- Preheat oven to 350°F (175°C). Grease two 9-inch round cake pans, line bottoms with parchment paper, grease parchment, and dust with flour.
- In a medium bowl, whisk together flour, baking powder, baking soda, and salt for 20 seconds. Set aside.
- In a stand mixer with paddle attachment, beat softened butter on medium speed until smooth, about 1 minute. Add sugar and beat on medium-high for 3-5 minutes until pale and fluffy. Scrape bowl halfway through.
- Add eggs one at a time, beating well after each (about 30 seconds per egg). Add vanilla and beat until combined.
- With mixer on low, add one-third of flour mixture, mixing until just combined. Add half of buttermilk, mixing until just combined. Repeat with another third of flour, remaining buttermilk, and final third of flour. Mix until last streaks of flour disappear. Do not overmix.
- Divide batter evenly between prepared pans. Smooth tops. Bake for 25-30 minutes until a toothpick inserted in center comes out clean or with a few moist crumbs. Cool in pans for 10 minutes, then turn out onto a cooling rack. Remove parchment and cool completely.
- For buttercream: In stand mixer with paddle attachment, beat softened butter on medium-high for 5 minutes until pale and fluffy. Reduce speed to low and gradually add sifted powdered sugar, one cup at a time. Add heavy cream, vanilla, and salt. Beat on medium-high for 3-4 minutes until light and fluffy. Fold in sprinkles by hand.
- Place one cooled cake layer on serving plate. Spread about 1 cup buttercream evenly on top. Place second layer on top, flat side up. Apply a thin crumb coat of frosting all over. Refrigerate for 15 minutes. Apply final layer of frosting, smoothing with offset spatula. Decorate with extra sprinkles. Optionally pipe a border with a star tip.
Notes
Room temperature ingredients are crucial. Do not overmix the batter. Chill cake before frosting. Use jimmies sprinkles, not nonpareils, to avoid color bleeding. Cake tastes even better on day two.
Nutrition
- Serving Size: 1 slice (1/12 of cak
- Calories: 520
- Sugar: 45
- Sodium: 320
- Fat: 28
- Saturated Fat: 17
- Carbohydrates: 65
- Fiber: 1
- Protein: 4
Keywords: birthday cake, sprinkle cake, classic cake, buttercream, celebration cake, homemade cake


