Love this? Save it for later!
Share the inspiration with your friends
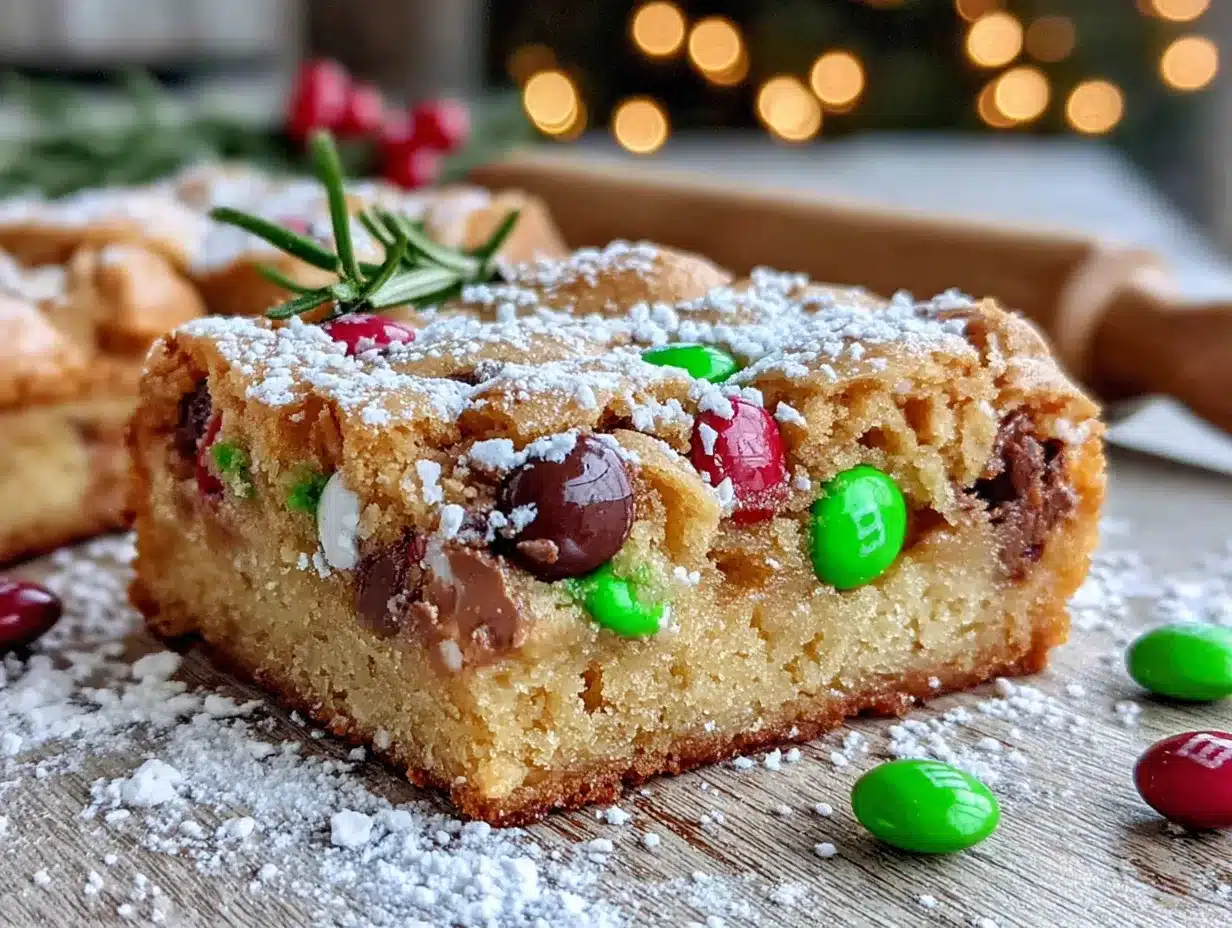
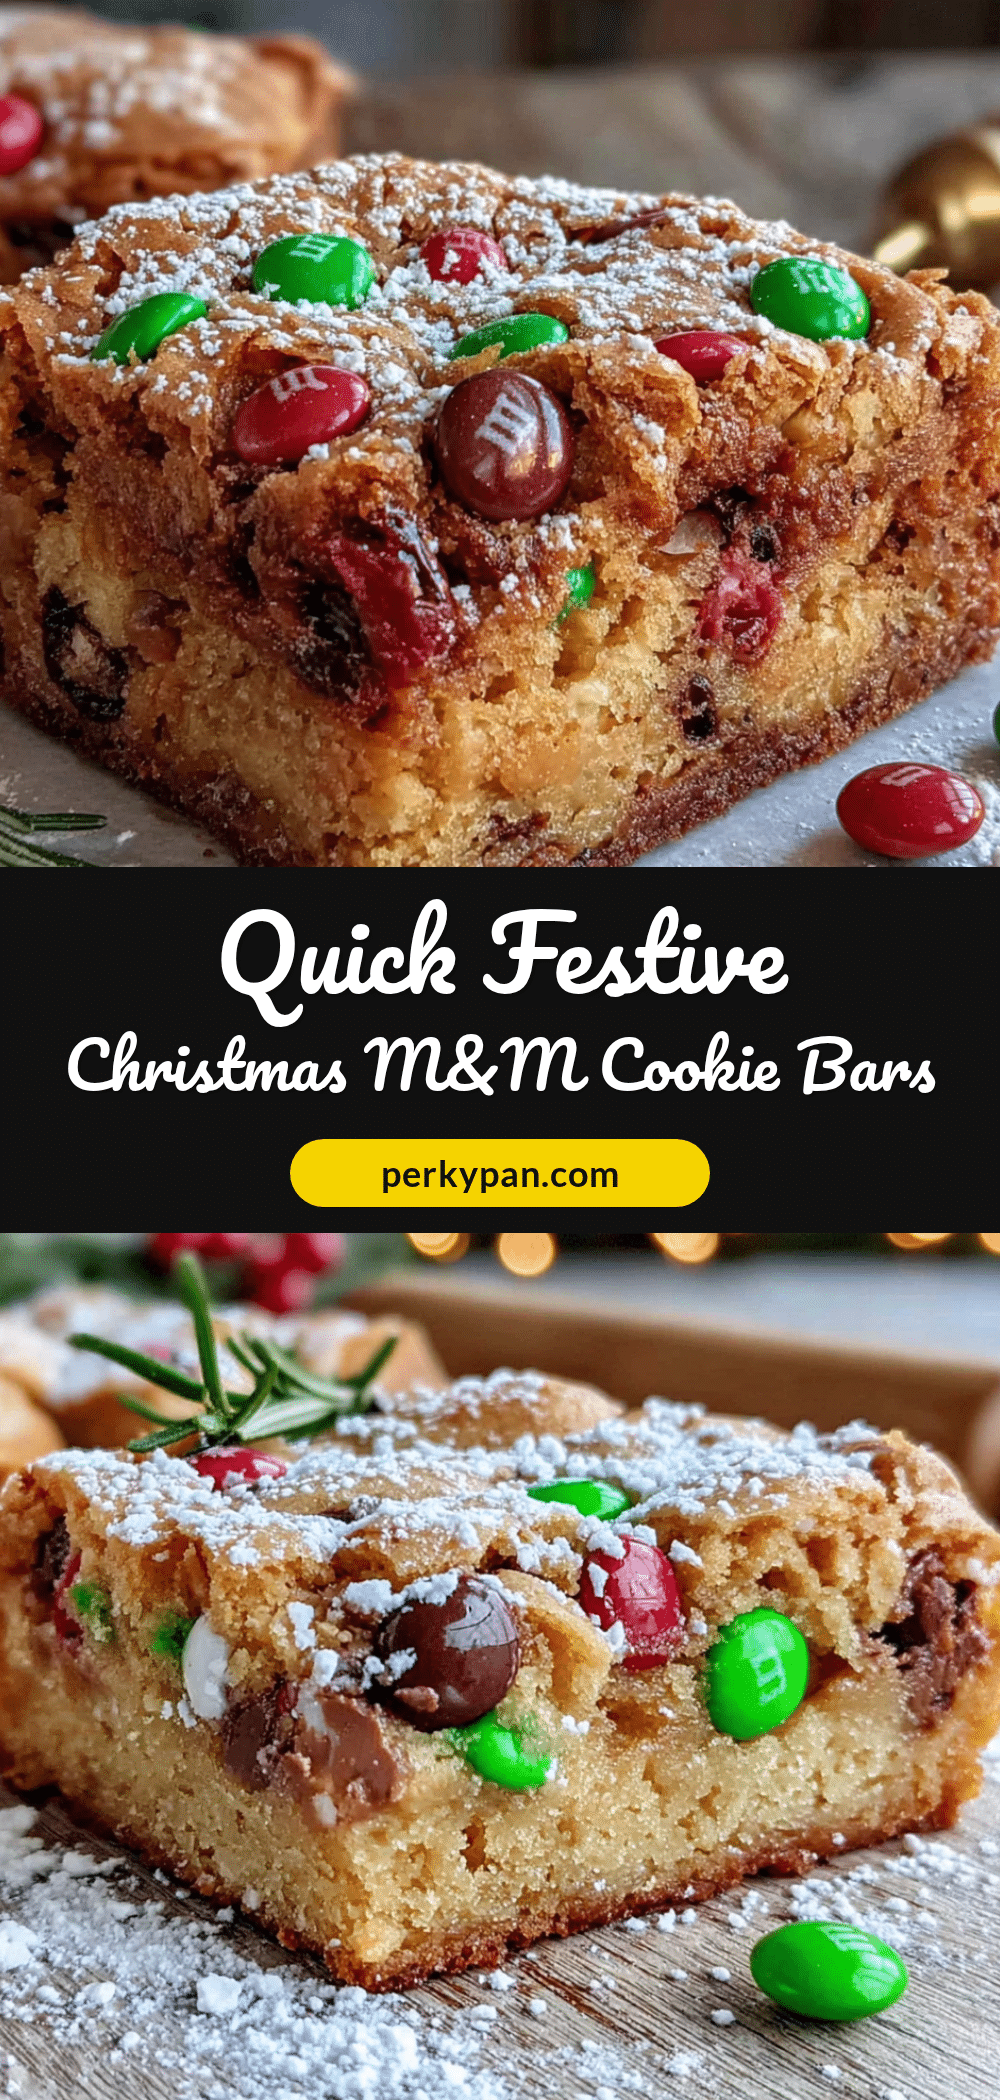
Let me tell you, these Quick Festive Christmas M&M Cookie Bars saved my holiday season last year. I was running around like a crazy person trying to prep for my daughter’s school party, and I needed something that looked impressive but didn’t require rolling a million cookie dough balls. These bars were the answer — and honestly, they’ve become my go-to ever since.
- Ready in 30 Minutes: From mixing bowl to cooling rack in under half an hour. That’s faster than most cookie recipes take just to chill the dough.
- No Chilling Required: Mix, press, bake. That’s it. No waiting around for dough to firm up in the fridge.
- Only One Bowl: Less dishes mean more time sipping hot cocoa by the tree. I’m all about that.
- Perfect for Cookie Exchanges: Cut them into squares and you’ve got uniform portions that stack beautifully on a platter.
- Kid-Friendly to Make: My niece helped press the M&Ms into the top last week, and she felt like a real chef.
- Crazy Versatile: Red and green M&Ms for Christmas, but you can switch them out for any holiday or occasion.
What makes these different from every other cookie bar recipe out there? It’s the texture. The edges get this beautiful golden crispiness while the center stays soft and chewy — like the perfect chocolate chip cookie, but without the hassle. I tested this recipe four times to get that balance just right. The first batch was too cakey, the second too flat. But this version? It’s pure cookie bar perfection.
These cookie bars are the kind of treat that makes people close their eyes after the first bite. I’ve seen it happen at three separate holiday parties now. They’re comfort food reimagined for the busiest time of year — faster, easier, but with the same soul-soothing satisfaction. Perfect for impressing guests without stress, or turning a simple Tuesday night into something special.
What Ingredients You Will Need
This recipe uses simple, pantry-friendly ingredients to deliver that classic cookie flavor with a festive twist. Most of these are probably already in your kitchen — which is exactly what you want when you’re baking during the holiday chaos.
For the Cookie Bars:
- Unsalted butter, ½ cup (1 stick), melted and slightly cooled — Melting the butter gives these bars a chewier texture than creaming room-temperature butter. I use Land O’Lakes for consistent results.
- Light brown sugar, ¾ cup, packed — Brown sugar adds moisture and that deep, almost caramel-like flavor. Dark brown sugar works too, but the bars will be slightly darker and more molasses-forward.
- Granulated sugar, ¼ cup — A little white sugar helps the edges crisp up nicely.
- Large egg, 1, at room temperature — If you forgot to set it out, place the egg in a bowl of warm water for 5 minutes. Works like a charm.
- Vanilla extract, 1½ teaspoons — Pure vanilla makes a difference here. I’ve used imitation in a pinch, but the flavor isn’t as warm and rich.
- All-purpose flour, 1¾ cups — Spoon and level your flour for the best results. Scooping directly from the bag packs in too much flour and makes the bars dry.
- Cornstarch, 1 tablespoon — This is my secret ingredient for that soft, bakery-style texture. Don’t skip it.
- Baking soda, ½ teaspoon — Helps the bars rise just enough.
- Salt, ½ teaspoon — Balances the sweetness and enhances all the flavors.
- Christmas M&Ms, 1 cup, plus ¼ cup extra for pressing on top — The red and green ones are perfect for the holidays, but any color works. I’ve made these with the mint M&Ms too, and they’re amazing.
- Semi-sweet chocolate chips, ½ cup — Adds extra chocolatey goodness in every bite. Milk chocolate chips work if you prefer a sweeter bar.
Ingredient Tips from My Kitchen:
I recommend using name-brand M&Ms for the best color payoff. The store-brand versions sometimes have duller colors that don’t pop as nicely on the cookie bars. For the chocolate chips, I’m partial to Ghirardelli — they hold their shape during baking and taste rich without being too sweet.
If you’re out of brown sugar, you can make your own by mixing ¾ cup granulated sugar with 1½ tablespoons molasses. It’s not quite the same, but it works in a pinch. I’ve done this when I didn’t want to brave the grocery store on December 23rd.
Equipment Needed
You don’t need fancy equipment for these cookie bars. That’s the beauty of this recipe — it’s designed for real kitchens with real limitations.
- 8×8-inch baking pan — This is the perfect size for thick, chewy bars. A 9×9 pan works too, but your bars will be thinner and bake a few minutes faster.
- Parchment paper — Absolutely essential for easy removal. Leave overhang on two sides to create handles.
- Mixing bowl — One medium bowl is all you need. Less dishes, more joy.
- Whisk or wooden spoon — I use a wooden spoon because it feels more natural, but a whisk works fine too.
- Measuring cups and spoons — For accuracy, especially with the flour and cornstarch.
- Spatula — For pressing the dough evenly into the pan. The back of a measuring cup works too.
- Cooling rack — Helps the bars cool evenly so the centers set properly.
I’ve made these bars with a cheap baking pan from the dollar store, and they turned out great. Don’t let fancy equipment requirements stop you. The only thing that really matters is the parchment paper — trust me, I learned that the hard way when I tried to pry stuck bars out of a pan with a butter knife. It was not my finest moment.
Preparation Method
Preheat your oven to 350°F (175°C). Line your 8×8 baking pan with parchment paper, leaving overhang on two opposite sides. This will make lifting the bars out so much easier later.
- Melt the butter — Place ½ cup of butter in a microwave-safe bowl and heat in 20-second intervals until just melted. Let it cool for 2-3 minutes. You want it warm, not hot — hot butter will scramble your egg.
- Mix the sugars and butter — In your mixing bowl, combine the melted butter, ¾ cup brown sugar, and ¼ cup granulated sugar. Whisk until smooth and well combined, about 30 seconds. The mixture should look like wet sand.
- Add the egg and vanilla — Crack in 1 large egg and add 1½ teaspoons vanilla extract. Whisk vigorously until the mixture is pale and slightly thickened, about 1 minute. This step helps create that crackly top crust we all love.
- Combine the dry ingredients — In a separate small bowl, whisk together 1¾ cups flour, 1 tablespoon cornstarch, ½ teaspoon baking soda, and ½ teaspoon salt. This ensures everything is evenly distributed.
- Mix wet and dry — Add the flour mixture to the butter mixture. Fold together with a spatula or wooden spoon until just combined. Stop as soon as you don’t see any more flour streaks. Overmixing will make the bars tough.
- Add the mix-ins — Fold in 1 cup of Christmas M&Ms and ½ cup chocolate chips. Reserve the extra ¼ cup M&Ms for the top. The dough will be thick and slightly sticky — that’s exactly right.
- Press into the pan — Transfer the dough to your prepared pan. Use a spatula or your fingers to press it evenly into all corners. The dough should be about ¾ inch thick. If it’s sticky, lightly wet your fingers with water.
- Top with extra M&Ms — Press the remaining ¼ cup M&Ms gently into the top of the dough. Space them evenly so every bar gets a few visible candies on top.
- Bake — Place the pan on the middle rack of your preheated oven. Bake for 18-22 minutes, or until the edges are golden brown and the center looks set but still soft. A toothpick inserted in the center should come out with a few moist crumbs — not wet batter.
- Cool completely — Let the bars cool in the pan on a wire rack for at least 20 minutes. Then use the parchment handles to lift the entire block onto the cooling rack. Let cool completely before cutting — about 1 hour total. Cutting warm bars leads to crumbly, messy edges.
Pro Tip: For cleaner cuts, use a sharp chef’s knife and wipe it clean between each slice. I run mine under hot water and dry it off before cutting. This gives you those beautiful, bakery-style squares.
Cooking Tips & Techniques
I’ve made these Quick Festive Christmas M&M Cookie Bars at least a dozen times, and I’ve learned a few things the hard way. Let me save you some trouble.
Don’t overbake. This is the number one mistake people make with cookie bars. They look underdone in the center when they’re actually perfect. The residual heat continues to cook them as they cool. Pull them out when the edges are golden and the center looks just set — slightly puffy and not glossy anymore. I pulled my first batch out too late and ended up with dry, crumbly bars that tasted more like biscotti than cookies.
Room temperature egg matters. I know it seems fussy, but a cold egg will seize the melted butter and give you a lumpy dough. If you forgot to take it out ahead of time, place the egg in a bowl of warm water for 5 minutes. Problem solved.
Press the dough evenly. Uneven thickness means some bars will be overdone while others are underdone. Take an extra 30 seconds to make sure the dough reaches all four corners and has a uniform thickness. I use the bottom of a measuring cup to press it flat.
Use the parchment paper. I cannot stress this enough. The first time I made these, I didn’t use parchment and spent 15 minutes chiseling the bars out of the pan. The second time, I used parchment and lifted the whole block out in one perfect piece. Learn from my mistakes.
Let them cool completely. I know the smell is intoxicating and you want to dig in immediately. But cutting warm bars is a disaster waiting to happen. The M&Ms will smear, the chocolate chips will drag through the dough, and you’ll end up with a crumbly mess. Patience, my friend. Let them cool for a full hour.
Variations & Adaptations
One of the best things about this recipe is how easily it adapts to different tastes and dietary needs. Here are some variations I’ve tried and loved.
White Chocolate Cranberry Version: Swap the semi-sweet chocolate chips for white chocolate chips and replace the M&Ms with dried cranberries and white chocolate chips. The tartness of the cranberries balances the sweetness beautifully. I made this version for a friend who doesn’t like milk chocolate, and she ate half the pan in one sitting.
Gluten-Free Adaptation: Substitute the all-purpose flour with a 1:1 gluten-free baking flour blend. I’ve used Bob’s Red Mill and Cup4Cup with great results. Add 1 teaspoon of xanthan gum if your blend doesn’t already include it. The texture is slightly more delicate, but still delicious.
Peanut Butter Twist: Reduce the butter to ¼ cup and add ¼ cup creamy peanut butter. Melt them together before mixing with the sugars. Use peanut butter M&Ms instead of regular ones for double the peanut butter flavor. My husband says this version is “dangerously good.”
Mint Chocolate Version: Use mint M&Ms (the green ones are perfect for Christmas) and add ½ teaspoon peppermint extract along with the vanilla. Crush a few candy canes and sprinkle them on top before baking for extra festive flair. This one always gets rave reviews at holiday parties.
Vegan Option: Use vegan butter sticks (not tub margarine) and a flax egg (1 tablespoon ground flaxseed mixed with 3 tablespoons water, let sit for 5 minutes). Use vegan chocolate chips and check that your M&Ms are vegan-friendly — the classic ones contain milk, but there are vegan versions available. The texture is slightly less tender, but still very good.
Serving & Storage Suggestions
These cookie bars are incredibly versatile when it comes to serving. Here’s how I like to enjoy them.
Serving Temperature: Room temperature is ideal. The texture is perfectly chewy, and the chocolate chips are set but not hard. If you want a special treat, warm a bar in the microwave for 10 seconds and top with a scoop of vanilla ice cream. The warm cookie with cold ice cream is pure magic.
Presentation Ideas: Cut the bars into 16 squares for standard portions, or 9 larger squares if you’re feeling generous. Arrange them on a festive platter with a dusting of powdered sugar and a few extra M&Ms scattered around. For gift-giving, stack 4-5 bars in a clear cellophane bag tied with a red ribbon.
Complementary Dishes: These bars pair beautifully with a cup of hot cocoa, a mug of spiced chai, or a glass of cold milk. For a dessert board, arrange them alongside sugar cookies, gingerbread men, and chocolate truffles.
Storage Instructions: Store the bars in an airtight container at room temperature for up to 5 days. Place a slice of bread in the container to keep them soft — the bread absorbs excess air and releases moisture. Replace the bread slice every 2 days. Do not refrigerate, as the cold air dries out the bars.
Freezer Instructions: These bars freeze beautifully. Wrap individual bars tightly in plastic wrap, then place them in a freezer-safe bag. They’ll keep for up to 3 months. To thaw, let them sit at room temperature for about 30 minutes, or microwave for 15-20 seconds for that fresh-from-the-oven taste.
Flavor Development: Honestly, these bars taste even better the next day. The flavors meld together overnight, and the texture becomes even more chewy and cohesive. I often make them a day ahead of when I need them.
Nutritional Information & Benefits
Let’s be real — these are a treat, not a health food. But here’s what you’re looking at per bar (based on 16 servings):
| Nutrient | Amount Per Bar |
|---|---|
| Calories | 245 |
| Total Fat | 12g |
| Saturated Fat | 7g |
| Cholesterol | 28mg |
| Sodium | 145mg |
| Total Carbohydrates | 33g |
| Dietary Fiber | 1g |
| Sugars | 22g |
| Protein | 3g |
Health Highlights: The dark chocolate chips provide a small amount of antioxidants, and the butter contains vitamin A. The M&Ms add a touch of joy — which, honestly, has its own health benefits during the stressful holiday season.
Dietary Considerations: These bars contain gluten, dairy, and eggs. For gluten-free and vegan options, check the variations section above. They are nut-free as written, making them safe for school parties (but always check labels on your specific ingredients).
I’m not a nutritionist, and I don’t pretend to be one. These are cookies, meant to be enjoyed in moderation. The real benefit here is the joy of sharing something homemade with the people you love. That’s the kind of wellness I can get behind.
Conclusion
These Quick Festive Christmas M&M Cookie Bars have become a staple in my holiday baking rotation for good reason. They’re fast, they’re forgiving, and they deliver that nostalgic cookie flavor without the fuss of rolling and chilling dough. Whether you’re baking for a school party, a cookie exchange, or just because it’s Tuesday and you need something sweet — these bars deliver every single time.
I love that this recipe leaves room for your own creativity. Swap the colors for different holidays, add your favorite mix-ins, or keep it classic with red and green M&Ms. There’s no wrong way to make them, and that’s the beauty of a simple, reliable recipe.
I’d love to hear how yours turn out! Drop a comment below and let me know what variations you tried, or tag me in your photos on social media. Did you add white chocolate chips? Use mint M&Ms? Make them gluten-free? I’m always looking for new ideas to try.
Happy baking, friend. May your kitchen smell like butter and sugar, and may your cookie bars come out perfectly chewy every single time.
Frequently Asked Questions
Can I use salted butter instead of unsalted?
Yes, you can. Just reduce the added salt to ¼ teaspoon. The bars will be slightly saltier, which actually works well with the sweet M&Ms. I’ve done this when I ran out of unsalted butter, and nobody complained.
Why did my cookie bars turn out cakey instead of chewy?
This usually happens from overmixing the batter or using too much flour. Mix until just combined, and make sure you’re measuring your flour correctly by spooning it into the measuring cup and leveling it off. The cornstarch in this recipe also helps prevent a cakey texture.
Can I make these ahead of time for a party?
Absolutely! These bars actually taste better the next day. Bake them up to 2 days ahead, store in an airtight container at room temperature, and cut into squares just before serving. You can also freeze the baked bars for up to 3 months.
How do I prevent the M&Ms from sinking to the bottom?
The dough in this recipe is thick enough that sinking isn’t usually an issue. But if you’re worried, toss the M&Ms in a tablespoon of flour before folding them into the batter. This creates friction that helps them stay suspended in the dough.
Can I double this recipe for a larger crowd?
Yes! Double all ingredients and bake in a 9×13-inch pan. The baking time will increase to about 25-30 minutes. Keep an eye on the edges — they should be golden brown and the center should be set but still soft. Let cool completely before cutting into 24 squares.
Pin This Recipe!
Quick Festive M&M Cookie Bars: Easy Christmas Dessert
These Quick Festive Christmas M&M Cookie Bars are ready in 30 minutes with no chilling required. They have a perfect chewy texture with crisp edges and are ideal for holiday parties, cookie exchanges, or a simple festive treat.
- Prep Time: 10 minutes
- Cook Time: 20 minutes
- Total Time: 30 minutes
- Yield: 16 servings 1x
- Category: Dessert
- Cuisine: American
Ingredients
- ½ cup (1 stick) unsalted butter, melted and slightly cooled
- ¾ cup light brown sugar, packed
- ¼ cup granulated sugar
- 1 large egg, at room temperature
- 1½ teaspoons vanilla extract
- 1¾ cups all-purpose flour
- 1 tablespoon cornstarch
- ½ teaspoon baking soda
- ½ teaspoon salt
- 1 cup Christmas M&Ms, plus ¼ cup extra for pressing on top
- ½ cup semi-sweet chocolate chips
Instructions
- Preheat oven to 350°F (175°C). Line an 8×8-inch baking pan with parchment paper, leaving overhang on two opposite sides.
- Melt ½ cup butter in a microwave-safe bowl in 20-second intervals until just melted. Let cool for 2-3 minutes.
- In a mixing bowl, combine melted butter, ¾ cup brown sugar, and ¼ cup granulated sugar. Whisk until smooth, about 30 seconds.
- Add 1 large egg and 1½ teaspoons vanilla extract. Whisk vigorously until pale and slightly thickened, about 1 minute.
- In a separate small bowl, whisk together 1¾ cups flour, 1 tablespoon cornstarch, ½ teaspoon baking soda, and ½ teaspoon salt.
- Add the flour mixture to the butter mixture. Fold together with a spatula or wooden spoon until just combined. Do not overmix.
- Fold in 1 cup M&Ms and ½ cup chocolate chips. Reserve the extra ¼ cup M&Ms for the top.
- Transfer dough to the prepared pan. Press evenly into all corners using a spatula or your fingers. The dough should be about ¾ inch thick.
- Press the remaining ¼ cup M&Ms gently into the top of the dough, spacing them evenly.
- Bake on the middle rack for 18-22 minutes, until edges are golden brown and the center looks set but still soft. A toothpick inserted in the center should come out with a few moist crumbs.
- Cool in the pan on a wire rack for at least 20 minutes. Then use the parchment handles to lift the entire block onto the cooling rack. Cool completely before cutting, about 1 hour total.
Notes
For cleaner cuts, use a sharp chef’s knife and wipe it clean between each slice. Run the knife under hot water and dry it off before cutting. These bars taste even better the next day. Store in an airtight container at room temperature for up to 5 days. To freeze, wrap individual bars tightly in plastic wrap and place in a freezer-safe bag for up to 3 months.
Nutrition
- Serving Size: 1 bar
- Calories: 245
- Sugar: 22
- Sodium: 145
- Fat: 12
- Saturated Fat: 7
- Carbohydrates: 33
- Fiber: 1
- Protein: 3
Keywords: M&M cookie bars, Christmas cookie bars, easy cookie bars, festive dessert, no chill cookie bars, one bowl cookie bars