Love this? Save it for later!
Share the inspiration with your friends
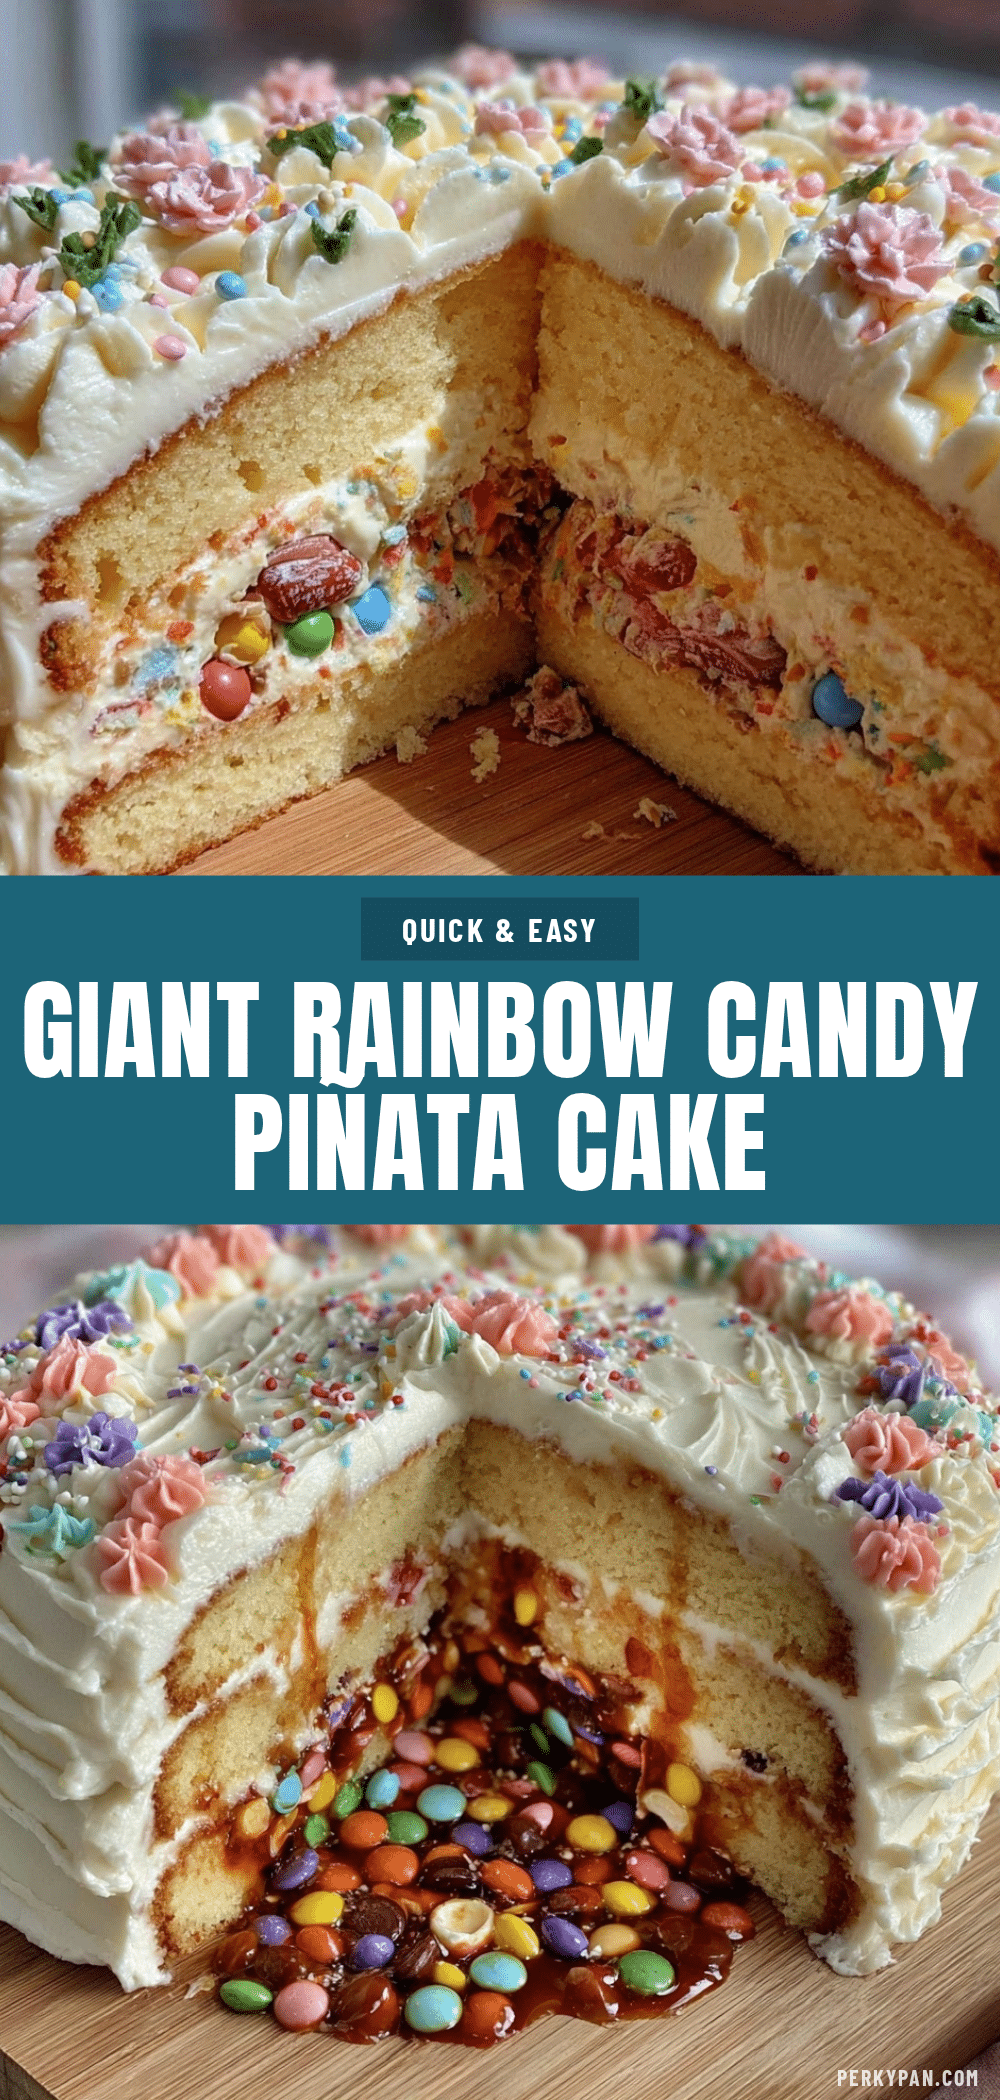
“I wasn’t even planning to bake that day,” I confessed to myself as I stared at the towering stack of cake layers cooling on the counter. It was a random Saturday afternoon, and honestly, I just wanted a quick sweet fix. But then my neighbor, Mrs. Lopez, popped over with a mischievous grin and a box of rainbow candies. She casually mentioned how her granddaughter adored piñatas, and right there, a lightbulb clicked. What if I could make a giant piñata cake that actually reveals a rainbow candy center?
Now, you might think this sounds like a party trick for kids only, but honestly, it’s one of those joyful creations that bring out the kid in all of us. I remember the chaotic but thrilling moment when I finally sliced into that layered cake, and colorful candies tumbled out like a little celebration. The kitchen was a mess, I forgot to set a timer (again!), and the frosting got a little uneven—but the smiles around the table made every bit of it worth it.
Maybe you’ve been there, staring at a birthday or special occasion and wondering how to make it unforgettable without spending days in the kitchen. This Perfect Giant Piñata Reveal Cake with Rainbow Candy Center recipe is your answer. It’s bold, fun, and surprisingly doable with everyday ingredients. Let me tell you why I keep coming back to this cake, no matter the occasion.
Why You’ll Love This Recipe
Having tested this recipe multiple times (sometimes with unexpected candy substitutions!), I can confidently say it’s a showstopper that’s also manageable for home bakers. Here’s why it’s one of my favorites:
- Quick & Easy: You can get this cake ready in about 2 hours, perfect for last-minute celebrations.
- Simple Ingredients: No fancy bakery runs needed—just pantry staples and a bag of your favorite rainbow candies.
- Perfect for Parties: Whether it’s a birthday, a festive gathering, or just a fun weekend treat, this cake steals the spotlight.
- Crowd-Pleaser: Kids and adults alike can’t get enough of the candy surprise inside.
- Unbelievably Delicious: Moist layers with a hint of vanilla paired perfectly with the sweet crunch of candies.
- Unique Technique: The clever hollowing and candy filling method makes this piñata cake stand out from typical layered cakes.
Honestly, this isn’t just any layered cake. It’s the kind that makes you laugh and gasp all at once when the candy center spills out. It’s comfort food with a party twist—fun to make, delightful to eat, and perfect for turning any ordinary day into something memorable.
What Ingredients You Will Need
This recipe uses simple, wholesome ingredients that come together to create a moist, flavorful cake with a colorful candy surprise inside. Most of these are pantry staples, with the candy center adding the festive touch.
- For the Cake Batter:
- 2 ½ cups (315g) all-purpose flour, sifted
- 2 ½ tsp baking powder
- ½ tsp salt
- 1 cup (230g) unsalted butter, softened (I recommend Plugrá for best creaminess)
- 1 ¾ cups (350g) granulated sugar
- 4 large eggs, room temperature
- 1 tbsp vanilla extract (use pure vanilla for depth)
- 1 cup (240ml) whole milk, room temperature (you can swap for almond milk if preferred)
- For the Filling:
- 2 – 3 cups assorted rainbow candies (think Skittles, M&Ms, or your favorite hard-coated sweets)
- Optional: small chocolate chips or mini marshmallows to mix in for texture
- For the Frosting:
- 1 ½ cups (340g) unsalted butter, softened
- 5 cups (600g) powdered sugar, sifted
- 2 tsp vanilla extract
- 3 – 4 tbsp heavy cream or milk (adjust for preferred consistency)
- Pinch of salt
If you want a dairy-free version, you can use a coconut milk-based frosting and swap butter for dairy-free margarine. For gluten-free options, almond or oat flour blends work well but expect a slightly different texture.
Equipment Needed
To make this giant piñata cake, you’ll need a few basic tools:
- Two 9-inch (23cm) round cake pans (non-stick recommended)
- Mixing bowls – one large for batter, one for frosting
- Electric mixer (hand or stand) to cream butter and sugar smoothly
- Offset spatula for frosting the cake evenly
- Large serrated knife or cake leveler to slice cake layers
- Mixing spoons and measuring cups/spoons (both metric and US if possible)
- Cooling racks to allow cake layers to cool completely and avoid sogginess
If you don’t have a cake leveler, a sharp serrated knife works fine; just take your time. I once tried using a bread knife that was too dull and ended up with a few crumbly edges—lesson learned! For frosting, an offset spatula really helps get a smooth finish, but a butter knife can do in a pinch. Budget-friendly pans from brands like Wilton or USA Pan have served me well over the years.
Preparation Method

- Preheat your oven to 350°F (175°C). Grease and flour your two 9-inch pans or line them with parchment paper. This helps the cakes release easily.
- Mix dry ingredients: In a medium bowl, whisk together the sifted flour, baking powder, and salt. Set aside. This ensures even leavening.
- Cream butter and sugar: In a large bowl, beat the softened butter and sugar on medium speed with your mixer until light and fluffy, about 3-4 minutes. This step is crucial for a tender crumb.
- Add eggs: Crack in the eggs one at a time, beating well after each addition. Then stir in the vanilla extract.
- Combine wet and dry: Alternately add the dry flour mixture and milk to the butter mixture, starting and ending with flour. Mix on low speed just until combined—don’t overmix or the cake will be dense.
- Divide batter: Pour batter evenly into the prepared pans, smoothing the tops with a spatula. Bake for 30-35 minutes or until a toothpick inserted in the center comes out clean.
- Cool layers: Let cakes cool in pans for 10 minutes, then turn out onto racks to cool completely (about 1 hour). This step is key to prevent melting the frosting later.
- Level cakes: Using a serrated knife or cake leveler, carefully trim the domed tops to create flat layers.
- Assemble and hollow: Place one cake layer on your serving plate. Using a small round cookie cutter or a sharp knife, cut a circle about 4 inches (10cm) in diameter in the center of this layer, creating a “well” for the candy.
- Fill the cavity: Spoon in your rainbow candies until the hollow is full but not overflowing.
- Top with second layer: Gently place the second cake layer on top, aligning edges carefully.
- Make the frosting: Beat softened butter until smooth. Gradually add powdered sugar, vanilla, salt, and cream, mixing until fluffy and spreadable.
- Frost the cake: Apply a thin crumb coat to seal in crumbs, then chill for 15 minutes. Finish with a thicker layer of frosting, smoothing the sides and top. Add extra decorations if desired.
- Chill and serve: Refrigerate the cake for at least 30 minutes before slicing. When you cut into it, watch the candy tumble out!
Pro tip: When hollowing the cake, save the trimmed cake bits to crumble over the frosting or enjoy as a snack. Also, if you find the frosting too stiff, add a splash more milk to soften it up. I once accidentally added too much cream and ended up with a runny mess—just a heads up!
Cooking Tips & Techniques
To get this giant piñata cake just right, here are some tried-and-true tips I’ve picked up over the years:
- Don’t skip sifting: Sifting flour and powdered sugar ensures no lumps, which makes your cake and frosting smoother.
- Room temperature ingredients: Butter, eggs, and milk at room temp blend better, giving you a consistent batter.
- Beat butter and sugar well: This aerates the batter, making the cake lighter. I use a stand mixer for this step but a good hand mixer works too.
- Don’t overmix: Once you add flour, mix just until combined to avoid a tough cake.
- Level cake layers: This helps your cake stack evenly and keeps the candy hidden until the big reveal.
- Fill candy cavity carefully: Use candies that won’t melt or stick together too much. Hard candies like Skittles or coated chocolates are perfect.
- Crumb coat frosting: A thin layer traps crumbs so your final frosting looks neat and polished.
- Chill the cake: This helps the frosting set and makes slicing cleaner.
One time, I forgot to chill the cake before slicing, and the candies started sliding out prematurely. Lesson learned: patience pays off here! Also, multitasking by prepping frosting while cakes cool can save a lot of time.
Variations & Adaptations
This piñata cake is a great base that welcomes plenty of creative twists depending on your mood or dietary needs.
- Chocolate Lover’s Variation: Swap half the flour for cocoa powder to create a rich chocolate cake. Use chocolate candies inside for a double chocolate surprise.
- Gluten-Free Version: Use a gluten-free all-purpose flour blend in place of regular flour. Just watch the baking time as it might vary slightly.
- Fruit-Filled Adaptation: Instead of candies, fill the hollow with fresh berries or chopped fruits and a drizzle of fruit preserves for a fresher, less sweet center.
- Vegan Option: Replace butter with vegan margarine, use flax eggs (1 tbsp ground flaxseed + 3 tbsp water per egg), and plant-based milk. For frosting, coconut cream whipped with powdered sugar works beautifully.
- Seasonal Theme: Customize candy colors to match seasons or holidays—pumpkin candies for fall, pastel candies for spring.
Personally, I once tried adding crushed peppermint candies inside during the holidays—let’s just say it added a festive crunch and a surprise minty kick that everyone loved!
Serving & Storage Suggestions
Serve this cake at room temperature so the frosting is soft and the candy center stays crunchy. Presentation-wise, slice it slowly to catch that magical moment when the candies spill out like a mini celebration.
This cake pairs wonderfully with a simple cup of coffee or a scoop of vanilla ice cream. For a party, adding fresh fruit alongside balances the sweetness nicely.
Store leftover cake covered loosely in the refrigerator for up to 3 days. If you want to freeze it, wrap tightly in plastic wrap and foil—it keeps well for up to a month. When reheating, allow it to thaw at room temperature, then serve.
Flavors tend to meld and deepen overnight, so sometimes the next day’s slice tastes even better. Just watch out for the candy center softening if stored too long.
Nutritional Information & Benefits
Each slice of this giant piñata cake offers a generous portion of carbohydrates, fats, and sugars, thanks to the layered cake and candy filling. It’s a treat best enjoyed in moderation but offers some nutritional perks:
- The eggs provide protein and essential amino acids.
- Butter contributes fat-soluble vitamins like A and D.
- Using whole milk adds calcium and vitamin B12.
- Rainbow candies add a fun, colorful appeal but are primarily sugar.
For those watching gluten or dairy, the suggested substitutions make this recipe accessible. From a wellness perspective, it’s a joyful indulgence that can fit into balanced eating when shared and savored mindfully.
Conclusion
This Perfect Giant Piñata Reveal Cake with Rainbow Candy Center is one of those recipes that keeps bringing smiles, whether it’s a birthday surprise or a weekend project gone deliciously right. I love that it’s both playful and approachable, letting you celebrate with flair without hours of fuss.
Feel free to tweak the candy fillings, frosting flavors, or cake base to suit your taste or occasion. Honestly, experimenting with this recipe has been half the fun for me, and I hope you find that same joy in it.
If you try this recipe, I’d love to hear how your piñata cake turned out or any fun twists you came up with—drop a comment below and share your story. Now, go ahead and make your next gathering unforgettable with this colorful, candy-filled cake!
FAQs
Can I make the cake layers ahead of time?
Yes! You can bake the cake layers a day in advance and wrap them tightly in plastic wrap. Store them at room temperature or refrigerate if your kitchen is warm. Just bring them to room temperature before assembling.
What candies work best for the piñata center?
Hard-coated candies like Skittles, M&Ms, or any small, colorful candy that won’t melt quickly are ideal. Avoid gummy candies as they can get sticky and messy inside the cake.
How do I prevent the candies from getting soggy?
Make sure the cake layers are fully cooled before hollowing and filling. Also, frost the cake soon after assembly and serve within a day or two for the best candy crunch.
Can I use a different frosting?
Absolutely! Cream cheese frosting or Swiss meringue buttercream both work well. Just choose a frosting that’s sturdy enough to hold the cake together and complement the sweetness.
Is this recipe suitable for kids to help with?
Definitely! Kids love filling the candy center and decorating the frosting. Just supervise knife work or cake leveling for safety.
For a fun twist on party desserts, you might enjoy trying this with a crispy garlic chicken dinner beforehand or following it up with a refreshing lemon blueberry muffins brunch the next day.
Pin This Recipe!
Perfect Giant Piñata Reveal Cake Recipe with Rainbow Candy Center
A fun and festive giant piñata cake with a surprise rainbow candy center, perfect for parties and celebrations. Moist vanilla layers with a colorful candy filling make this cake a joyful treat for all ages.
- Prep Time: 30 minutes
- Cook Time: 35 minutes
- Total Time: 2 hours
- Yield: 12 servings 1x
- Category: Dessert
- Cuisine: American
Ingredients
- 2 ½ cups (315g) all-purpose flour, sifted
- 2 ½ tsp baking powder
- ½ tsp salt
- 1 cup (230g) unsalted butter, softened
- 1 ¾ cups (350g) granulated sugar
- 4 large eggs, room temperature
- 1 tbsp vanilla extract
- 1 cup (240ml) whole milk, room temperature
- 2 – 3 cups assorted rainbow candies (Skittles, M&Ms, or hard-coated sweets)
- Optional: small chocolate chips or mini marshmallows
- 1 ½ cups (340g) unsalted butter, softened (for frosting)
- 5 cups (600g) powdered sugar, sifted
- 2 tsp vanilla extract (for frosting)
- 3 – 4 tbsp heavy cream or milk (for frosting)
- Pinch of salt (for frosting)
Instructions
- Preheat your oven to 350°F (175°C). Grease and flour two 9-inch round cake pans or line them with parchment paper.
- In a medium bowl, whisk together sifted flour, baking powder, and salt. Set aside.
- In a large bowl, beat softened butter and sugar on medium speed until light and fluffy, about 3-4 minutes.
- Add eggs one at a time, beating well after each addition. Stir in vanilla extract.
- Alternately add dry flour mixture and milk to the butter mixture, starting and ending with flour. Mix on low speed just until combined.
- Divide batter evenly into prepared pans and smooth tops. Bake for 30-35 minutes or until a toothpick inserted in the center comes out clean.
- Let cakes cool in pans for 10 minutes, then turn out onto racks to cool completely (about 1 hour).
- Level cakes by trimming domed tops with a serrated knife or cake leveler.
- Place one cake layer on serving plate. Using a small round cookie cutter or sharp knife, cut a 4-inch diameter circle in the center to create a hollow.
- Fill the hollow with rainbow candies until full but not overflowing.
- Place the second cake layer on top, aligning edges carefully.
- Make frosting by beating softened butter until smooth. Gradually add powdered sugar, vanilla, salt, and cream, mixing until fluffy and spreadable.
- Apply a thin crumb coat of frosting to seal in crumbs, then chill for 15 minutes.
- Finish with a thicker layer of frosting, smoothing sides and top. Add decorations if desired.
- Refrigerate the cake for at least 30 minutes before slicing to allow frosting to set and candy to stay crunchy.
- Slice slowly to reveal the candy center spilling out.
Notes
Use hard-coated candies like Skittles or M&Ms to prevent melting or stickiness inside the cake. Save trimmed cake bits to crumble over frosting or enjoy as a snack. Chill the cake before slicing to keep candy from sliding out prematurely. For dairy-free or gluten-free versions, substitute ingredients accordingly. Avoid gummy candies for the filling.
Nutrition
- Serving Size: 1 slice (1/12th of c
- Calories: 450
- Sugar: 45
- Sodium: 250
- Fat: 22
- Saturated Fat: 13
- Carbohydrates: 60
- Fiber: 1
- Protein: 5
Keywords: piñata cake, rainbow candy cake, party cake, layered cake, candy surprise, vanilla cake, easy cake recipe