Love this? Save it for later!
Share the inspiration with your friends
“You think you can make a giant flag cookie?” my cousin joked as I pulled out the baking sheet, flour dusting the counter like fresh snow. It was the weekend before the Fourth of July, and honestly, I wasn’t planning on anything that ambitious. But you know that feeling when you get a wild idea and just have to run with it? That was me. I had this vision of a cookie so big it could be the centerpiece of our neighborhood block party table—a sweet, edible star-spangled banner that everyone could share (and maybe sneak a few extra bites of when no one was looking).
I didn’t have a fancy stand or cookie cutters that big, just a cracked baking sheet and my trusty rolling pin. Things got a little messy (there was flour on the ceiling, don’t ask), and I almost forgot the red food coloring at first. But by the time that cookie came out of the oven, glowing golden and smellin’ like a sugar dream, I knew this was going to be a tradition. Maybe you’ve been there—wanting to bring something unique but simple enough that it doesn’t stress you out. This Perfect Giant Flag Cookie Party Centerpiece is exactly that: fun, festive, and way easier than you think.
Let me tell you, this recipe stuck with me because it’s not just another cookie. It’s a statement piece, a conversation starter, and honestly, a crowd-pleaser that’s as much a joy to make as it is to eat. So, if you’re looking for that easy homemade party centerpiece idea that steals the show without needing a baking degree, keep reading. You’re going to love this!
Why You’ll Love This Recipe
After several test runs (and yes, learning to tame the giant dough beast), this Perfect Giant Flag Cookie recipe has become my go-to for parties and celebrations. Here’s why it’s a total win:
- Quick & Easy: You can whip this up in under 45 minutes, including baking time—ideal for last-minute party prep or spontaneous get-togethers.
- Simple Ingredients: No need for specialty stores; all ingredients are pantry staples that you probably have already.
- Perfect for Celebrations: Whether it’s a Fourth of July barbecue, Memorial Day picnic, or just a fun family gathering, this cookie centerpiece steals the spotlight.
- Crowd-Pleaser: Kids adore the giant size and bright colors, and adults appreciate the classic sugar cookie flavor with a festive twist.
- Unbelievably Delicious: The cookie has a soft, chewy center with just the right crisp around the edges, and the royal icing adds that perfect pop of sweetness and color.
What makes this cookie stand out is the way the icing is applied—carefully piped stripes and stars that give it a professional, yet homemade charm. I like to use a slightly thicker dough so the cookie holds its shape without cracking, and a blend of vanilla and almond extract adds a subtle depth that you won’t find in your average sugar cookie. Honestly, it’s comfort food with a festive soul.
Whether you’re a seasoned baker or someone who usually sticks to boxed mixes, this recipe is approachable and forgiving. Plus, you get the added bonus of impressing your guests with a centerpiece they can actually eat—no awkward leftovers here!
What Ingredients You Will Need
This recipe uses straightforward, wholesome ingredients that come together to create a bold flavor and satisfying texture without fuss. Most of these are pantry staples, making it super convenient, and if you want to tweak it for dietary needs, I’ve got some substitution tips below.
- For the Cookie Dough:
- 3 cups (360g) all-purpose flour, sifted (I recommend King Arthur for consistent results)
- 1 teaspoon baking powder
- ½ teaspoon salt
- 1 cup (227g) unsalted butter, softened (room temperature is key)
- 1 ¼ cups (250g) granulated sugar
- 2 large eggs, room temperature
- 2 teaspoons vanilla extract (pure vanilla for best flavor)
- ½ teaspoon almond extract (optional, adds a lovely hint of nuttiness)
- For the Royal Icing:
- 3 cups (360g) powdered sugar, sifted
- 3 tablespoons meringue powder
- 6 tablespoons warm water (adjust for consistency)
- Red and blue gel food coloring (I use AmeriColor gels for vibrant colors)
Ingredient Tips: If you want a gluten-free version, swapping the flour for a 1:1 gluten-free baking flour works well, though the texture will be slightly different. For a dairy-free cookie, replace butter with a plant-based margarine, and use a vegan egg substitute like flax eggs. In summer, fresh blueberries could be a fun natural twist to add to the dough or as decoration if you feel adventurous!
Equipment Needed
- Large mixing bowl and a medium bowl for icing
- Electric mixer (handheld or stand mixer) to cream butter and sugar smoothly
- Rolling pin (a non-stick or silicone mat helps with rolling out large dough evenly)
- Large rimmed baking sheet (at least 15×20 inches) to hold the giant cookie
- Parchment paper or silicone baking mat (prevents sticking and ensures even baking)
- Offset spatula or butter knife for spreading icing
- Piping bags with small round tips (sizes 1 or 2) for precise icing work
- Measuring cups and spoons
If you don’t have a piping bag, a sturdy zip-top bag with a tiny corner cut off can work in a pinch. Also, I’ve found that a dough scraper is handy for transferring the large rolled dough onto the baking sheet without tearing. For budget-friendly options, silicone mats last forever and save you from greasing pans every time.
Preparation Method
- Mix Dry Ingredients: In a medium bowl, whisk together 3 cups (360g) of sifted all-purpose flour, 1 teaspoon baking powder, and ½ teaspoon salt. Set aside. This ensures your dry ingredients are evenly distributed.
- Cream Butter and Sugar: In a large bowl, beat 1 cup (227g) softened unsalted butter and 1 ¼ cups (250g) granulated sugar with an electric mixer on medium speed until light and fluffy, about 3-4 minutes. The texture should be creamy with no visible sugar granules.
- Add Eggs and Extracts: Beat in 2 large eggs, one at a time, followed by 2 teaspoons vanilla extract and ½ teaspoon almond extract. Mix until combined but don’t overbeat or the dough will be too soft.
- Combine Dry and Wet: Gradually add the flour mixture into the butter mixture, mixing on low speed until just incorporated. The dough will be thick and slightly sticky. Avoid overmixing to keep the cookie tender.
- Chill Dough: Wrap the dough in plastic wrap and refrigerate for at least 1 hour. This step is crucial to help the dough firm up, making it easier to roll out and maintain shape.
- Preheat Oven and Prepare Sheet: Preheat your oven to 350°F (175°C). Line a large rimmed baking sheet with parchment paper or a silicone mat.
- Roll Out Dough: Lightly flour your work surface and rolling pin. Roll the dough into a rectangle roughly 15×20 inches and about ¼ inch (6mm) thick. Use a ruler or square edge to get straight edges. Transfer the dough carefully onto the prepared baking sheet using a dough scraper.
- Bake: Bake the giant cookie for 18-22 minutes, or until the edges start to turn golden brown but the center is still soft. The cookie will firm up as it cools. Keep a close eye towards the end to avoid overbaking.
- Cool Completely: Let the cookie cool on the baking sheet for 15 minutes, then transfer to a wire rack to cool completely. This prevents cracking when decorating.
- Prepare Royal Icing: In a bowl, combine 3 cups (360g) powdered sugar, 3 tablespoons meringue powder, and 6 tablespoons warm water. Beat on medium speed until stiff peaks form, about 5-7 minutes. Divide icing into 3 bowls; tint one with red gel, one with blue gel, and leave one white.
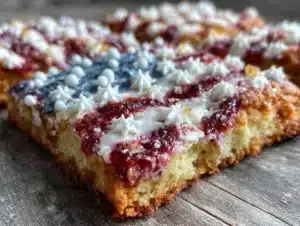
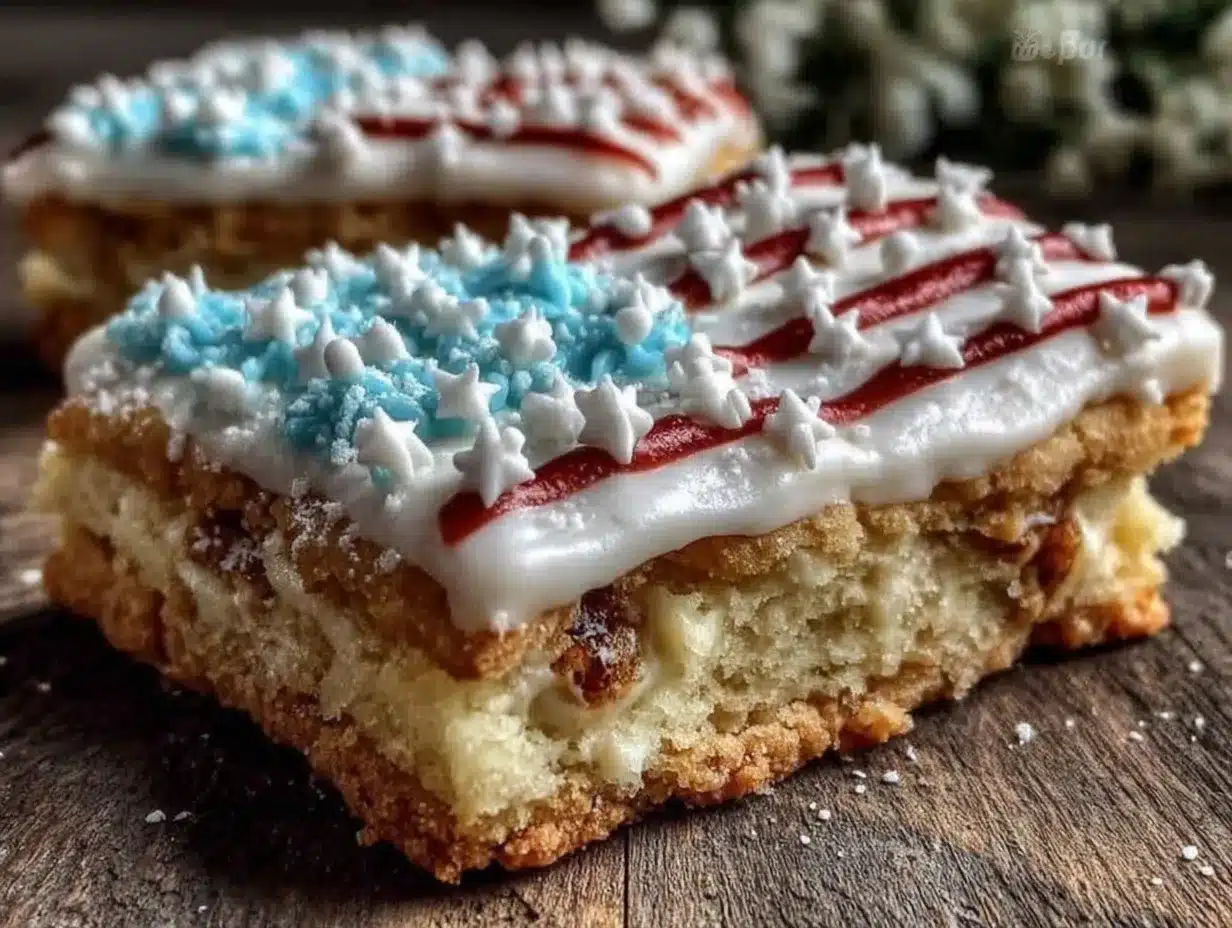
- Decorate: Using piping bags with small round tips, pipe horizontal red and white stripes across the cookie, leaving a blue square in the top left corner. Pipe white stars onto the blue section carefully. Let the icing dry completely, about 3-4 hours or overnight for best results.
Tip: If you notice your icing is too thick to pipe smoothly, add a teaspoon of water at a time to loosen it. Too thin? Add a little more powdered sugar. Also, if a piping bag bursts (it happened to me once during a party!), just grab a new one quickly—no stress!
Cooking Tips & Techniques
- Chill the Dough Well: Chilling is non-negotiable for this giant cookie. It helps prevent spreading and keeps those crisp edges you want for that perfect texture contrast.
- Roll Evenly: Uneven dough leads to uneven baking—thicker parts stay soft, thinner parts burn. Using a silicone mat with grid lines or a ruler helps keep things uniform.
- Watch the Oven Closely: Since the cookie is so large, oven hotspots can cause uneven browning. Rotate the pan halfway through baking if your oven is quirky.
- Royal Icing Consistency Matters: For outlining, thicker icing is best to hold edges; for flooding (filling in), thin the icing slightly. Practice piping on parchment paper to get a feel.
- Don’t Skip Cooling: Decorating a warm cookie causes icing to melt and run, turning your masterpiece into a mess.
- Use Gel Food Coloring: Gel colors provide vibrant hues without watering down the icing, which can affect drying and texture.
- Patience is Key: Let each color dry before piping the next to prevent colors running into each other.
Honestly, the first time I tried this, I rushed the icing and it was a smudgy disaster. Lesson learned: slow down, and your giant flag cookie will look like a pro’s handiwork.
Variations & Adaptations
This recipe is a blank canvas for your creativity. Here are some ways to make it your own:
- Dietary Tweaks: Use almond or coconut flour for a gluten-free version, or substitute butter with vegan margarine for a plant-based cookie. Just remember, texture might vary slightly.
- Seasonal Flair: For Christmas, swap the colors for red and green stripes with white stars, or for Halloween, use orange and black icing with fun shapes.
- Flavor Twists: Add lemon zest to the dough for a citrusy zing, or swap vanilla extract for peppermint during the holidays.
- Cooking Method: If your oven is small, bake the dough in two smaller cookie sheets as rectangles and piece them together when decorating.
- Personal Variation: One summer, I added tiny edible silver beads along the stripes for a bit of sparkle—it was a hit at the party!
Serving & Storage Suggestions
Serve the Perfect Giant Flag Cookie at room temperature, right at the center of your party table. It pairs wonderfully with cold lemonade, iced tea, or a creamy vanilla milkshake for the kids. If you want to really impress, slice it into neat squares or rectangles and arrange on a decorated platter.
Store leftovers in an airtight container at room temperature for up to 5 days. If your party runs long, the cookie freezes well—wrap tightly in plastic wrap and foil, then thaw at room temperature before serving. Reheat slightly in a warm oven (about 300°F/150°C for 5 minutes) to refresh the soft texture.
Keep in mind, the flavors meld beautifully after a day, and the icing hardens just enough to give a pleasant snap when you bite in. Trust me, this cookie tastes even better the next day.
Nutritional Information & Benefits
One large slice (about 1/12 of the cookie) contains approximately:
| Calories | 280 |
|---|---|
| Fat | 12g |
| Carbohydrates | 38g |
| Protein | 3g |
| Sugar | 22g |
This cookie isn’t exactly health food, but it’s made with real butter and eggs, which provide some protein and essential fats. Using pure vanilla and almond extracts adds flavor without artificial additives. For those watching gluten or dairy, the substitutions shared earlier make this recipe accessible without losing the festive feel.
From a personal perspective, this cookie fits perfectly into a balanced lifestyle: a special treat that brings people together, which in itself is a kind of wellness.
Conclusion
The Perfect Giant Flag Cookie Party Centerpiece is more than just a dessert—it’s a celebration on a baking sheet. It’s simple enough to make without stress, yet impressive enough to be the star of your holiday table or any festive occasion. I love how it brings everyone together, whether it’s kids eagerly reaching for a slice or neighbors complimenting the effort (and flavor!).
Give it a shot, tweak it your way, and don’t worry if it’s not flawless the first time. Baking giant cookies is as much about the joy and memories as the final bite. I’d love to hear how your cookie turns out or any creative spins you add—drop a comment below or share your photos!
Here’s to sweet moments and giant cookies that bring a little extra cheer to your celebrations.
FAQs
How do I prevent my giant cookie from cracking?
Chilling the dough well before rolling and baking helps prevent cracks. Also, avoid rolling the dough too thin or handling it roughly when transferring to the baking sheet.
Can I make the cookie dough ahead of time?
Absolutely! You can prepare and chill the dough up to 2 days in advance. Just keep it wrapped tightly in the fridge until ready to roll out.
What if I don’t have royal icing ingredients?
You can use store-bought decorating icing or make a simple glaze with powdered sugar and milk for a less detailed finish, though it won’t harden as well as royal icing.
Can I bake this cookie in parts instead of one giant sheet?
Yes, baking in two or more smaller sheets and assembling them when decorating works fine. Just be sure to join and decorate carefully for a seamless look.
How long does the decorated cookie last?
Stored in an airtight container at room temperature, it stays fresh for up to 5 days. For longer storage, freeze wrapped well and thaw before serving.
Pin This Recipe!
Perfect Giant Flag Cookie Recipe Easy Homemade Party Centerpiece Idea
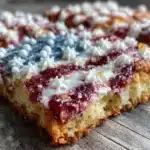
A fun and festive giant sugar cookie decorated like a star-spangled flag, perfect as a party centerpiece for celebrations like the Fourth of July. Easy to make with simple pantry ingredients and decorated with royal icing.
- Prep Time: 1 hour 15 minutes
- Cook Time: 22 minutes
- Total Time: 1 hour 37 minutes
- Yield: 12 servings 1x
- Category: Dessert
- Cuisine: American
Ingredients
- 3 cups (360g) all-purpose flour, sifted
- 1 teaspoon baking powder
- ½ teaspoon salt
- 1 cup (227g) unsalted butter, softened (room temperature)
- 1 ¼ cups (250g) granulated sugar
- 2 large eggs, room temperature
- 2 teaspoons vanilla extract
- ½ teaspoon almond extract (optional)
- 3 cups (360g) powdered sugar, sifted (for royal icing)
- 3 tablespoons meringue powder (for royal icing)
- 6 tablespoons warm water (for royal icing)
- Red and blue gel food coloring
Instructions
- Mix Dry Ingredients: In a medium bowl, whisk together 3 cups (360g) sifted all-purpose flour, 1 teaspoon baking powder, and ½ teaspoon salt. Set aside.
- Cream Butter and Sugar: In a large bowl, beat 1 cup (227g) softened unsalted butter and 1 ¼ cups (250g) granulated sugar with an electric mixer on medium speed until light and fluffy, about 3-4 minutes.
- Add Eggs and Extracts: Beat in 2 large eggs, one at a time, followed by 2 teaspoons vanilla extract and ½ teaspoon almond extract. Mix until combined but do not overbeat.
- Combine Dry and Wet: Gradually add the flour mixture into the butter mixture, mixing on low speed until just incorporated. The dough will be thick and slightly sticky.
- Chill Dough: Wrap the dough in plastic wrap and refrigerate for at least 1 hour.
- Preheat Oven and Prepare Sheet: Preheat oven to 350°F (175°C). Line a large rimmed baking sheet with parchment paper or a silicone mat.
- Roll Out Dough: Lightly flour work surface and rolling pin. Roll dough into a rectangle roughly 15×20 inches and about ¼ inch (6mm) thick. Transfer dough carefully onto prepared baking sheet using a dough scraper.
- Bake: Bake for 18-22 minutes, until edges turn golden brown but center is still soft. Cookie will firm up as it cools.
- Cool Completely: Let cookie cool on baking sheet for 15 minutes, then transfer to wire rack to cool completely.
- Prepare Royal Icing: In a bowl, combine 3 cups (360g) powdered sugar, 3 tablespoons meringue powder, and 6 tablespoons warm water. Beat on medium speed until stiff peaks form, about 5-7 minutes. Divide icing into 3 bowls; tint one red, one blue, and leave one white.
- Decorate: Using piping bags with small round tips, pipe horizontal red and white stripes across the cookie, leaving a blue square in the top left corner. Pipe white stars onto the blue section. Let icing dry completely, about 3-4 hours or overnight.
Notes
Chill dough well to prevent cracking and spreading. Roll dough evenly for uniform baking. Watch oven closely to avoid uneven browning. Use gel food coloring for vibrant colors without thinning icing. Let each color dry before piping the next to prevent smudging. If royal icing is too thick, add water a teaspoon at a time; if too thin, add powdered sugar. Dough can be prepared and chilled up to 2 days ahead. Store leftovers in airtight container at room temperature up to 5 days or freeze wrapped tightly.
Nutrition
- Serving Size: 1 large slice (about
- Calories: 280
- Sugar: 22
- Fat: 12
- Carbohydrates: 38
- Protein: 3
Keywords: giant cookie, flag cookie, sugar cookie, party centerpiece, Fourth of July, patriotic dessert, royal icing, easy cookie recipe