Love this? Save it for later!
Share the inspiration with your friends
Last 4th of July, I found myself scrambling through the grocery store aisles, trying to find a fun party treat that would impress both the kids and the adults without sending anyone spinning from alcohol overload. Honestly, I wasn’t sure if I could pull off something festive yet family-friendly. Then, while juggling a basket full of picnic essentials, I spotted these tiny plastic cups and thought, “What if I made layered jello shots—but totally virgin?”
That’s how these Festive Red White Blue Layered Jello Shots came to life. It turns out, layering jello in patriotic colors isn’t just for the grown-ups with booze — it’s a total crowd-pleaser for all ages. I’ll admit, my first attempt was a bit messy (I got a little impatient and the layers mixed), but after a few tries, I nailed the perfect separation and the most vibrant colors that popped against the sunshine of that backyard barbecue.
Maybe you’ve been there too—wanting to bring something that’s playful, colorful, and just a little bit nostalgic to your party table without the fuss or the hangover. These virgin jello shots do just that. They’re fun to make, easy on the budget, and honestly, they bring out a grin from everyone who tries them. Let me tell you, there’s something about that first spoonful of cool, wobbly red, white, and blue that makes you pause and smile. That’s why I keep making them year after year.
Why You’ll Love This Recipe
After testing dozens of jello variations, these Festive Red White Blue Layered Jello Shots quickly became my go-to for any holiday or party that calls for a splash of fun without the alcohol. Here’s why this recipe stands apart from the rest:
- Quick & Easy: You can whip these up in about 30 minutes of hands-on time, with chilling in between layers. Perfect for last-minute party prep or spontaneous celebrations.
- Simple Ingredients: No fancy or hard-to-find items here — just basic gelatin mixes and fruit juices you probably already have in your pantry.
- Perfect for All Ages: Since they’re virgin, these jello shots are great for kid-friendly events, baby showers, or anyone avoiding alcohol.
- Eye-Catching and Festive: The distinct red, white, and blue layers make them an instant conversation starter and photo-worthy addition to your spread.
- Customizable Flavors: You can swap out juices to match your taste or dietary needs without losing that classic layered look.
What makes this recipe different? It’s the way the layers set just right—soft but firm, with a smooth texture that melts in your mouth without feeling rubbery. I use a little trick to soften the white layer so it’s creamy and not chalky, which honestly was a game changer for me. This isn’t just another jello shot; it’s a friendly, festive treat that feels like a party in your mouth without any of the fuss or worry.
What Ingredients You Will Need
This recipe relies on simple, straightforward ingredients that work together to create those vibrant layers you see on the party table. Each component plays a role in the flavor and texture, making sure every bite is delicious and visually stunning.
- Red Layer:
- 1 package (3 oz / 85 g) strawberry or cherry flavored gelatin (I like Jell-O for consistent color and flavor)
- 1 cup (240 ml) boiling water
- ½ cup (120 ml) cold water
- White Layer:
- 1 package (3 oz / 85 g) unflavored gelatin
- 2 cups (480 ml) milk (whole or 2% for creaminess; can substitute with coconut milk for dairy-free)
- ⅓ cup (67 g) granulated sugar
- 1 tsp vanilla extract
- Blue Layer:
- 1 package (3 oz / 85 g) blue raspberry flavored gelatin
- 1 cup (240 ml) boiling water
- ½ cup (120 ml) cold water
- Additional:
- Small clear plastic shot cups or mini dessert cups (about 2 oz / 60 ml capacity)
- Optional: fresh fruit pieces like blueberries or sliced strawberries for garnish
Pro tip: For the white layer, I recommend using a trusted brand of unflavored gelatin like Knox, and make sure to bloom the gelatin properly for the smoothest texture. If you want to make this gluten-free, all these gelatin packets are typically safe, but double-check the packaging just to be certain. Also, in summer, swapping fresh berries in the red or blue layer can add a natural sweetness and extra flavor punch.
Equipment Needed
- Measuring cups and spoons – Accurate liquid measurement is key for perfect gelatin layers.
- Mixing bowls – At least two, for preparing red and blue gelatin separately, plus one for the white layer.
- Whisk or spoon – For stirring gelatin until fully dissolved.
- Small clear plastic shot cups or mini dessert cups – I like using disposable ones for easy cleanup, but reusable silicone ones work too.
- Refrigerator space – You’ll need enough room to chill the cups flat for about 20 minutes per layer.
- Optional: small ladle or syringe – Makes layering the gelatin easier and less messy (especially if you’re layering in tight spaces).
I remember once trying to pour the layers without a ladle and ended up with a big gelatin spill all over the counter—lesson learned! If you don’t have a ladle, a teaspoon works just fine; just take your time. And if you’re budget-conscious, any set of plastic shot glasses from a party supply store will do just fine.
Preparation Method
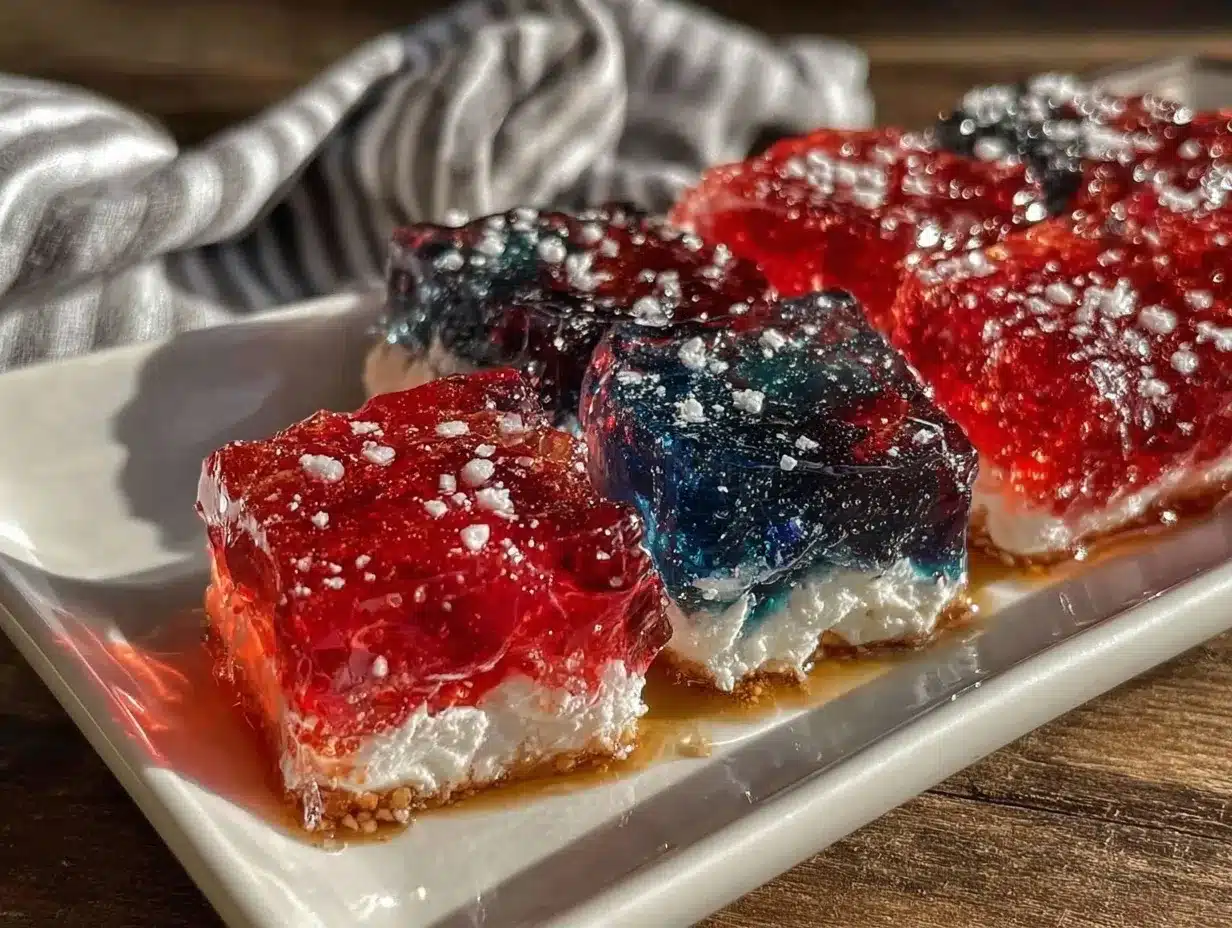
- Prepare the Red Layer: In a medium bowl, dissolve the strawberry or cherry gelatin powder in 1 cup (240 ml) boiling water. Stir well for about 2 minutes until completely dissolved. Add ½ cup (120 ml) cold water and mix. Pour about 2 tablespoons (30 ml) of this mixture into each shot cup. Refrigerate for 20-25 minutes or until set but still slightly tacky to the touch.
- Prepare the White Layer: While the red layer chills, bloom the unflavored gelatin by sprinkling it over ½ cup (120 ml) of cold milk. Let it sit for 5 minutes. Meanwhile, warm the remaining 1½ cups (360 ml) milk with sugar in a small saucepan over low heat, stirring until sugar dissolves. Remove from heat and stir in the bloomed gelatin and vanilla extract until fully dissolved. Let this mixture cool to room temperature (about 15 minutes).
- Add the White Layer: Once the red layer is set, gently pour about 2 tablespoons (30 ml) of the cooled white gelatin mixture over each cup. To avoid mixing layers, pour slowly over the back of a spoon held just above the red layer. Refrigerate for another 20-25 minutes until set but still slightly tacky.
- Prepare the Blue Layer: Repeat the gelatin dissolving process with the blue raspberry gelatin—1 cup (240 ml) boiling water, stir until dissolved, then add ½ cup (120 ml) cold water. Let it cool to room temperature (about 10-15 minutes).
- Finish with the Blue Layer: Slowly pour about 2 tablespoons (30 ml) of the blue gelatin mixture over the white layer using the spoon trick again. Refrigerate for at least 2 hours or until completely firm.
- Optional Garnish: Just before serving, top each jello shot with a blueberry or a small slice of strawberry for that extra festive flair.
Quick tip: Timing is everything here. Make sure each layer is set enough to hold the next layer but not fully firm so they stick together. If you rush, the colors will bleed, and you’ll lose that crisp, layered look.
Cooking Tips & Techniques
- Bloom gelatin properly: Always sprinkle your gelatin powder over cold liquid first and let it sit for a few minutes before adding warm liquid. This prevents clumps and ensures smooth texture.
- Pouring layers gently: Use the back of a spoon or a small ladle to pour layers slowly. This prevents the new layer from breaking through the previous one.
- Temperature matters: Let gelatin mixtures cool to room temperature before pouring layers. Pouring hot gelatin over set layers will melt them and ruin the effect.
- Patience is key: I know it’s tempting to speed up the process, but chilling each layer long enough guarantees those clean, crisp lines.
- Use consistent cup sizes: Using uniform shot cups means layers set evenly and look more professional.
- Experiment with flavors: I once swapped the blue raspberry for blueberry juice and it worked beautifully, just remember to adjust the sugar if your juice is less sweet.
Variations & Adaptations
- Dietary Variations: Use coconut milk or almond milk in place of dairy in the white layer to make these vegan-friendly (just swap gelatin for agar-agar powder, adjusting for firmness).
- Seasonal Twists: Replace the red gelatin with raspberry or watermelon for summer freshness, or even pomegranate for a richer hue.
- Flavor Boost: Add a splash of fresh lemon juice to the white layer for a subtle tang that cuts sweetness.
- Skip the Layers: For a simpler version, make single-color jello shots in red, white, or blue and arrange them in a tray to form a flag pattern.
- Personal Favorite: Once, I tried adding a thin layer of crushed pineapple between white and blue layers for a tropical surprise. It was a hit and gave a fun texture contrast!
Serving & Storage Suggestions
Serve these jello shots chilled straight from the fridge. They’re best enjoyed cold, so keep them refrigerated right up to serving time. Presentation-wise, arrange them on a festive tray or platter to highlight the colorful layers.
For a party, you can complement these with refreshing beverages like iced tea or lemonade, and they pair nicely with other finger foods like crispy garlic chicken or fresh fruit skewers for a balanced spread.
Store leftover jello shots covered in the fridge for up to 3 days. Avoid freezing, as the texture won’t hold up well. When reheating, just pop them back in the fridge; they don’t need to be warmed up but can soften slightly at room temperature for a few minutes before serving if preferred.
Flavors develop subtly over a day in the fridge, making them taste even better the next day. Just be mindful that the layers might soften slightly over time, so serve sooner rather than later for the best visual impact.
Nutritional Information & Benefits
Each shot contains roughly 60-80 calories, depending on the gelatin flavor and milk used. These festive jello shots are low in fat and provide a small dose of protein from gelatin. Using milk in the white layer adds calcium and vitamin D, making them a slightly more nourishing party treat than your average sugary snack.
They’re gluten-free and can be made dairy-free with milk substitutes to suit most dietary needs. Just watch for added sugars in flavored gelatin mixes if you’re watching your sugar intake.
Personally, I appreciate that these jello shots offer a fun, portion-controlled way to enjoy a sweet treat without going overboard, especially when you have a crowd with mixed ages and tastes.
Conclusion
These Festive Red White Blue Layered Jello Shots are the kind of recipe that turns any party into a celebration. They’re easy, colorful, and bring a smile to everyone’s face—without the alcohol fuss. Whether you’re hosting a backyard barbecue, a family picnic, or a holiday gathering, they add that perfect pop of fun and flavor.
Feel free to tweak the flavors or presentation to match your style, and don’t stress if your first batch isn’t perfect—the process is half the joy! I love how these shots bring everyone together, from the youngest cousins to the grandparents, with no one missing out on the fun.
Give them a try, and let me know how your party went in the comments. I’m always curious to hear your twists and stories!
Frequently Asked Questions
Can I make these jello shots ahead of time?
Yes! You can prepare them a day in advance and store them covered in the fridge. Just make sure they’re fully set before covering to keep the layers intact.
What if I don’t have unflavored gelatin for the white layer?
You can substitute with white-flavored gelatin like coconut or vanilla if you want a sweeter white layer, but the texture and sweetness will be different.
How do I prevent the layers from mixing?
Pour each new layer slowly over a spoon and wait until the previous layer is set but still slightly tacky to help layers stick together without bleeding.
Can I use agar-agar instead of gelatin?
Yes, but agar-agar sets differently and more firmly. You’ll need to adjust the quantities and timing, and it might not have the same wobbly texture.
What are some fun ways to serve these jello shots?
Try arranging them in a flag pattern on a large tray or topping each with a small fruit piece like a blueberry or strawberry slice for extra flair.
Pin This Recipe!
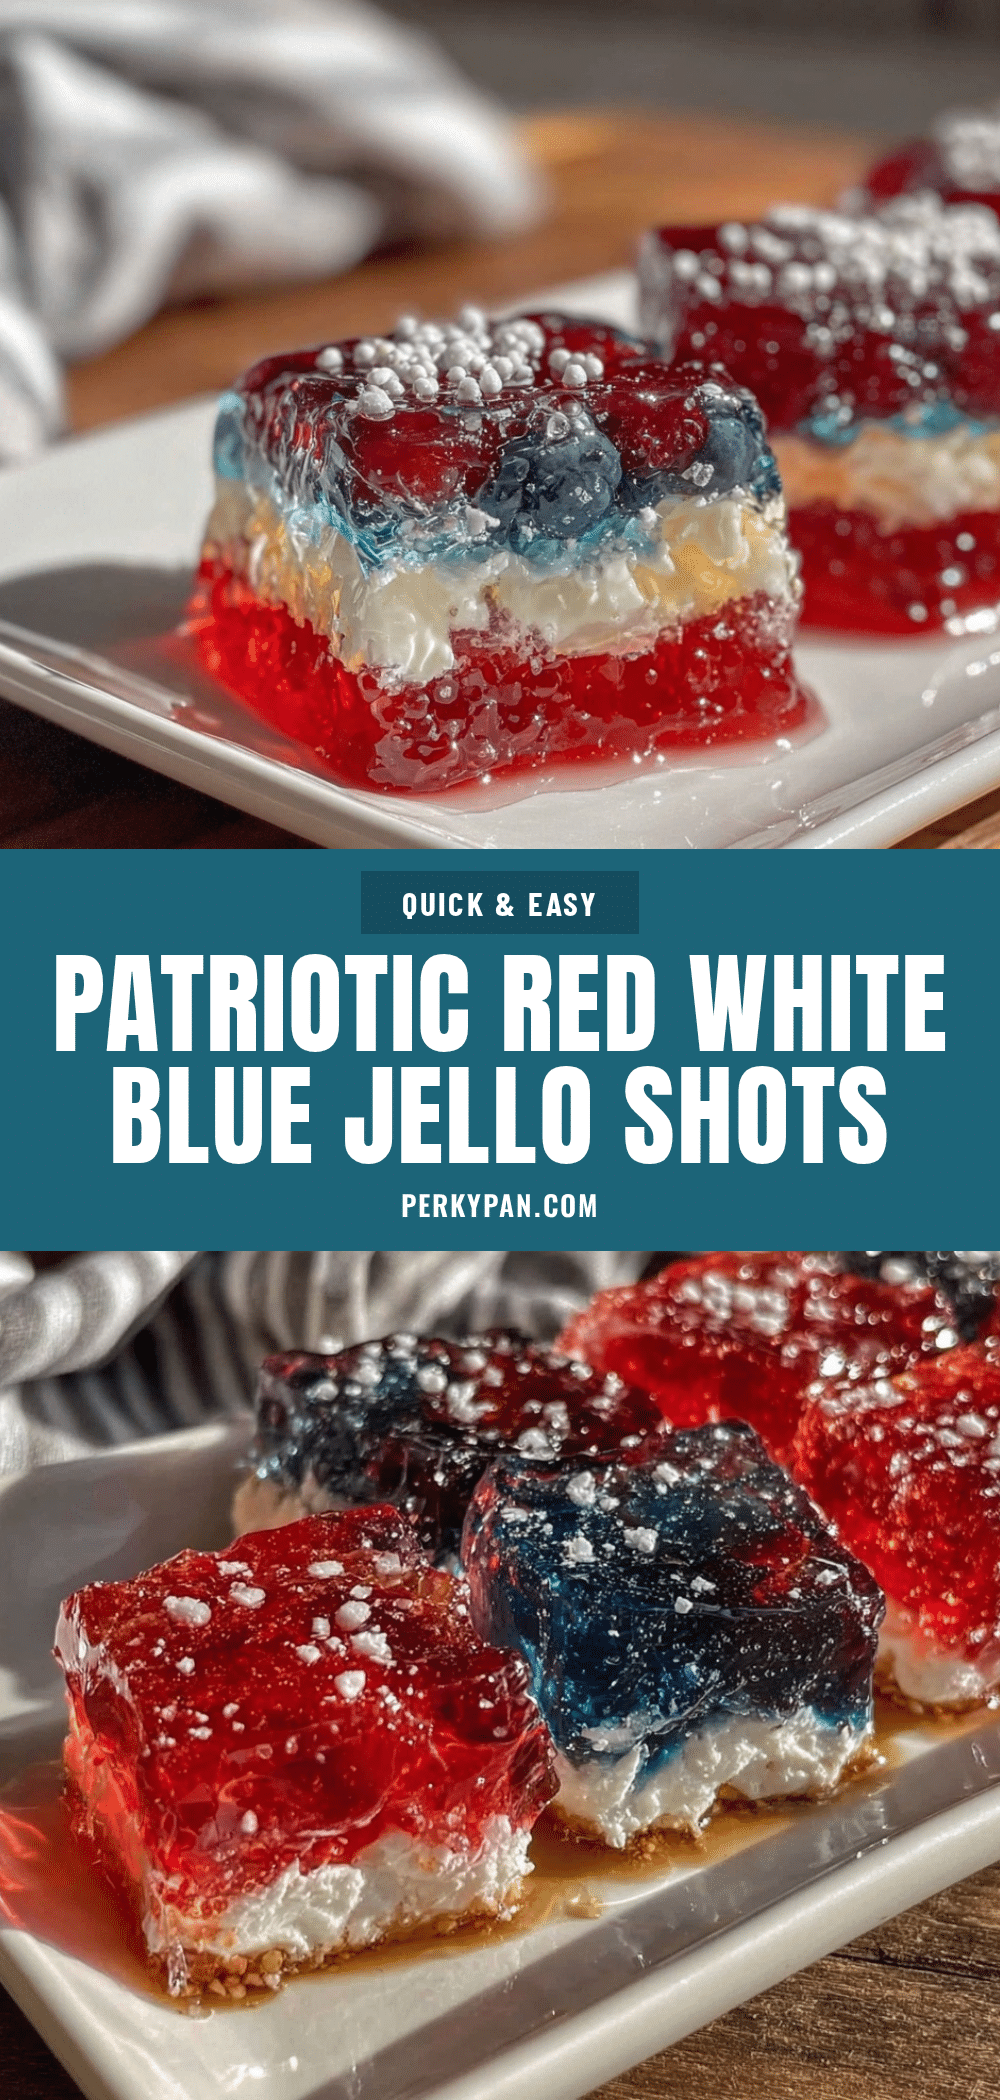
Festive Red White Blue Layered Jello Shots Easy Virgin Party Treats
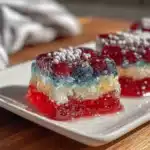
These festive red, white, and blue layered jello shots are a fun, alcohol-free party treat perfect for all ages. They feature vibrant layers with a creamy white middle and are easy to make with simple ingredients.
- Prep Time: 15 minutes
- Cook Time: 15 minutes
- Total Time: 3 hours 15 minutes
- Yield: 12 servings 1x
- Category: Dessert
- Cuisine: American
Ingredients
- 1 package (3 oz / 85 g) strawberry or cherry flavored gelatin
- 1 cup (240 ml) boiling water
- ½ cup (120 ml) cold water
- 1 package (3 oz / 85 g) unflavored gelatin
- 2 cups (480 ml) milk (whole or 2%, or coconut milk for dairy-free)
- ⅓ cup (67 g) granulated sugar
- 1 tsp vanilla extract
- 1 package (3 oz / 85 g) blue raspberry flavored gelatin
- 1 cup (240 ml) boiling water
- ½ cup (120 ml) cold water
- Small clear plastic shot cups or mini dessert cups (about 2 oz / 60 ml capacity)
- Optional: fresh fruit pieces like blueberries or sliced strawberries for garnish
Instructions
- Prepare the Red Layer: Dissolve strawberry or cherry gelatin powder in 1 cup boiling water, stir for 2 minutes until dissolved. Add ½ cup cold water and mix. Pour about 2 tablespoons (30 ml) into each shot cup. Refrigerate 20-25 minutes until set but tacky.
- Prepare the White Layer: Bloom unflavored gelatin over ½ cup cold milk for 5 minutes. Warm remaining 1½ cups milk with sugar over low heat until sugar dissolves. Remove from heat, stir in bloomed gelatin and vanilla extract until dissolved. Cool to room temperature (~15 minutes).
- Add the White Layer: Pour about 2 tablespoons (30 ml) of cooled white gelatin mixture slowly over the back of a spoon onto the red layer. Refrigerate 20-25 minutes until set but tacky.
- Prepare the Blue Layer: Dissolve blue raspberry gelatin in 1 cup boiling water, stir until dissolved, add ½ cup cold water. Cool to room temperature (10-15 minutes).
- Finish with the Blue Layer: Pour about 2 tablespoons (30 ml) of blue gelatin mixture slowly over the white layer using the spoon trick. Refrigerate at least 2 hours until completely firm.
- Optional Garnish: Top each jello shot with a blueberry or small strawberry slice before serving.
Notes
Bloom gelatin properly by sprinkling over cold liquid before adding warm liquid to avoid clumps. Pour layers slowly over the back of a spoon to prevent mixing. Let each layer set until tacky but not fully firm for best adhesion. Use consistent cup sizes for even layers. Can substitute coconut or almond milk and agar-agar for vegan versions, adjusting firmness and texture accordingly. Fresh berries can be added for extra flavor and garnish.
Nutrition
- Serving Size: One 2 oz (60 ml) jel
- Calories: 70
- Sugar: 13
- Sodium: 50
- Fat: 1
- Saturated Fat: 0.5
- Carbohydrates: 15
- Protein: 2
Keywords: jello shots, layered jello, virgin jello shots, party treats, 4th of July dessert, kid-friendly dessert, festive jello, red white blue dessert