Love this? Save it for later!
Share the inspiration with your friends
It was 10 PM on a random Wednesday, and I needed to decorate something. Not the house, not the tree—that wasn’t even up yet. I mean, I needed to decorate a cookie. A weird, specific craving hit me for those soft, pillowy sugar cookies you get at the bakery, but with the kind of royal icing that dries hard and shiny. The problem? I didn’t have any fancy cookie cutters for leaves, and my butter was cold as a rock. But I had a sharp paring knife, a stubborn streak, and the memory of my neighbor Carol’s annual Thanksgiving cookie swap. She always brings these incredible leaf-shaped cookies, and I figured, honestly, how hard could it be to make my own? I grabbed a stick of butter and started hacking away at it with a fork to soften it—a move my grandmother would have scolded me for. But you know that feeling when you just have to make something with your hands? That was me, standing in my kitchen in my pajamas, determined to create the best Thanksgiving sugar cookies with royal icing leaves I could manage without a proper plan.
Let me tell you, the first batch was a disaster. The dough was too sticky, the “leaves” I cut with my knife looked more like sad potatoes, and I may have accidentally used salted butter instead of unsalted. I almost threw the whole bowl in the sink. But then I took a deep breath, added a little more flour, and tried again. By 11:30 PM, I had a tray of slightly lopsided but undeniably charming leaf cookies cooling on the counter. The royal icing? I made it too thin at first, and it ran right off the cookie onto the parchment paper. Round two was better. By midnight, I was piping little veins onto maple leaves and feeling like a total pro. That’s the thing about late-night baking—the rules loosen up. You stop worrying about perfection and start enjoying the process. And honestly, those imperfect, handmade cookies ended up being the hit of Carol’s swap. Someone even asked if I’d taken a class. Nope, just a Wednesday night and a craving.
Why You’ll Love This Recipe
These aren’t just any sugar cookies. These are the kind that make your kitchen smell like vanilla and butter for hours, the kind that earn you genuine compliments from people who “don’t bake.” Here’s why this recipe is different from the dozens of others out there:
- Simple, Budget-Friendly Ingredients: You probably have everything in your pantry right now. No expensive almond flour, no obscure extracts. Just butter, sugar, flour, eggs, and a few pantry staples. This is a recipe designed for home cooks feeding a family on a sensible budget.
- No Chilling Required: I know, it sounds like a lie. But this dough is sturdy enough to roll out immediately. No waiting for hours while your kids ask when the cookies will be ready. You can have cookies in the oven in under 15 minutes.
- Perfect for Picky Eaters: Let’s face it—Thanksgiving can be a minefield of unfamiliar flavors for kids. These cookies are a safe, familiar landing pad. They’re sweet, buttery, and fun to decorate. Even the cousin who “doesn’t like pie” will eat three of these.
- Royal Icing That Actually Works: I’ve tested this icing a dozen times. It dries hard, doesn’t crack, and holds its shape for piping intricate leaf veins. No more runny messes or sticky fingers.
- Leftovers Reheat Beautifully: Made too many? No problem. These cookies freeze like a dream. Pop them out for a last-minute dessert or a school bake sale.
What makes this my best version is the texture. The cookie itself is soft in the center with a slightly crisp edge—the holy grail of sugar cookies. The royal icing sets up with a beautiful matte finish that looks professional without the stress. And the flavor? It’s pure, nostalgic comfort. The kind of cookie that makes you close your eyes after the first bite and remember baking with your mom.
What Ingredients You Will Need
This recipe uses simple, wholesome ingredients to deliver bold flavor and satisfying texture without the fuss. Everything is easy to find at your local grocery store, and most items are pantry staples you likely already have on hand.
For the Sugar Cookies
- 2 ¾ cups (345g) all-purpose flour – Spoon and level it for accuracy. Too much flour makes dense cookies. I prefer Gold Medal for consistent results.
- 1 teaspoon baking powder – Helps the cookies rise slightly and stay soft.
- ½ teaspoon salt – Balances the sweetness. Use fine sea salt.
- 1 cup (226g) unsalted butter, softened – Must be at room temperature. If you forgot to take it out, microwave it for 10 seconds at a time, flipping it over. Do not melt it.
- 1 cup (200g) granulated sugar – Regular white sugar gives the best texture.
- 1 large egg, room temperature – Cold egg will seize the butter. Leave it on the counter for 30 minutes.
- 2 teaspoons vanilla extract – Pure vanilla, not imitation. It makes a real difference in flavor.
- ½ teaspoon almond extract (optional) – Adds a subtle, bakery-style flavor. I use it every time now.
For the Royal Icing
- 3 cups (360g) powdered sugar, sifted – Sifting prevents lumps. Trust me on this one.
- 2 large egg whites, room temperature – Or use 3 tablespoons meringue powder mixed with 4 tablespoons water for a safer option.
- 1 teaspoon lemon juice or vanilla extract – Lemon juice brightens the flavor and helps the icing set.
- Gel food coloring – Liquid coloring will thin the icing. I recommend Americolor or Wilton gels in autumn shades like warm brown, burnt orange, and golden yellow.
For Decoration
- Leaf-shaped cookie cutters – A set of 3 different sizes is ideal. I found mine at a dollar store.
- Piping bags or zip-top bags – Snip a tiny corner for precision.
- Piping tips (#2 or #3) – Optional but helpful for fine details.
- Edible glitter or sanding sugar (optional) – Adds a festive touch.
Equipment Needed
- Stand mixer or hand mixer – A hand mixer works fine, but a stand mixer makes creaming butter and sugar effortless. I’ve used both.
- Rolling pin – Even thickness is key. If you don’t have one, a wine bottle works in a pinch. I’ve been there.
- Parchment paper – Non-negotiable for easy cleanup and preventing sticking.
- Baking sheets – Light-colored metal sheets prevent over-browning. Dark sheets can burn the bottoms.
- Cooling rack – Air circulation is crucial for even cooling. Stack two racks if you’re baking in batches.
- Sifter or fine-mesh strainer – For the powdered sugar. A strainer works just as well.
- Small offset spatula – Helpful for spreading icing, but a butter knife will do.
Preparation Method
Step 1: Make the Cookie Dough
In a medium bowl, whisk together the flour, baking powder, and salt. Set aside. In a large bowl, beat the softened butter and granulated sugar together on medium speed until light and fluffy—about 3 minutes. Scrape down the sides of the bowl. Add the egg, vanilla extract, and almond extract (if using). Beat until combined, about 1 minute. The mixture should look creamy and smooth.
Gradually add the dry ingredients to the wet ingredients, mixing on low speed just until the dough comes together. Do not overmix, or the cookies will be tough. The dough should be soft but not sticky. If it feels too sticky, add 1 tablespoon of flour at a time until it pulls away from the bowl.
Step 2: Roll and Cut the Dough
Lightly flour your work surface and rolling pin. Divide the dough in half. Roll one half to about ¼-inch thickness. If the dough sticks, dust a little more flour underneath. Use your leaf-shaped cookie cutters to cut out shapes. Press straight down and lift straight up—don’t twist, or the edges will be distorted. Transfer the cutouts to a parchment-lined baking sheet, spacing them about 1 inch apart.
Gather the scraps, gently press them together, and re-roll once. Do not re-roll more than once, or the cookies will become tough. Repeat with the second half of dough.
Step 3: Bake the Cookies
Preheat your oven to 350°F (175°C). Bake the cookies for 8-10 minutes, or until the edges are just barely golden. The centers should look set but not browned. For softer cookies, bake for 8 minutes. For slightly crispier edges, go to 10 minutes. Let the cookies cool on the baking sheet for 5 minutes, then transfer them to a cooling rack to cool completely. Do not ice warm cookies—the icing will melt and slide right off.
Step 4: Prepare the Royal Icing
In a clean, grease-free bowl, beat the egg whites (or meringue powder mixture) with the lemon juice until frothy. Gradually add the sifted powdered sugar, beating on low speed until combined. Increase speed to medium-high and beat for 5-7 minutes, until the icing is thick, glossy, and holds stiff peaks. The icing should be thick enough that when you lift the beater, the ribbon of icing holds its shape for a few seconds before slowly sinking back into the bowl.
Step 5: Color and Thin the Icing
Divide the icing into separate bowls for each color. Add gel food coloring a tiny drop at a time, mixing thoroughly until you reach your desired shade. For autumn leaves, I use warm brown, burnt orange, golden yellow, and a touch of deep red. Cover the bowls with a damp paper towel to prevent the icing from drying out.
For flooding (filling in the cookies), thin a portion of each color by adding water a few drops at a time until the icing flows like honey and smooths out within 10 seconds. For piping details (like veins), leave some icing thick—it should hold a peak when you lift the spatula.
Step 6: Decorate the Cookies
Fit a piping bag with a #2 tip for outlining and a #3 tip for flooding. Outline each cookie with the thicker icing, then fill in the center with the thinner flooding icing. Use a toothpick to guide the icing into corners and pop any air bubbles. Let the flooded cookies sit for 10 minutes, then pipe leaf veins with the thicker icing in a contrasting color. Add edible glitter while the icing is still wet if desired.
Let the decorated cookies dry at room temperature for at least 4 hours, or overnight. The icing should be completely hard to the touch before stacking or storing.
Cooking Tips & Techniques
I’ve made these cookies at least twenty times, and I’ve learned a few things the hard way. Here are my best tips:
- Room temperature ingredients matter. Cold butter won’t cream properly, and cold egg will make the batter seize. Set everything out an hour before you start. I learned this after a batch of lumpy dough that baked into hockey pucks.
- Don’t overwork the dough. Overmixing develops gluten, which makes cookies tough. Mix just until the flour disappears. A few streaks are fine.
- Chill the cutouts if they’re too soft. If your kitchen is warm and the cutouts are losing their shape, pop the baking sheet in the fridge for 15 minutes before baking. This helps them hold their edges.
- Rotate your baking sheets halfway through. Ovens have hot spots. Rotating ensures even browning. I forgot once and had half a batch of burnt cookies.
- Keep royal icing covered. It dries out fast. When not using a bowl, cover it with a damp paper towel or plastic wrap pressed directly onto the surface.
- Practice piping on parchment paper first. Before you touch a cookie, practice your leaf veins on a piece of parchment. It saves a lot of frustration.
Variations & Adaptations
Dietary Variations
- Gluten-Free: Substitute the all-purpose flour with a 1:1 gluten-free baking blend that contains xanthan gum. I’ve used Bob’s Red Mill with great results. The texture is slightly more tender, but still delicious.
- Dairy-Free: Use vegan butter sticks (not tub margarine) in place of unsalted butter. Miyoko’s or Country Crock Plant Butter work well.
- Egg-Free Royal Icing: Use 3 tablespoons meringue powder mixed with 4 tablespoons water instead of egg whites. It’s safer for kids and pregnant women.
Flavor Variations
- Spiced Sugar Cookies: Add 1 teaspoon cinnamon, ½ teaspoon nutmeg, and ¼ teaspoon cloves to the dry ingredients. It gives the cookies a warm, Thanksgiving aroma.
- Citrus Sugar Cookies: Add 1 tablespoon lemon or orange zest to the butter-sugar mixture. Pair with a lemon royal icing for a bright twist.
- Chocolate Leaf Cookies: Replace ¼ cup of the flour with unsweetened cocoa powder. The dark cookies look stunning with gold or orange royal icing.
Different Cooking Methods
- Air Fryer: Preheat to 325°F (163°C). Bake cookies in a single layer in the air fryer basket for 5-7 minutes. Check at 5 minutes—air fryers run hot.
- Convection Oven: Reduce temperature by 25°F (15°C) and bake for 7-9 minutes. The cookies will brown more evenly.
Serving & Storage Suggestions
These cookies are best served at room temperature. Arrange them on a platter or cake stand for a stunning Thanksgiving dessert table. They pair beautifully with a hot cup of spiced apple cider or a warm mug of coffee. For a dessert board, arrange them alongside other Thanksgiving treats like mini pumpkin pies, pecan tarts, and chocolate truffles.
Storage: Store undecorated cookies in an airtight container at room temperature for up to 1 week. Decorated cookies can be stacked with parchment paper between layers after the icing has fully hardened (at least 8 hours). They stay fresh for up to 2 weeks.
Freezing: Undecorated baked cookies freeze beautifully for up to 3 months. Layer them in a freezer-safe container with parchment paper between each layer. Thaw at room temperature before decorating. Royal icing does not freeze well, so always ice after thawing.
Reheating: These cookies are best enjoyed at room temperature. If you prefer a warm cookie, pop an undecorated one in a 300°F (150°C) oven for 3-4 minutes. Do not microwave—it will make the cookie tough.
One thing I love about these cookies is that the flavors actually deepen over time. The vanilla and butter notes become more pronounced after a day or two. They’re one of the rare cookies that taste even better on day three.
Nutritional Information & Benefits
Per serving (1 cookie, based on 24 cookies):
- Calories: 185
- Fat: 8g
- Saturated Fat: 5g
- Carbohydrates: 27g
- Sugar: 18g
- Protein: 2g
- Sodium: 55mg
While these are definitely a treat, they offer some small nutritional benefits. The butter provides vitamin A for eye health, and the egg whites in the royal icing are a good source of protein. If you use the almond extract variation, you get a hint of vitamin E. For a slightly healthier twist, you can reduce the sugar in the cookie dough to ¾ cup without affecting the texture too much.
These cookies are naturally nut-free if you skip the almond extract, and the royal icing can be made without egg whites using meringue powder. Always check your labels if baking for someone with allergies.
Conclusion
These Thanksgiving sugar cookies with royal icing leaves are more than just a dessert—they’re a tradition waiting to happen. They’re the kind of cookie that brings people together, whether you’re decorating them with your kids on a rainy afternoon or arranging them on a platter for the big feast. The recipe is forgiving, the ingredients are simple, and the results are genuinely impressive.
I love this recipe because it reminds me that baking doesn’t have to be perfect to be wonderful. Those first sad, potato-shaped leaves taught me that the joy is in the process. So go ahead—make a mess, pipe a wobbly vein, and eat a cookie that’s still warm from the oven. You deserve it.
I’d love to hear how yours turn out. Leave a comment below with your favorite leaf color combination or tag me in your photos on Pinterest. Happy baking, and happy Thanksgiving!
Frequently Asked Questions
Can I make the dough ahead of time?
Absolutely. Wrap the dough tightly in plastic wrap and refrigerate for up to 3 days. Let it sit at room temperature for 10 minutes before rolling. You can also freeze the dough for up to 3 months.
Why did my royal icing crack?
Cracking usually happens when the icing is too thick or the cookies are too dry. Make sure your flooding icing is thin enough to smooth out on its own. Also, don’t overbake the cookies—dry cookies absorb moisture from the icing and cause cracking.
Can I use store-bought cookie dough?
You can, but the texture won’t be the same. Homemade dough gives you that soft, buttery center that holds up to royal icing. Store-bought dough tends to spread more and lose its shape.
How do I get clean, sharp edges on my leaf cookies?
Chill the cutouts on the baking sheet for 15 minutes before baking. This helps the cookies hold their shape. Also, use sharp cookie cutters and press straight down without twisting.
Can I freeze decorated cookies?
It’s not recommended. Royal icing can become sticky or weep when thawed. Instead, freeze undecorated cookies and ice them after thawing. The cookies taste just as fresh.
Pin This Recipe!

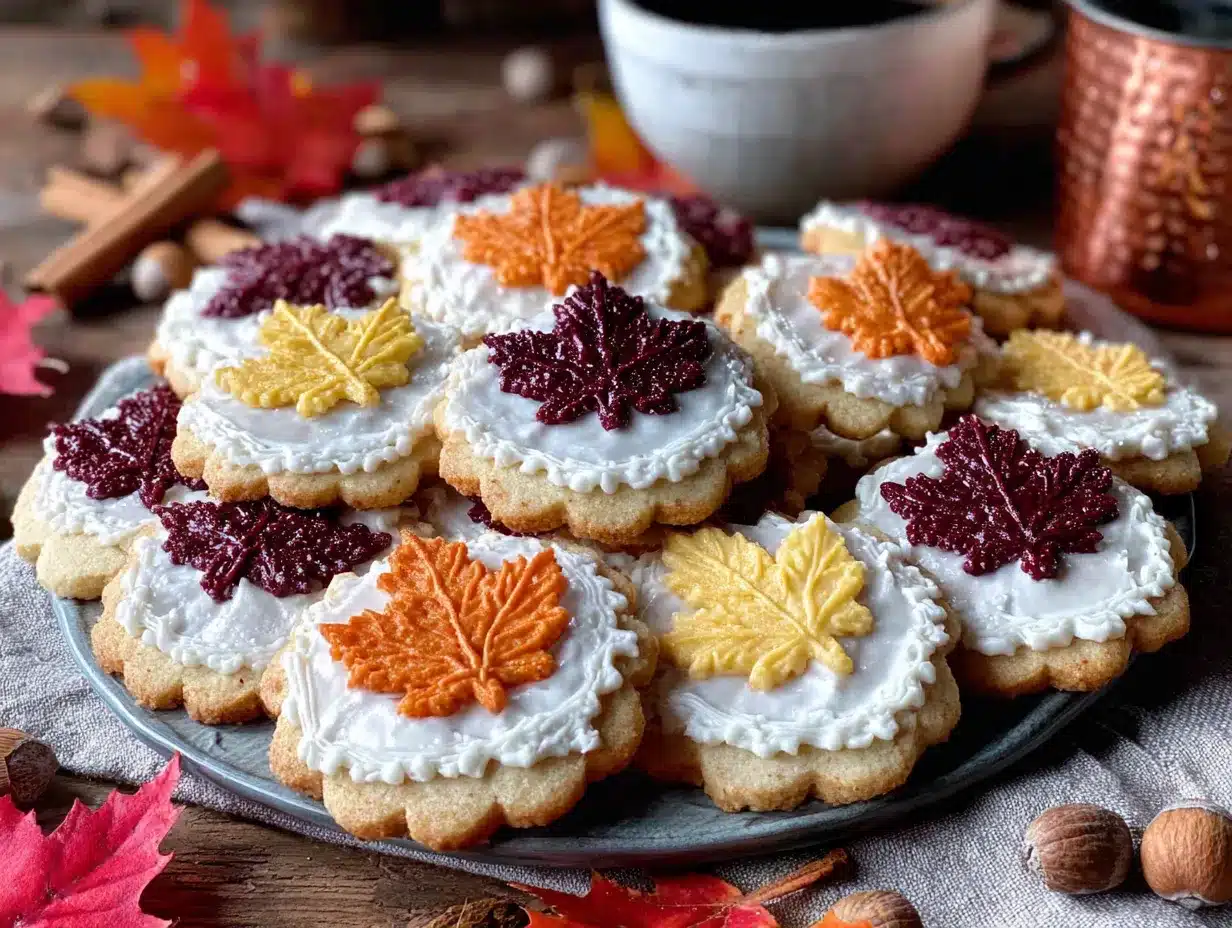
Easy Thanksgiving Sugar Cookies with Royal Icing Leaves

Soft, buttery sugar cookies with a slightly crisp edge, decorated with beautiful royal icing leaves. Perfect for Thanksgiving dessert tables, cookie swaps, or a fun family baking activity.
- Prep Time: 30 minutes
- Cook Time: 10 minutes
- Total Time: 45 minutes (plus 4 hours drying time)
- Yield: 24 servings 1x
- Category: Dessert
- Cuisine: American
Ingredients
- 2 ¾ cups (345g) all-purpose flour
- 1 teaspoon baking powder
- ½ teaspoon fine sea salt
- 1 cup (226g) unsalted butter, softened
- 1 cup (200g) granulated sugar
- 1 large egg, room temperature
- 2 teaspoons pure vanilla extract
- ½ teaspoon almond extract (optional)
- 3 cups (360g) powdered sugar, sifted
- 2 large egg whites, room temperature (or 3 tablespoons meringue powder mixed with 4 tablespoons water)
- 1 teaspoon lemon juice or vanilla extract
- Gel food coloring (warm brown, burnt orange, golden yellow, deep red)
- Leaf-shaped cookie cutters (set of 3 sizes)
- Piping bags or zip-top bags
- Piping tips (#2 or #3)
- Edible glitter or sanding sugar (optional)
Instructions
- In a medium bowl, whisk together flour, baking powder, and salt. Set aside.
- In a large bowl, beat softened butter and granulated sugar on medium speed until light and fluffy, about 3 minutes. Scrape down sides.
- Add egg, vanilla extract, and almond extract (if using). Beat until combined, about 1 minute.
- Gradually add dry ingredients to wet ingredients, mixing on low speed just until dough comes together. Do not overmix.
- Lightly flour work surface and rolling pin. Divide dough in half. Roll one half to ¼-inch thickness.
- Use leaf-shaped cookie cutters to cut out shapes. Press straight down and lift straight up. Transfer to parchment-lined baking sheet, spacing 1 inch apart.
- Gather scraps, gently press together, and re-roll once. Repeat with second half of dough.
- Preheat oven to 350°F (175°C). Bake cookies for 8-10 minutes, until edges are just barely golden.
- Let cookies cool on baking sheet for 5 minutes, then transfer to cooling rack to cool completely.
- For royal icing: In a clean bowl, beat egg whites (or meringue powder mixture) with lemon juice until frothy. Gradually add sifted powdered sugar, beating on low until combined. Increase speed to medium-high and beat 5-7 minutes until thick, glossy, and holds stiff peaks.
- Divide icing into bowls for each color. Add gel food coloring a tiny drop at a time. Cover bowls with damp paper towel.
- For flooding, thin a portion of each color with water a few drops at a time until icing flows like honey. For piping details, leave some icing thick.
- Fit piping bag with #2 tip for outlining and #3 tip for flooding. Outline each cookie with thick icing, then fill with thin flooding icing. Use toothpick to guide icing and pop air bubbles.
- Let flooded cookies sit 10 minutes, then pipe leaf veins with thick icing in contrasting color. Add edible glitter if desired.
- Let decorated cookies dry at room temperature for at least 4 hours or overnight until icing is hard.
Notes
Room temperature ingredients are crucial for best results. Do not overmix dough. Chill cutouts for 15 minutes if dough becomes too soft. Keep royal icing covered with damp paper towel to prevent drying. Practice piping on parchment paper first. Cookies taste even better on day three as flavors deepen.
Nutrition
- Serving Size: 1 cookie
- Calories: 185
- Sugar: 18
- Sodium: 55
- Fat: 8
- Saturated Fat: 5
- Carbohydrates: 27
- Protein: 2
Keywords: Thanksgiving sugar cookies, royal icing leaves, leaf cookies, fall cookies, decorated sugar cookies, holiday baking, easy sugar cookies


