Love this? Save it for later!
Share the inspiration with your friends
It was 11:17 PM on a quiet Tuesday, and a serious craving for something crunchy and cheesy took over my kitchen. I didn’t have any pre-made crackers or those fancy seasoning packets you find in the store. But I did have a block of sharp cheddar, some flour, and a stubborn urge to make something homemade that would satisfy that late-night snack attack. Honestly, the idea that popped into my head felt a little wild—why not try making my own crispy Cheez-It style crackers right then and there? The best part? The kitchen was silent except for the faint hum of the fridge, and for once, I was cooking with no one watching or judging my experiment.
Now, let me tell you, this wasn’t a flawless process. I accidentally knocked over the flour jar mid-rollout and ended up with a dusted countertop that looked like a snowstorm hit. But that’s part of the charm, right? There’s something oddly satisfying about crafting these golden, sharp cheddar crackers in your own kitchen, especially when you realize they taste far better than the store-bought ones you grew up snacking on. Maybe you’ve been there—hungry at an odd hour, with limited ingredients, and just enough courage to try something new.
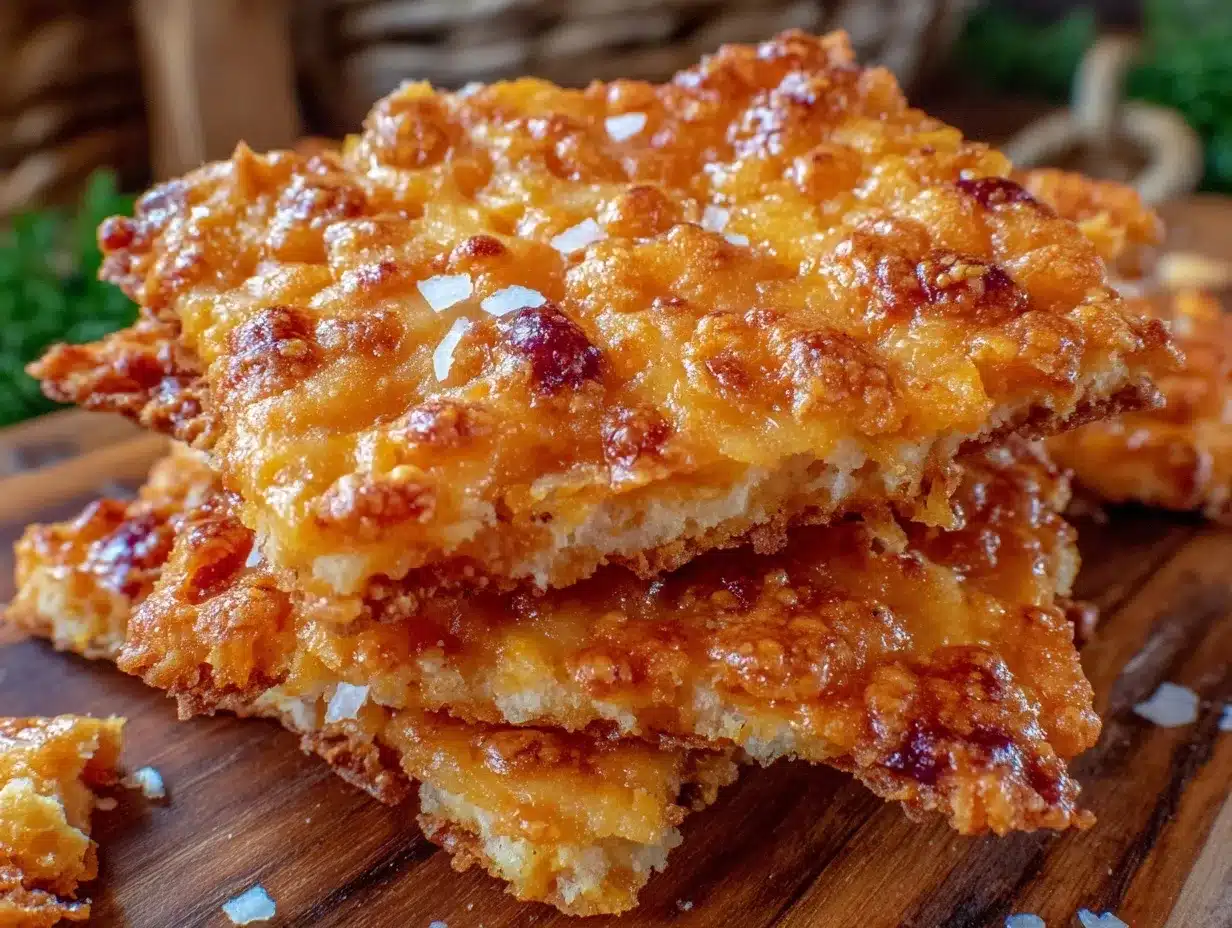
This recipe for crispy homemade Cheez-It crackers with sharp cheddar stuck with me ever since that night. It’s simple, quick, and makes the kitchen smell like a cheesy dream come true. Whether you’re craving a snack alone or want to impress a crowd with something homemade, these crackers hit the spot every time.
Why You’ll Love This Recipe
After many late-night trials and a few early morning tweaks, I can confidently say this recipe is a keeper. Here’s why it’s quickly become a favorite in my snack rotation:
- Quick & Easy: Comes together in about 30 minutes, perfect for those sudden snack cravings or last-minute party prep.
- Simple Ingredients: No need for specialty stores—flour, cheese, butter, and a few pantry basics are all you need.
- Perfect for Any Occasion: Whether you’re hosting a casual get-together or just want something to munch on during movie night, these crackers deliver.
- Crowd-Pleaser: Kids, adults, picky eaters—everyone asks for seconds because of that unbeatable crunchy-cheesy combo.
- Unbelievably Delicious: The sharp cheddar gives the crackers a punchy flavor while the crispy texture keeps you coming back for more.
This isn’t just another homemade cracker recipe. The key difference? I use a blend of sharp cheddar and a touch of kosher salt right in the dough, plus a quick chill before baking that locks in the crispiness. The result is a cracker that tastes like it’s straight from a gourmet snack shop, but honestly, it’s made in your own oven. It’s comfort food with a little sass—a snack that makes you pause and savor every bite, maybe even close your eyes once or twice.
What Ingredients You Will Need
This recipe relies on a handful of straightforward, wholesome ingredients that deliver bold flavor and that signature crunchy texture without any fuss. Most are pantry staples, so you likely already have them on hand.
- All-purpose flour (1 ½ cups / 190 g) – Forms the base of the dough; for best texture, I prefer King Arthur Flour.
- Sharp cheddar cheese (1 cup / 110 g, finely shredded) – The star of the show; opt for a block cheese you can shred yourself for maximum flavor.
- Unsalted butter (¼ cup / 57 g, cold and cubed) – Adds richness and helps create that perfect flaky crunch.
- Cold water (3-4 tablespoons / 45-60 ml) – Helps bring the dough together without making it sticky.
- Kosher salt (½ teaspoon) – Enhances the cheese flavor and balances the dough.
- Smoked paprika (optional, ¼ teaspoon) – For a subtle smoky twist that pairs beautifully with cheddar.
Substitutions? If you’re after gluten-free crackers, almond flour will work but expect a slightly different texture—more crumbly but still tasty. For a dairy-free version, try vegan cheddar shreds and a plant-based butter. In summer, I sometimes swap sharp cheddar for a mix of cheddar and Parmesan for a more complex flavor.
Equipment Needed
Making these crispy homemade Cheez-It crackers doesn’t require anything fancy, which is part of the fun.
- Mixing bowl: A medium-sized bowl for combining ingredients.
- Box grater: Essential for shredding that block of sharp cheddar finely.
- Rolling pin: For rolling out the dough thinly and evenly; a silicone one works great.
- Baking sheet: A rimmed sheet with parchment paper or a silicone baking mat to prevent sticking.
- Sharp knife or pizza cutter: To cut dough into perfect squares before baking.
- Fork: To prick each cracker, creating those classic little holes that help them bake evenly.
If you don’t have a rolling pin, a clean wine bottle or sturdy glass can do the trick. For grating cheese, a food processor with a grater attachment speeds things up, but I actually enjoy the manual method—it gives me time to savor the smell of sharp cheddar filling the kitchen. Keeping your butter cold is key; I recommend chilling your baking sheet before popping it in the oven to help the crackers stay crisp.
Preparation Method
- Grate the Cheese: Using a box grater, finely shred 1 cup (110 g) of sharp cheddar cheese. The finer the shred, the better the cheese will incorporate into the dough. (Time: 5 minutes)
- Mix Dry Ingredients: In a medium bowl, whisk together 1 ½ cups (190 g) all-purpose flour, ½ teaspoon kosher salt, and ¼ teaspoon smoked paprika if using. This ensures even seasoning. (Time: 2 minutes)
- Cut in Butter: Add the cold, cubed ¼ cup (57 g) unsalted butter to the flour mixture. Use a pastry cutter or your fingers to rub the butter into the flour until the mixture resembles coarse crumbs. The butter pieces should be pea-sized. (Time: 5 minutes)
- Add Cheese: Stir the shredded sharp cheddar into the flour and butter mixture, distributing it evenly. (Time: 1 minute)
- Form the Dough: Gradually add 3 to 4 tablespoons (45-60 ml) of cold water, mixing gently with a fork or your hands until the dough comes together but isn’t sticky. You might not need all the water. Handle the dough as little as possible to keep it tender. (Time: 3 minutes)
- Chill the Dough: Shape the dough into a flat disc, wrap it in plastic wrap, and refrigerate for at least 30 minutes. This step firms the butter and makes rolling easier. (Time: 30 minutes)
- Preheat Oven: Set your oven to 350°F (175°C) and line a baking sheet with parchment paper or a silicone mat. (Time: 10 minutes)
- Roll Out Dough: On a lightly floured surface, roll the chilled dough as thin as possible—about 1/8 inch (3 mm). The thinner, the crispier. (Time: 10 minutes)
- Cut and Dock Crackers: Using a sharp knife or pizza cutter, cut the dough into 1-inch (2.5 cm) squares. Use a fork to prick each square in the center, which helps steam escape and keeps crackers flat. (Time: 5 minutes)
- Transfer and Bake: Carefully transfer crackers to the prepared baking sheet, spacing them about ½ inch (1.25 cm) apart. Bake for 12-15 minutes or until golden and crispy. Keep an eye on them around the 12-minute mark to avoid burning. (Time: 15 minutes)
- Cool Completely: Remove crackers from oven and allow them to cool on a wire rack. They will crisp up further as they cool. (Time: 10 minutes)
Pro Tip: If your dough feels too soft to roll, pop it back in the fridge for another 10-15 minutes. Also, use a bench scraper to help lift the crackers from the work surface to the baking sheet without breaking.
Cooking Tips & Techniques
Making perfect crispy homemade Cheez-It crackers is a bit like a science experiment, but a tasty one. Here are some tips I’ve picked up from my many kitchen sessions:
- Keep Ingredients Cold: Cold butter and water help create flaky layers and prevent greasy dough. I like to chill my mixing bowl and tools too when possible.
- Don’t Overwork the Dough: Handle it gently and just enough to bring it together. Over-kneading develops gluten and makes crackers tough.
- Roll Thin: Thin dough equals crisp crackers. Roll it out evenly to avoid uneven baking.
- Docking is Essential: Those little fork holes aren’t just for looks—they keep crackers from puffing up and ensure even cooking.
- Watch the Oven: Oven temperatures vary. Start checking at 12 minutes and pull crackers as soon as they turn golden brown.
- Use Parchment or Silicone Mats: Prevents sticking and easy cleanup.
- Batch Baking: If you’re making a big batch, rotate your baking sheets halfway through so crackers bake evenly.
One time, I forgot to chill the dough and ended up with crackers that spread too much and lacked crunch—lesson learned! Also, multitasking works well here: while the dough chills, I prep a quick dip or slice some fresh veggies to go with the crackers.
Variations & Adaptations
This recipe is super flexible, which is one reason I keep coming back to it. Here are a few ways to switch things up:
- Spicy Kick: Add ¼ teaspoon cayenne pepper or a pinch of chili flakes to the dough for a little heat.
- Herb-Infused: Mix in dried rosemary, thyme, or chives for an aromatic twist that pairs well with cheese.
- Different Cheeses: Swap sharp cheddar for Gruyère, Parmesan, or a smoky smoked cheddar for unique flavor profiles.
- Gluten-Free: Use a gluten-free flour blend instead of all-purpose flour. Expect a slightly different texture but still delicious.
- Vegan Option: Replace butter with coconut oil and cheddar with a plant-based cheese alternative.
I’ve personally tried adding a sprinkle of nutritional yeast on top before baking for an extra cheesy boost. It’s a fun way to change up the flavor without much effort. Also, instead of cutting squares, you can cut the dough into triangles or use small cookie cutters for fun shapes—perfect for serving at parties.
Serving & Storage Suggestions
These crackers are best enjoyed fresh and crisp, but they keep well if stored properly. Here’s how to serve and store them like a pro:
- Serving Temperature: Serve at room temperature to get the full crunch and flavor. Warm crackers tend to be softer.
- Presentation Ideas: Pair with a creamy dip like spinach-artichoke or hummus, or alongside a charcuterie board featuring cured meats and pickles.
- Storage: Keep crackers in an airtight container at room temperature for up to a week. Avoid humidity to maintain crispiness.
- Freezing: You can freeze baked crackers in a sealed bag for up to 3 months. Thaw at room temperature and, if needed, pop them in a warm oven for a few minutes to refresh the crunch.
- Reheating: A quick 3-5 minute bake in a 325°F (160°C) oven revives crispness if crackers soften over time.
Flavors tend to deepen after a day or two, so if you can wait, you’ll notice a richer cheddar taste. Just don’t wait too long—these crackers disappear fast in my house!
Nutritional Information & Benefits
Here’s a rough estimate per serving (about 10 crackers):
| Calories | 140 kcal |
|---|---|
| Fat | 9 g |
| Carbohydrates | 12 g |
| Protein | 4 g |
| Sodium | 150 mg |
The sharp cheddar is a great source of calcium and protein, supporting bone health and muscle repair. Using real cheese instead of processed snacks means you’re getting fewer additives and more natural nutrients. This recipe can be tailored for gluten-free or vegan diets, making it accessible for many. Just remember, cheddar and butter are dairy-based, so this recipe isn’t suitable for those with dairy allergies unless modified.
Personally, I find these crackers a satisfying, homemade alternative to store-bought snacks that often contain preservatives and artificial flavors. They fit well into a balanced diet when enjoyed in moderation—and honestly, they just make snack time feel a little more special.
Conclusion
If you’re searching for a snack that’s crunchy, cheesy, and utterly addictive, these crispy homemade Cheez-It crackers with sharp cheddar are your new best friend. The recipe is straightforward enough for a spontaneous late-night baking session, yet sophisticated enough to impress guests or elevate your afternoon snack game. I love how the sharp cheddar flavor shines through every bite, making you forget those boxed crackers ever existed.
Feel free to tweak the seasonings or cheese based on what you have or what you like best. Homemade snacks like these are all about making the recipe your own. So grab that block of cheddar, dust off your rolling pin, and get ready for some seriously tasty crunch.
Remember to come back and share your own twists or questions—I’d love to hear how your batch turns out. Happy snacking!
Frequently Asked Questions
- Can I use pre-shredded cheese? You can, but freshly shredded cheese melts better and results in a superior texture.
- How thin should I roll the dough? About 1/8 inch (3 mm) thin—the thinner, the crispier the crackers.
- Can I add spices or herbs? Absolutely! Smoked paprika, cayenne, rosemary, or thyme work wonderfully.
- How do I store leftover crackers? Keep them in an airtight container at room temperature for up to a week.
- What if my crackers aren’t crispy enough? Try baking a few extra minutes or reheat them in a 325°F (160°C) oven for 3-5 minutes to crisp up.
Pin This Recipe!
Crispy Homemade Cheez-It Crackers Recipe with Sharp Cheddar

A quick and easy recipe for crispy, cheesy homemade Cheez-It style crackers using sharp cheddar cheese. Perfect for a crunchy snack or party appetizer.
- Prep Time: 15 minutes
- Cook Time: 15 minutes
- Total Time: 45 minutes
- Yield: About 40 crackers (10 crackers per serving, 4 servings) 1x
- Category: Snack
- Cuisine: American
Ingredients
- 1 ½ cups (190 g) all-purpose flour
- 1 cup (110 g) sharp cheddar cheese, finely shredded
- ¼ cup (57 g) unsalted butter, cold and cubed
- 3–4 tablespoons (45–60 ml) cold water
- ½ teaspoon kosher salt
- ¼ teaspoon smoked paprika (optional)
Instructions
- Grate the sharp cheddar cheese finely using a box grater.
- In a medium bowl, whisk together the all-purpose flour, kosher salt, and smoked paprika if using.
- Add the cold, cubed unsalted butter to the flour mixture and rub it in with a pastry cutter or fingers until the mixture resembles coarse crumbs with pea-sized butter pieces.
- Stir the shredded sharp cheddar cheese into the flour and butter mixture evenly.
- Gradually add cold water, 3 to 4 tablespoons, mixing gently until the dough comes together but is not sticky. Handle the dough as little as possible.
- Shape the dough into a flat disc, wrap in plastic wrap, and refrigerate for at least 30 minutes.
- Preheat the oven to 350°F (175°C) and line a baking sheet with parchment paper or a silicone baking mat.
- Roll out the chilled dough on a lightly floured surface as thin as possible, about 1/8 inch (3 mm).
- Cut the dough into 1-inch (2.5 cm) squares using a sharp knife or pizza cutter.
- Use a fork to prick each square in the center to prevent puffing during baking.
- Transfer the crackers to the prepared baking sheet, spacing about ½ inch (1.25 cm) apart.
- Bake for 12-15 minutes or until golden and crispy, checking at 12 minutes to avoid burning.
- Remove from oven and cool completely on a wire rack to crisp up further.
Notes
Keep ingredients cold to ensure flaky texture. Roll dough very thin for crispiness. Dock crackers with a fork to prevent puffing. Chill dough before rolling. Watch oven closely to avoid burning. Use parchment or silicone mats for easy cleanup. If dough is too soft, chill longer. Rotate baking sheets if baking in batches.
Nutrition
- Serving Size: About 10 crackers
- Calories: 140
- Sodium: 150
- Fat: 9
- Carbohydrates: 12
- Protein: 4
Keywords: Cheez-It crackers, homemade crackers, sharp cheddar crackers, crispy snack, easy snack recipe, cheesy crackers