Love this? Save it for later!
Share the inspiration with your friends
The neighborhood Halloween potluck was in six hours and I’d completely forgotten. Everyone else would be bringing elaborate things—a cauldron-shaped cake with dry ice smoke, a full charcuterie board shaped like a skeleton, even a batch of homemade caramel apples that apparently took two days. I had a box of brownie mix in the pantry, a bag of marshmallows from the last camping trip, and about twenty minutes before I needed to start getting the kids ready. I stood there, staring at the kitchen counter, feeling that particular brand of panic that comes with knowing you’re about to show up with something embarrassingly simple. “Okay,” I said out loud to no one, “what can I actually make?”
That’s when I spotted the white chocolate chips I’d bought for a recipe I never got around to making. And the pretzel sticks from snack duty. And honestly, that’s when the idea hit me—not a brilliant, planned-out idea, but more of a desperate, “let’s see what happens” kind of idea. I threw the brownies in the oven, melted marshmallows in the microwave (don’t judge, I was in a hurry), and started shaping little white chocolate ghosts. By the time I pulled the brownies out, the marshmallows had started to melt and drip in a way that looked… kind of creepy. And kind of perfect. I added some pretzel stick arms, a few candy eyes, and called it a day. I showed up late, slightly flustered, carrying a tray of what I’d mentally labeled “the panic brownies.”
You know that feeling when you’re sure everyone’s going to see right through your last-minute effort? Yeah, that was me. But here’s the thing—those brownies disappeared first. People kept coming back for “just one more” bite of the gooey, marshmallow-topped squares. Someone asked me for the recipe, then someone else, and by the end of the night, I’d written it down on a napkin three times. I mean, honestly, I felt a little sheepish about it. But that’s how this recipe was born—under pressure, with whatever I had on hand, and somehow becoming the thing everyone wanted. It’s the kind of happy accident that makes you trust your instincts a little more. And now, every Halloween, these cozy melting witch mummy brownies are the first thing I make. Not because they’re fancy, but because they taste like that night—warm, a little messy, and absolutely unforgettable.
Why You’ll Love This Recipe
Let me tell you why these brownies have become my go-to Halloween dessert. First off, they’re ridiculously easy to make. I’m talking box-mix-and-marshmallows easy, which means you can whip them up even when you’ve got a million other things going on. I’ve tested this recipe with homemade brownie batter too (because sometimes I get ambitious), and honestly, the box mix version holds its own perfectly. The marshmallows get all melty and gooey, creating that signature “melting witch” effect that makes everyone smile.
- Quick & Easy: From start to finish, you’re looking at about 35 minutes. That’s less time than it takes to decide what to watch on Netflix. Perfect for those “I need a Halloween treat right now” moments.
- Simple Ingredients: Brownie mix, marshmallows, white chocolate chips, pretzel sticks, and candy eyes. That’s it. No weird specialty items, no trips to three different stores. You probably have most of this stuff already.
- Perfect for Halloween Parties: These are the kind of brownies that make people stop and say, “Wait, how did you do that?” They look impressive, but you know the secret—they’re basically foolproof.
- Crowd-Pleaser: I’ve brought these to school events, office parties, and family gatherings. Kids love the gooey marshmallow and candy eyes. Adults love that they’re not overly sweet. Everyone wins.
- Unbelievably Delicious: The combination of fudgy brownie, toasted marshmallow, and crunchy pretzel is next-level comfort food. It’s like a s’more and a brownie had a Halloween baby.
What makes these brownies different from every other Halloween dessert out there? It’s the texture, honestly. The marshmallows melt into these little pools of gooey sweetness that get slightly crispy on the edges, while the brownie stays fudgy and rich. The pretzel sticks add that salty crunch that cuts through all the sweetness. And the white chocolate? It adds a creamy, vanilla-y note that ties everything together. I’ve tried other versions—using fondant, making homemade marshmallows, even attempting some fancy piping—but nothing beats the simplicity of this one. It’s comfort food reimagined for Halloween, and it’s the kind that makes you close your eyes after the first bite.
What Ingredients You Will Need
This recipe uses simple, everyday ingredients to create something that looks like it took hours. The magic is in how they come together, not in fancy components. Here’s what you’ll need:
For the Brownie Base
- 1 box (18 oz) fudge brownie mix (I recommend Ghirardelli or Duncan Hines for the fudgiest texture)
- 2 large eggs, room temperature
- 1/2 cup vegetable oil (or melted coconut oil for a slightly different flavor)
- 1/4 cup water (use milk instead for extra richness)
For the Melting Witch Mummy Topping
- 1 cup mini marshmallows (the smaller ones melt more evenly)
- 1 cup white chocolate chips (I like Ghirardelli or Toll House for smooth melting)
- 1 tablespoon coconut oil or vegetable shortening (helps the white chocolate melt smoothly)
- 24 pretzel sticks (the thin, salted kind work best)
- 24 candy eyes (you can find these in the baking aisle or online)
For Decoration (Optional but Fun)
- 1/4 cup powdered sugar (for dusting, makes it look extra spooky)
- Black gel icing (for drawing little witch hats or spiderwebs)
- Orange sprinkles (for a pop of Halloween color)
Let me share a few things I’ve learned about these ingredients. For the brownie mix, go with the fudge variety rather than the milk chocolate one. The fudge base is denser and holds up better to all the toppings. I’ve tried using the “chewy” style brownie mixes, and while they’re good, they don’t have that same rich, almost truffle-like texture that makes these brownies so satisfying. If you’re feeling ambitious, you can use your favorite homemade brownie recipe—just make sure it’s on the fudgier side.
For the marshmallows, mini ones are definitely the way to go. They melt faster and more evenly than the big ones, and they create those little pools of gooey goodness that make these brownies so special. I’ve tried using the giant marshmallows cut in half, and they just don’t melt the same way. Trust me on this one.
The white chocolate chips are another key player. Make sure you’re using real white chocolate (look for cocoa butter in the ingredients) rather than white baking chips, which don’t melt as smoothly. And that tablespoon of coconut oil? It’s not strictly necessary, but it makes the white chocolate much easier to drizzle and gives it a beautiful shine. If you don’t have coconut oil, vegetable shortening works just fine.
Equipment Needed
You don’t need a fancy kitchen to make these brownies, which is part of their charm. Here’s what you’ll need:
- 9×13 inch baking pan – This is the ideal size for getting that perfect brownie-to-topping ratio. If you use an 8×8 pan, your brownies will be thicker and need a few extra minutes of baking time.
- Parchment paper – A total lifesaver for easy removal. I always leave a little overhang on the sides so I can lift the whole thing out.
- Mixing bowls – One large one for the brownie batter, one small one for melting the white chocolate.
- Whisk and spatula – A whisk for the batter, a rubber spatula for folding and spreading.
- Microwave-safe bowl – For melting the white chocolate. You can also use a double boiler if you’re feeling fancy.
- Toothpicks or skewers – For testing doneness and for swirling the marshmallow topping.
- Cooling rack – Essential for letting the brownies cool evenly before you add the decorations.
I’ll be honest with you—I’ve made these brownies without half of these tools at various points. No parchment paper? Just grease the pan really well. No cooling rack? A cutting board works in a pinch. The only thing I really wouldn’t skip is the 9×13 pan, because the proportions really do matter here. I learned that the hard way when I used a smaller pan and ended up with brownies that were more like cake. Still delicious, but not quite the same.
Preparation Method
Alright, let’s get to the fun part. Here’s how to make these cozy melting witch mummy brownies:
- Preheat your oven to 350°F (175°C). Line your 9×13 inch baking pan with parchment paper, leaving a couple inches of overhang on the long sides. This will make lifting the brownies out so much easier later.
- Make the brownie batter. In a large bowl, combine the brownie mix, eggs, oil, and water. Stir with a whisk until just combined—about 30 to 40 strokes. Don’t overmix, or you’ll end up with tough brownies. A few lumps are totally fine. The batter should be thick and glossy.
- Pour the batter into the prepared pan. Use your spatula to spread it evenly into all the corners. Give the pan a gentle tap on the counter to release any air bubbles. This is one of those small steps that makes a difference—nobody wants a brownie with a big hole in the middle.
- Bake for 20 minutes. The brownies should look set around the edges but still slightly jiggly in the center. This is important because we’re going to add the marshmallows and bake them a bit more. If you overbake them now, they’ll be dry. I usually set a timer for 18 minutes and start checking from there.
- Add the marshmallows. Remove the pan from the oven and sprinkle the mini marshmallows evenly over the top. Don’t press them in—just let them sit on top of the partially baked brownie. Return the pan to the oven and bake for another 8 to 10 minutes, until the marshmallows are puffed and golden brown on top. Keep an eye on them, because marshmallows can go from perfectly toasted to burnt in about 30 seconds.
- Let the brownies cool. Transfer the pan to a cooling rack and let the brownies cool completely in the pan. This takes about 1 to 2 hours. I know it’s tempting to dig in right away, but the marshmallows need time to set, and the brownies need to firm up. Patience pays off here.
- Melt the white chocolate. Once the brownies are cool, place the white chocolate chips and coconut oil in a microwave-safe bowl. Microwave in 30-second intervals, stirring after each, until smooth and fully melted. This usually takes about 1 to 2 minutes total. Be careful not to overheat it, or the chocolate will seize up and get grainy.
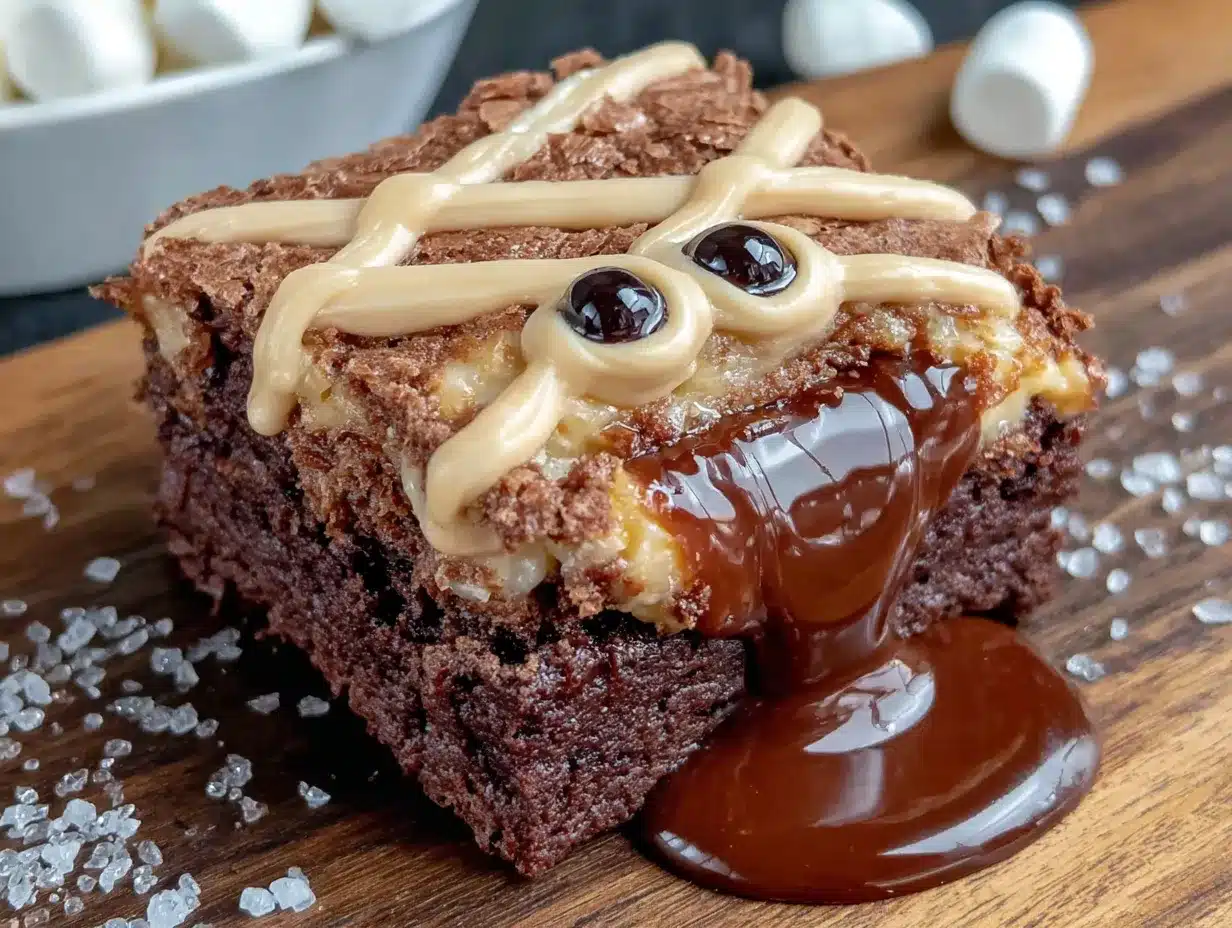
- Drizzle the white chocolate. Using a spoon or a small piping bag, drizzle the melted white chocolate over the cooled brownies in a zigzag pattern. This creates the “mummy” effect. Don’t worry about making it perfect—the messier it is, the more it looks like mummy bandages. I’ve found that a spoon works better than a piping bag for this, because you get those irregular, organic lines.
- Add the pretzel arms and candy eyes. While the white chocolate is still wet, press two pretzel sticks into each brownie square to look like arms. Then add two candy eyes. Work quickly, because the white chocolate sets fast. If it starts to harden, pop it back in the microwave for 10 seconds.
- Let everything set. Allow the white chocolate to fully set before cutting the brownies. This takes about 30 minutes at room temperature, or you can pop the pan in the fridge for 15 minutes if you’re in a hurry. Use the parchment paper overhang to lift the whole slab out of the pan, then cut into squares with a sharp knife.
One thing I’ve learned the hard way: cut the brownies with a sharp knife and wipe it clean between each cut. The marshmallow topping can get sticky, and if you don’t clean the knife, you’ll end up with ragged edges. A little trick I use is to spray the knife with non-stick cooking spray before cutting. It makes the whole process so much smoother.
Cooking Tips & Techniques
After making these brownies more times than I can count, I’ve picked up a few tricks that make a real difference. Let me share them with you:
Don’t overbake the brownies. This is the number one mistake I see people make. Brownies continue to cook after you take them out of the oven, so it’s better to pull them a minute or two early than to leave them in too long. You want them fudgy, not cakey. The toothpick test should come out with a few moist crumbs, not clean.
Toast the marshmallows carefully. Marshmallows are tricky little things. They puff up beautifully in the oven, but they can go from golden to charcoal in seconds. I recommend staying by the oven during the last few minutes of baking. If you see the marshmallows getting too dark on one side, rotate the pan. And if you want extra toasty flavor, you can use a kitchen torch to give them a quick blast after they come out of the oven.
Let the brownies cool completely. I know, I know—I said this already, but it’s worth repeating. If you try to cut these brownies while they’re still warm, the marshmallow topping will slide right off. I learned this the hard way when I was rushing to bring them to a party and ended up with a sticky mess. Give them the full cooling time, and you’ll be rewarded with clean, beautiful squares.
Use a hot knife for clean cuts. Run your knife under hot water, dry it off, and then make your cuts. The heat helps the knife glide through the marshmallow without sticking. Wipe the knife clean between each cut for the best results. It takes a little extra time, but the presentation is worth it.
Make ahead for better flavor. Here’s a secret: these brownies actually taste better the next day. The flavors meld together overnight, and the marshmallow topping sets into this wonderful chewy layer. I often make them a day ahead and store them in an airtight container at room temperature. Just add the white chocolate drizzle and decorations after they’ve cooled, and wait to cut them until you’re ready to serve.
One more thing—if you’re making these for a party, consider doubling the recipe. I’ve never, ever had leftovers. Not once. These brownies have a way of disappearing faster than you’d expect.
Variations & Adaptations
One of the best things about this recipe is how easy it is to customize. Here are some variations I’ve tried and loved:
Gluten-Free Version: Use a gluten-free brownie mix (King Arthur Flour makes an excellent one), and make sure your marshmallows and white chocolate chips are certified gluten-free. The rest of the ingredients are naturally gluten-free, so this is an easy swap. I’ve made these for friends with celiac disease, and they couldn’t tell the difference.
Vegan Option: Substitute the eggs with flax eggs (1 tablespoon ground flaxseed mixed with 3 tablespoons water per egg), use a vegan brownie mix, and opt for vegan marshmallows and dairy-free white chocolate. I’ve tested this version, and while the texture is slightly different, it’s still delicious. The key is to let the flax eggs sit for 5 minutes to thicken before adding them to the batter.
Peanut Butter Lovers: Swirl 1/4 cup of peanut butter into the brownie batter before baking. The peanut butter adds a salty, nutty flavor that pairs beautifully with the chocolate and marshmallow. I’ve also tried using almond butter and cookie butter, and they’re all fantastic.
Extra Spooky: Add a few drops of orange or green food coloring to the white chocolate drizzle for a more Halloween-themed look. You can also sprinkle edible glitter or black sanding sugar over the top while the white chocolate is still wet. My kids love this version—they call them “monster brownies.”
Different Candy Eyes: If you can’t find candy eyes, use M&Ms or chocolate chips turned upside down. You can also pipe little eyes with black gel icing. I’ve done all three, and honestly, the candy eyes are the most fun, but the alternatives work great in a pinch.
Frozen Treat: Pop the finished brownies in the freezer for about 30 minutes before serving. The cold brownie with the chewy marshmallow topping is a whole different experience. It’s especially good on warm fall days when you want something cool and sweet.
Serving & Storage Suggestions
These brownies are best served at room temperature, but honestly, they’re delicious at any temperature. Here are my favorite ways to serve them:
Presentation Ideas: Arrange the brownies on a platter lined with orange or black napkins for a festive look. Dust them with a little powdered sugar right before serving to make them look extra magical. I like to add a few extra candy eyes around the platter for a fun, spooky touch. If you’re serving these at a party, consider putting them on a cake stand to make them the centerpiece of your dessert table.
Pairing Suggestions: These brownies are amazing with a cold glass of milk, a scoop of vanilla ice cream, or a warm mug of hot chocolate. For an adult twist, try them with a glass of red wine or a spiked apple cider. The richness of the brownie pairs beautifully with something cold and creamy or something warm and spiced.
Storage Instructions: Store leftover brownies in an airtight container at room temperature for up to 3 days. If you stack them, place a piece of parchment paper between layers to prevent sticking. Do not refrigerate them, as the cold temperature can make the brownies dry out and the marshmallow topping become hard.
Freezing Tips: These brownies freeze beautifully. Cut them into individual squares, wrap each one tightly in plastic wrap, and place them in a freezer-safe bag. They’ll keep for up to 3 months. To thaw, let them sit at room temperature for about 30 minutes. The marshmallow topping will soften back to its original texture. I often make a double batch and freeze half for unexpected Halloween visitors.
Reheating: If you want that fresh-from-the-oven experience, pop a brownie in the microwave for 10 to 15 seconds. The marshmallow will get all gooey again, and the chocolate will soften. Just be careful not to overheat it, or the marshmallow can become too soft and runny.
One thing I’ve noticed is that these brownies actually develop better flavor after a day or two. The marshmallow topping sets into a chewy, almost caramel-like layer, and the brownie becomes even more fudgy. So don’t worry if you have leftovers—they’ll be just as good, if not better, the next day.
Nutritional Information & Benefits
Let’s be real—these are a treat, not a health food. But that doesn’t mean they can’t be part of a balanced diet. Here’s a rough nutritional breakdown for one brownie (based on 24 servings):
- Calories: Approximately 220-250 per serving
- Fat: 12g
- Carbohydrates: 32g
- Protein: 3g
- Sugar: 22g
- Sodium: 180mg
While these brownies aren’t exactly a health food, they do have a few redeeming qualities. The dark chocolate in the brownie mix contains antioxidants called flavonoids, which have been linked to heart health. The marshmallows provide a quick source of energy (hey, sometimes you need that). And the pretzel sticks add a little bit of sodium, which can help balance out all that sugar.
If you’re looking to make these a little healthier, you can use a sugar-free brownie mix, swap the vegetable oil for unsweetened applesauce, and use dark chocolate chips instead of white chocolate. I’ve tried this version, and while it’s not quite as indulgent, it’s still pretty darn good. The marshmallows and candy eyes are harder to substitute, but you can find sugar-free marshmallows at some specialty stores.
As always, these brownies contain common allergens including wheat, dairy, and soy. If you’re serving them at a party or event, it’s a good idea to label them so guests with allergies can make informed choices. I always put a little sign next to mine that lists the main ingredients.
Conclusion
These cozy melting witch mummy brownies have become a Halloween tradition in my house, and I hope they become one in yours too. They’re the kind of recipe that proves you don’t need fancy ingredients or hours of prep time to create something truly special. Whether you’re making them for a party, a school event, or just because you want a little Halloween magic in your life, these brownies deliver every single time.
What I love most about this recipe is how forgiving it is. You can customize it, adapt it, and make it your own. Maybe you’ll add extra marshmallows, or swap the pretzels for licorice strings, or use different colored candy eyes. That’s the beauty of it—there’s no wrong way to make these brownies. They’re meant to be fun, playful, and a little bit messy, just like Halloween itself.
So go ahead and give these a try. I’d love to hear how they turn out for you. Did you add your own twist? Did your kids help with the decorations? Did they disappear as fast as mine always do? Drop a comment below and share your experience. And if you’re looking for more Halloween treats, be sure to check out our spider web cupcakes and pumpkin patch dirt dessert. Happy Halloween, and happy baking!
Frequently Asked Questions
Can I use homemade brownie batter instead of a box mix?
Absolutely! I’ve tested this recipe with both box mix and homemade batter, and both work beautifully. If you’re using homemade batter, aim for a fudgy recipe rather than a cakey one. The key is to underbake it slightly so the brownies stay moist and dense. My favorite homemade version uses melted butter and cocoa powder for that rich, almost truffle-like texture.
How do I prevent the marshmallows from burning?
Keep a close eye on them during the last few minutes of baking. Marshmallows can go from perfectly toasted to burnt in about 30 seconds. I recommend setting a timer for 8 minutes when you add the marshmallows, then checking them every minute after that. If you see them getting too dark on one side, rotate the pan. And if you want extra control, you can use the broiler for the last minute or two, but watch them like a hawk.
Can I make these brownies ahead of time?
Yes, and honestly, they taste even better the next day. You can bake the brownies and add the marshmallows a day ahead. Let them cool completely, then store them in an airtight container at room temperature. Add the white chocolate drizzle and decorations just before serving. The marshmallow topping will set into a chewy, delicious layer overnight.
What can I use instead of candy eyes?
If you don’t have candy eyes, you have plenty of options. Use M&Ms (brown or white ones work best), chocolate chips turned upside down, or pipe little eyes with black gel icing. I’ve also used mini chocolate chips for a smaller, cuter look. The eyes are really just for decoration, so feel free to get creative with whatever you have on hand.
How do I store leftover brownies?
Store them in an airtight container at room temperature for up to 3 days. Place a piece of parchment paper between layers to prevent sticking. Do not refrigerate them, as the cold temperature can dry out the brownies and make the marshmallow topping hard. If you need to store them longer, freeze individual squares wrapped tightly in plastic wrap for up to 3 months.
Pin This Recipe!
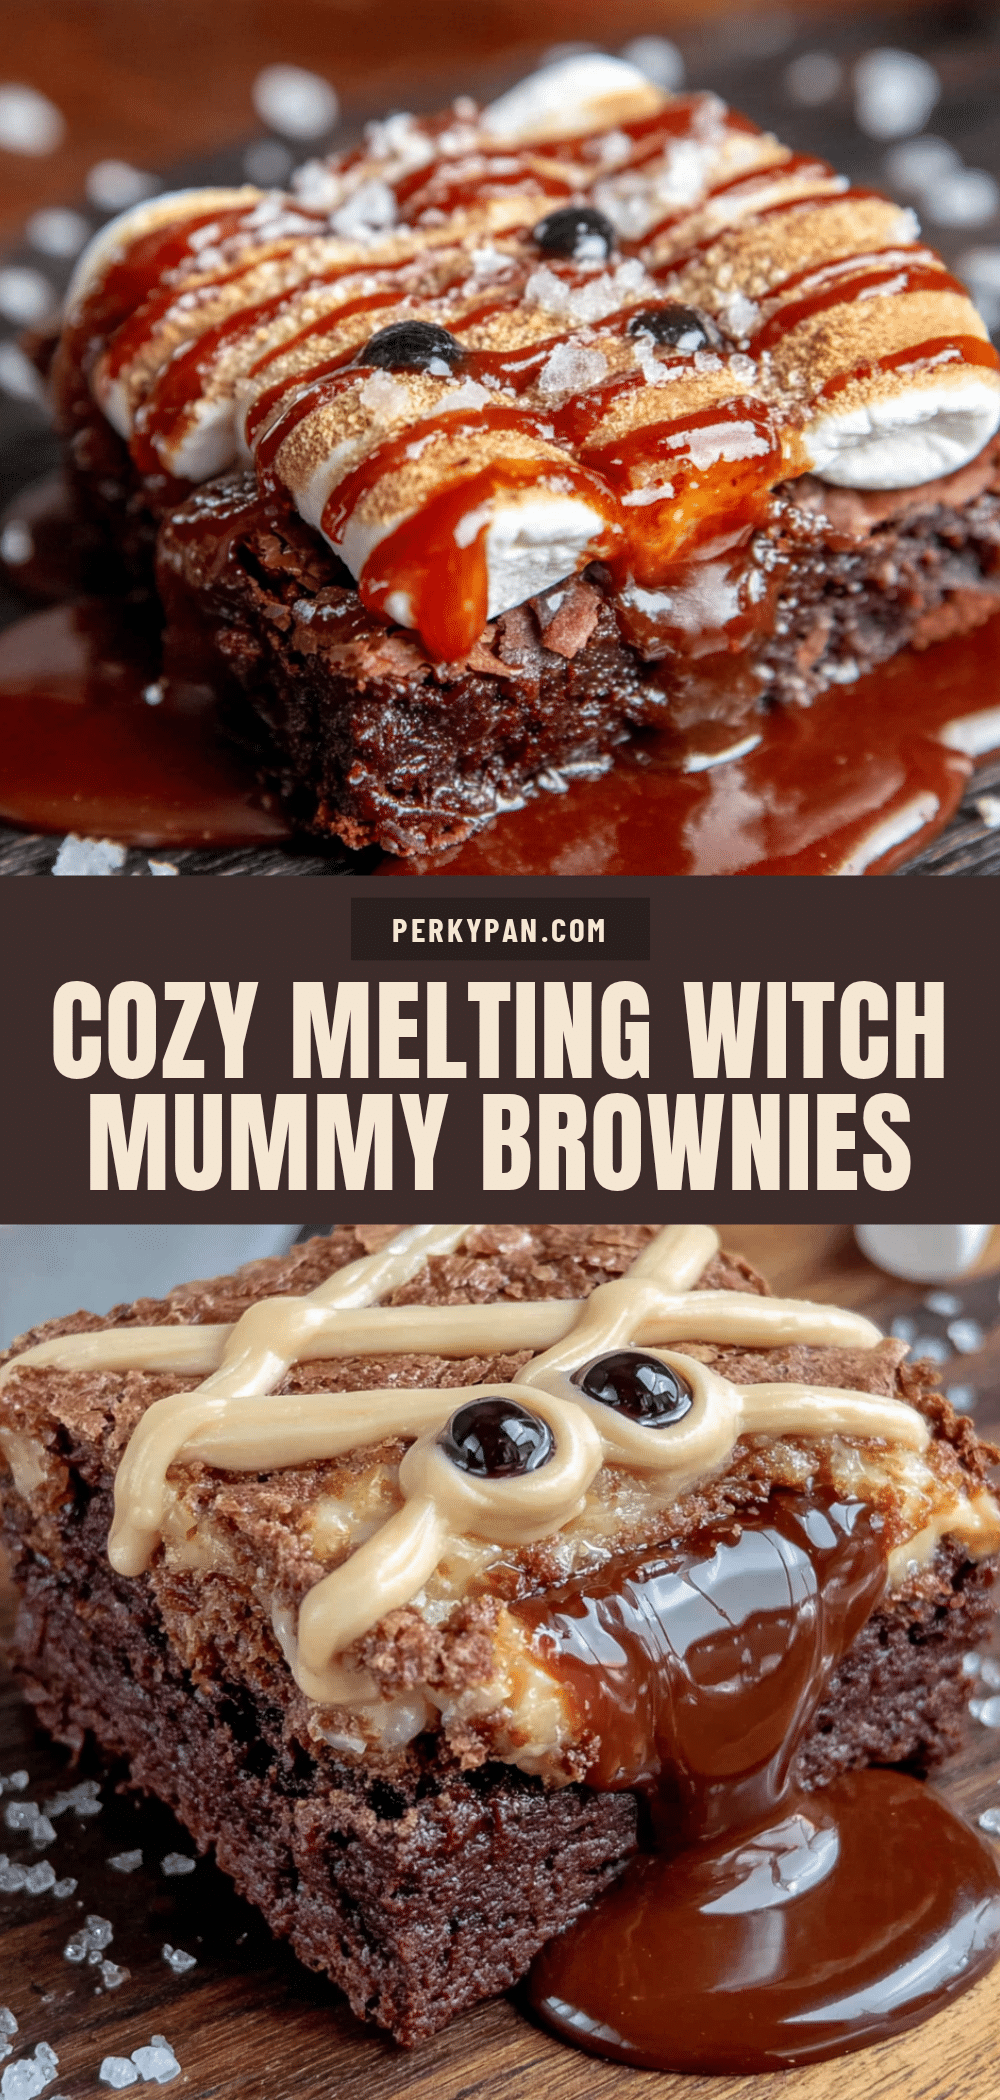
Cozy Witch Mummy Brownies: Best Melting Halloween Dessert
These easy, gooey brownies topped with melted marshmallows, white chocolate drizzle, pretzel arms, and candy eyes are the perfect last-minute Halloween treat that looks impressive but is incredibly simple to make.
- Prep Time: 15 minutes
- Cook Time: 30 minutes
- Total Time: 45 minutes
- Yield: 24 servings 1x
- Category: Dessert
- Cuisine: American
Ingredients
- 1 box (18 oz) fudge brownie mix (recommended: Ghirardelli or Duncan Hines)
- 2 large eggs, room temperature
- 1/2 cup vegetable oil (or melted coconut oil)
- 1/4 cup water (or milk for extra richness)
- 1 cup mini marshmallows
- 1 cup white chocolate chips (real white chocolate, not baking chips)
- 1 tablespoon coconut oil or vegetable shortening
- 24 pretzel sticks (thin, salted)
- 24 candy eyes
- 1/4 cup powdered sugar (optional, for dusting)
- Black gel icing (optional, for decoration)
- Orange sprinkles (optional, for decoration)
Instructions
- Preheat oven to 350°F (175°C). Line a 9×13 inch baking pan with parchment paper, leaving overhang on the long sides.
- In a large bowl, combine brownie mix, eggs, oil, and water. Stir with a whisk until just combined (about 30-40 strokes). Do not overmix.
- Pour batter into prepared pan and spread evenly. Tap pan gently on counter to release air bubbles.
- Bake for 20 minutes. Brownies should be set around edges but slightly jiggly in center.
- Remove pan from oven and sprinkle mini marshmallows evenly over top. Return to oven and bake for another 8-10 minutes, until marshmallows are puffed and golden brown.
- Transfer pan to a cooling rack and let brownies cool completely in the pan (about 1-2 hours).
- Once cool, place white chocolate chips and coconut oil in a microwave-safe bowl. Microwave in 30-second intervals, stirring after each, until smooth and fully melted (about 1-2 minutes total).
- Drizzle melted white chocolate over cooled brownies in a zigzag pattern to create a mummy effect.
- While white chocolate is still wet, press two pretzel sticks into each brownie square for arms and add two candy eyes. Work quickly.
- Let white chocolate set completely (about 30 minutes at room temperature or 15 minutes in the fridge). Use parchment overhang to lift brownies out, then cut into squares with a sharp knife.
Notes
For best results, do not overbake the brownies; they should be fudgy. Watch marshmallows closely during the last few minutes of baking to prevent burning. Let brownies cool completely before adding white chocolate and decorations. Use a hot knife or spray with non-stick spray for clean cuts. These brownies taste even better the next day.
Nutrition
- Serving Size: 1 brownie
- Calories: 235
- Sugar: 22
- Sodium: 180
- Fat: 12
- Saturated Fat: 4
- Carbohydrates: 32
- Fiber: 1
- Protein: 3
Keywords: Halloween brownies, mummy brownies, witch brownies, melting brownies, easy Halloween dessert, marshmallow brownies, white chocolate brownies, pretzel brownies, spooky brownies, last-minute Halloween treat