Love this? Save it for later!
Share the inspiration with your friends
I was supposed to be making a proper, sit-down dinner for my niece’s third birthday party. That was the plan. I had the mini casseroles prepped, the fruit salad chilling, and a fancy cake ordered from the bakery. Then the power went out at 3 PM on a rainy Saturday. The oven was useless, the stovetop was dead, and I had a house full of tiny, hungry party guests who were starting to get restless. I stood in my dark kitchen, staring at the fridge, feeling that familiar panic rising. What was I going to feed these kids?
I grabbed whatever I could find—cheese sticks, crackers, grapes, some lunch meat, and a bag of baby carrots. I tossed it all on a big wooden board, just to get it out of the way. My sister looked at the pile of snacks and said, “Well, it looks like a giant mess.” She wasn’t wrong. I started rearranging things, trying to make it look less like a disaster zone. I piled the crackers in the middle, lined up the cheese sticks like logs, and put the grapes in a little cluster. It still looked sad.
Then I looked at the clock—it was almost four—and I thought about Thanksgiving, which was just a few weeks away. On a whim, I grabbed a few slices of cheddar and cut them into feather shapes. I arranged them in a fan pattern behind the cracker pile. I used a pear for the body and a red pepper strip for the wattle. Honestly, I was just killing time. But when I stepped back, I saw it: a turkey. A goofy, edible, totally improvised turkey made of snack food. The kids lost their minds. They didn’t even ask about the cake for another hour. Maybe you’ve been there—when a total screw-up turns into the best part of the day. That’s how this recipe was born, and it’s why I keep making it, even when the power is on.
Why You’ll Love This Recipe
Let me tell you why this turkey-shaped charcuterie board is the best thing to happen to kids’ snacks since the invention of the juice box. I’ve tested this with my own picky eaters, my neighbor’s kids, and even a classroom of skeptical first graders. It passed every test with flying colors—and empty plates.
- Quick & Easy: You can throw this together in under 15 minutes. No cooking, no baking, no fancy tools. Just grab, arrange, and serve.
- Simple Ingredients: Everything comes from your fridge or pantry. No need to hunt down exotic cheeses or special crackers. You probably have most of it already.
- Perfect for Thanksgiving: This is the ultimate holiday appetizer for little ones. It keeps them busy and fed while the grown-ups wait for the big meal.
- Crowd-Pleaser: Kids love it because it’s fun to look at and eat. Adults love it because it’s easy and healthy-ish. Win-win.
- Unbelievably Delicious: The combination of salty crackers, creamy cheese, sweet fruit, and crunchy veggies hits every craving. It’s comfort food in snack form.
What makes this different from every other snack board out there? It’s the shape and the story. This isn’t just a pile of food—it’s a turkey. It’s interactive. Kids get to pick their own pieces and build their own mini snacks. Plus, you can customize it for any dietary need without losing the fun factor. It’s the kind of recipe that makes you feel like a kitchen hero, even when you started out feeling like a complete failure.
What Ingredients You Will Need
This recipe uses simple, everyday ingredients to create something magical. The key is variety—different colors, textures, and flavors make the turkey look amazing and keep kids interested. Here’s what you’ll need to build your bird:
For the Turkey Body
- 1 large pear or apple (any variety works, but a Bosc pear looks most like a turkey body)
- 1 small carrot, peeled (for the legs and beak)
- 1 red bell pepper strip (for the wattle—the red dangly bit under the beak)
- 2 candy eyes or small olive slices (for the face; candy eyes are more kid-friendly)
For the Feathers (Tail Section)
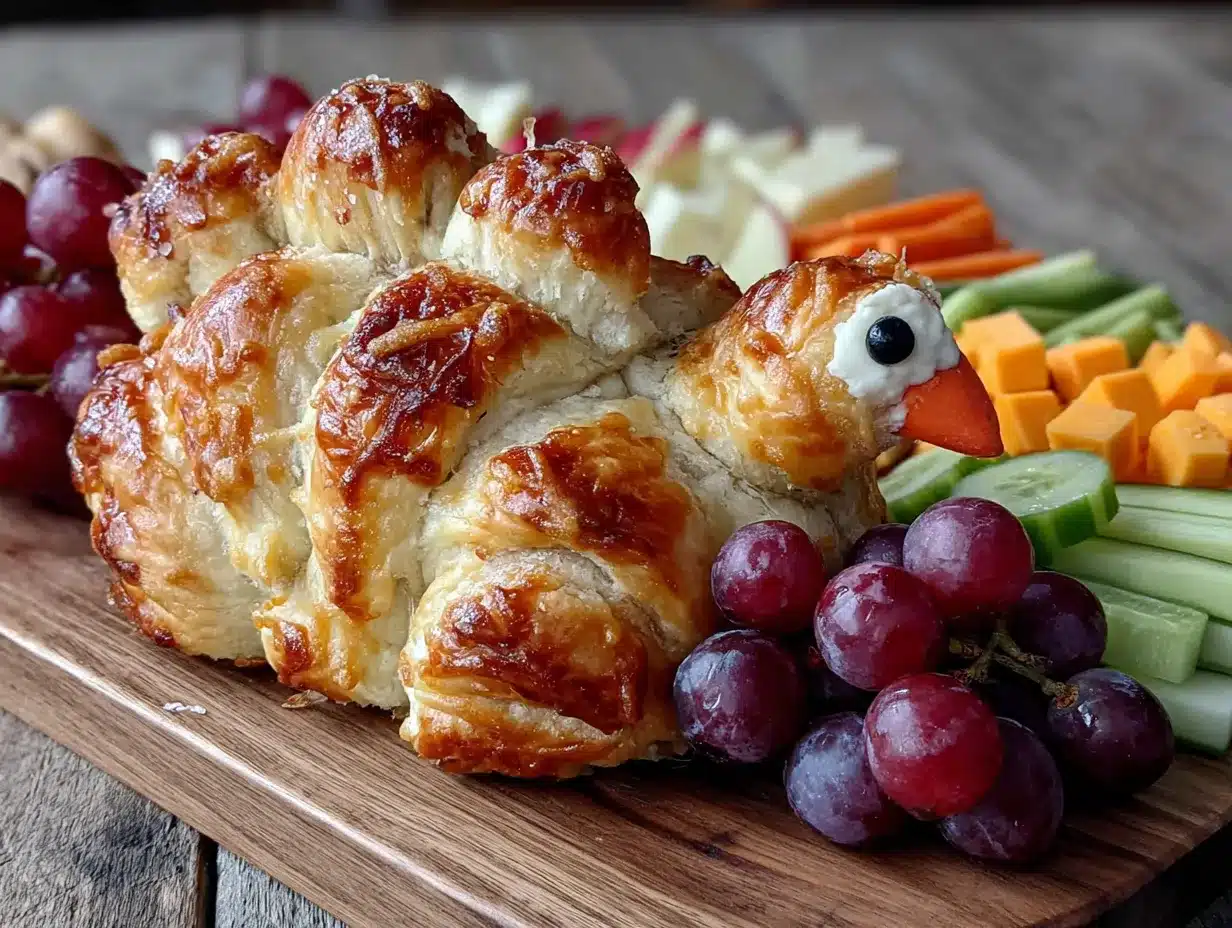
- 1 cup cheddar cheese slices (cut into feather shapes or triangles; I prefer sharp cheddar for flavor)
- 1 cup salami or turkey slices (rolled or folded into fan shapes)
- 1 cup pretzel sticks or breadsticks (these add crunch and structure)
- 1 cup cucumber rounds (slice them thin for a fresh, cool texture)
- 1 cup red and green grapes (halved lengthwise to prevent choking)
For the Base and Filler
- 1 large wooden board or platter (about 12×16 inches works well)
- 2 cups assorted crackers (I like a mix of buttery rounds and whole wheat squares)
- 1 cup cherry tomatoes (optional, for extra color)
- 1 cup cheese cubes (mozzarella or Colby Jack are good choices)
- Small bowl of ranch dip or hummus (for dipping; place it near the front of the board)
Ingredient Tips: I recommend using a firm pear so it holds its shape. For the cheese, look for pre-sliced cheddar to save time. If you’re serving toddlers, cut grapes and cherry tomatoes into quarters instead of halves. You can swap the salami for extra cheese or cucumber if you’re keeping it vegetarian. And honestly, you can use any crackers you have on hand—even the broken ones at the bottom of the box work fine for the base layer.
Equipment Needed
You don’t need much to make this board, which is part of the beauty. Here’s what I use every time:
- Large cutting board or serving platter: A wooden board looks rustic and cozy, but a large white platter works just as well. I’ve used a baking sheet in a pinch—it’s fine.
- Small cookie cutters: A leaf or feather shape is fun for the cheese, but you can also just cut triangles by hand. I found a set of mini cookie cutters at the dollar store that works perfectly.
- Sharp knife and small cutting board: For slicing fruit, cheese, and veggies. A paring knife is great for detail work like the beak.
- Small bowls: For dips, olives, or anything that might roll around. I use little ramekins I got from a thrift store.
- Toothpicks: Optional, but helpful for securing the wattle or eyes if you’re using olives.
Budget-Friendly Tip: If you don’t have a large board, use a clean pizza pan or even a piece of parchment paper laid flat on the table. The kids won’t care what it’s on—they just want to eat the turkey!
Preparation Method
Ready to build your turkey? Follow these steps, and you’ll have a snack board that looks like it took way more effort than it did. Trust me, I’ve done this dozens of times, and these little tricks make all the difference.
- Prep your board (2 minutes): Place your large board or platter on a flat surface. If you’re using a wooden board, you might want to line it with parchment paper for easy cleanup. Position the board so the wider end is at the top—that’s where the tail feathers will go.
- Build the tail feathers (5 minutes): Start at the top of the board, working in a fan shape. Lay down the pretzel sticks first, pointing outward like the bones of a fan. Then arrange the cheese triangles, salami rolls, cucumber rounds, and grape halves in overlapping rows. Think of it like a rainbow—start with the darkest items at the back and work forward with lighter colors. Don’t worry if it’s not perfect; the messier it looks, the more natural it seems.
- Create the turkey body (3 minutes): Place the whole pear or apple in the center of the board, just below the tail feathers. The stem should point upward—it looks like the turkey’s neck. If the pear wobbles, cut a tiny slice off the bottom to make it flat. I learned that the hard way after my turkey tipped over twice.
- Add the face (2 minutes): Stick the candy eyes onto the pear using a tiny dab of cream cheese or peanut butter as glue. For the beak, cut a small triangle from the carrot and press it into the pear just below the eyes. For the wattle, fold a small strip of red bell pepper and tuck it under the beak. If it won’t stay, use a toothpick to hold it in place.
- Make the legs (1 minute): Cut two thin carrot sticks about 2 inches long. Place them at the bottom of the pear, sticking out like turkey legs. Angle them slightly outward for a more realistic look.
- Fill in the base (3 minutes): Scatter the crackers, cheese cubes, and cherry tomatoes around the bottom half of the board, filling any empty spaces. Place the small bowl of dip near the front, like a little pond for the turkey to stand by. Make sure everything is within easy reach for small hands.
- Final check (1 minute): Step back and look at your turkey. Is there a bare spot? Add a few more grapes or crackers. Does the face look goofy? Good—that’s the point. Adjust anything that looks lopsided, then call the kids over. They’ll dive in before you can even take a picture.
Pro Tip: If you’re making this for a classroom or party, assemble the board on a disposable foil tray. That way, you can transport it easily and toss the tray when you’re done. No scrubbing required.
Cooking Tips & Techniques
I’ve made this board about twenty times now, and I’ve learned a few things the hard way. Here are my best tips to save you from my mistakes:
- Don’t overthink the feather arrangement. The first time I made this, I spent twenty minutes trying to make the tail feathers perfectly symmetrical. It looked stiff and weird. Now I just pile things on in a rough fan shape, and it always looks better. Kids don’t care about symmetry—they care about snacks.
- Use a mix of heights. Flat boards can look boring. Stack some crackers under the cheese slices, or roll the salami into little cones. The variation in height makes the turkey look more dimensional and exciting.
- Keep wet and dry items separate. Grapes and cucumber rounds can make crackers soggy if they sit too long. I place the wetter items toward the back of the tail feathers and keep the crackers near the front. That way, everything stays crisp until serving time.
- Prep everything before you start arranging. I once tried to cut cheese while balancing a pear on a board. It was a disaster. Now I slice all my fruit, cheese, and veggies first, put them in little bowls, and then arrange everything at once. It’s faster and way less stressful.
- Don’t forget the dip. A small bowl of ranch or hummus in the front turns this from a snack into an activity. Kids love dipping things, and it adds a creamy element that balances the salty and crunchy bits.
What I Learned the Hard Way: One time, I used a very ripe pear, and it started to brown within an hour. Now I always choose a firm pear and brush the cut surfaces with a little lemon juice. It keeps the turkey looking fresh for hours.
Variations & Adaptations
The beauty of this board is that you can change almost everything and still end up with a turkey. Here are some variations I’ve tried and loved:
- Vegetarian Version: Skip the salami and turkey slices. Use extra cheese, roasted red peppers, and marinated artichoke hearts instead. The colors are just as vibrant, and the flavors are even more interesting.
- Gluten-Free Option: Swap the crackers and pretzels for gluten-free rice crackers, veggie sticks, or cheese crisps. Everything else is naturally gluten-free, so it’s an easy adjustment.
- Seasonal Twist: In the summer, use fresh berries and melon balls for the tail feathers. In the fall, add sliced apples and pomegranate seeds. The turkey shape works with any fruit or veggie you have on hand.
- Dairy-Free Adaptation: Use vegan cheese slices and skip the cheese cubes. Add extra veggies like bell pepper strips and snap peas for crunch. The dip can be hummus or guacamole instead of ranch.
- Sweet Tooth Version: Turn it into a dessert board! Use a pineapple for the body, and make the tail feathers out of cookies, marshmallows, chocolate pieces, and fruit. The kids will lose their minds.
My Personal Favorite: I once made a breakfast version with a banana body, pancake feathers, and yogurt dip. It was a hit at a morning playdate. The kids ate it all before 9 AM.
Serving & Storage Suggestions
This board is best served immediately, while everything is fresh and crisp. Here’s how to make it shine:
- Serving Temperature: Serve at room temperature. Take the cheese and fruit out of the fridge about 15 minutes before assembling so they’re not ice-cold. The flavors are more pronounced that way.
- Presentation: Place the board in the center of the table where everyone can reach it. If you’re serving a crowd, make two smaller boards instead of one giant one—it prevents traffic jams and keeps things moving.
- Complementary Dishes: This board pairs beautifully with warm soup, a simple salad, or a cup of apple cider. For a full kids’ party menu, add some mini sandwiches or a bowl of popcorn.
- Storage: If you have leftovers (unlikely, but possible), separate the wet and dry items. Store crackers and pretzels in an airtight container at room temperature. Refrigerate the cheese, fruit, and veggies in separate bags. They’ll keep for 1-2 days.
- Reheating: You don’t need to reheat anything, but if the cheese cubes feel too firm, let them sit at room temperature for 10 minutes before serving again. The fruit might be a little softer the next day, but it’s still good for snacking.
Flavor Development: Honestly, this board is best fresh. The crackers stay crunchy, the fruit stays juicy, and the cheese is perfectly firm. But if you’re making it ahead, assemble the tail feathers and body separately, then combine just before serving. That way, nothing gets soggy.
Nutritional Information & Benefits
This board is surprisingly balanced for a snack. Here’s a rough estimate for a serving size of about one cup of assorted items (varies based on what you pick):
- Calories: Approximately 250-350 per serving
- Protein: 10-15 grams (from cheese, salami, and hummus)
- Carbohydrates: 25-35 grams (from fruit, crackers, and veggies)
- Fat: 15-20 grams (from cheese and salami)
- Fiber: 3-5 grams (from fruit and veggies)
Health Benefits: The fruit and veggies provide vitamins A and C, plus antioxidants. Cheese and meats offer protein and calcium for growing bodies. The crackers give quick energy for active kids. And because it’s a grazing board, kids can self-regulate and eat what they need.
Dietary Considerations: This recipe is naturally nut-free (if you skip peanut butter for the eyes). It can be made gluten-free, dairy-free, or vegetarian with simple swaps. Always check labels on packaged items for allergens.
My Wellness Perspective: I love that this board lets kids make their own choices. They can pick a grape, a cheese cube, and a cracker, and build their own mini snack. It encourages mindful eating without pressure. Plus, it’s fun—and that matters just as much as nutrition.
Conclusion
This cozy turkey-shaped charcuterie board started as a total accident, but it’s become one of my favorite go-to recipes. It’s proof that you don’t need a working oven or a perfect plan to create something memorable. All you need is a little creativity, some basic snack foods, and a willingness to laugh at yourself when things go wrong.
I love this recipe because it brings people together. Kids gather around the board, pointing at the turkey face and grabbing their favorite pieces. Grown-ups sneak bites of cheese while pretending to help. It turns a simple snack into a shared moment, and honestly, that’s what cooking is all about.
I hope you try this with your family—and I hope you make it your own. Swap in your kids’ favorite crackers, use whatever fruit is in season, and don’t stress about perfection. The goofier the turkey, the better. When you make it, come back and tell me how it went. Leave a comment below or tag me in your photos—I’d love to see your edible birds!
Happy snacking, and remember: sometimes the best recipes are the ones you never planned to make.
Frequently Asked Questions
Can I make this board ahead of time?
Yes, but with a few precautions. You can prep all the ingredients up to 24 hours in advance—slice the cheese, wash the fruit, cut the veggies—and store them separately in the fridge. Assemble the board no more than 2 hours before serving to keep everything fresh and crisp.
What if I don’t have a pear for the body?
No problem! You can use an apple, a small pineapple, or even a large bell pepper turned upside down. The key is something round-ish that can hold the face pieces. I’ve even used a hard-boiled egg for a mini turkey version.
How do I keep the crackers from getting soggy?
Place the crackers away from wet ingredients like grapes and cucumber rounds. I like to put the crackers in a little cluster at the front of the board, separate from the fruit. If you’re serving dip, keep it in a small bowl so it doesn’t spread onto the crackers.
Can I use this for a school party?
Absolutely! This is perfect for classroom celebrations or Halloween parties. Just make sure to check for any food allergies in the class. You can easily swap out common allergens like nuts or dairy. Use a disposable tray for easy transport and cleanup.
How many kids does this board serve?
A board this size serves about 6-8 kids as a snack, or 4-6 as a light meal. If you’re serving a larger group, double the ingredients and make two boards. Kids tend to eat more than you expect, especially when it looks this fun!
PrintCozy Kids Turkey Charcuterie Board: Easy Thanksgiving Snack
A fun and easy no-cook turkey-shaped snack board made with simple ingredients like cheese, crackers, fruit, and veggies. Perfect for Thanksgiving or any kids’ party.
- Prep Time: 15 minutes
- Cook Time: 0 minutes
- Total Time: 15 minutes
- Yield: 6-8 servings 1x
- Category: Appetizer
- Cuisine: American
Ingredients
- 1 large pear or apple
- 1 small carrot, peeled
- 1 red bell pepper strip
- 2 candy eyes or small olive slices
- 1 cup cheddar cheese slices
- 1 cup salami or turkey slices
- 1 cup pretzel sticks or breadsticks
- 1 cup cucumber rounds
- 1 cup red and green grapes, halved lengthwise
- 1 large wooden board or platter (about 12x16 inches)
- 2 cups assorted crackers
- 1 cup cherry tomatoes (optional)
- 1 cup cheese cubes (mozzarella or Colby Jack)
- Small bowl of ranch dip or hummus
Instructions
- Prep your board (2 minutes): Place your large board or platter on a flat surface. If using a wooden board, line it with parchment paper for easy cleanup. Position the board so the wider end is at the top for the tail feathers.
- Build the tail feathers (5 minutes): Start at the top of the board, working in a fan shape. Lay down the pretzel sticks first, pointing outward. Then arrange the cheese triangles, salami rolls, cucumber rounds, and grape halves in overlapping rows, starting with darkest items at the back and working forward with lighter colors.
- Create the turkey body (3 minutes): Place the whole pear or apple in the center of the board, just below the tail feathers, with the stem pointing upward. If the pear wobbles, cut a tiny slice off the bottom to make it flat.
- Add the face (2 minutes): Stick the candy eyes onto the pear using a tiny dab of cream cheese or peanut butter as glue. Cut a small triangle from the carrot for the beak and press it into the pear just below the eyes. Fold a small strip of red bell pepper for the wattle and tuck it under the beak; use a toothpick if needed.
- Make the legs (1 minute): Cut two thin carrot sticks about 2 inches long. Place them at the bottom of the pear, sticking out like turkey legs, angled slightly outward.
- Fill in the base (3 minutes): Scatter the crackers, cheese cubes, and cherry tomatoes around the bottom half of the board, filling any empty spaces. Place the small bowl of dip near the front.
- Final check (1 minute): Step back and look at your turkey. Adjust any bare spots or lopsided parts, then serve immediately.
Notes
Use a firm pear to prevent browning; brush cut surfaces with lemon juice if needed. For toddlers, cut grapes and cherry tomatoes into quarters. Keep wet and dry items separate to avoid soggy crackers. Assemble no more than 2 hours before serving.
Nutrition
- Serving Size: 1 cup of assorted it
- Calories: 250350
- Fat: 1520
- Carbohydrates: 2535
- Fiber: 35
- Protein: 1015
Keywords: turkey charcuterie board, kids snack, Thanksgiving appetizer, no-cook snack, easy snack board


