Love this? Save it for later!
Share the inspiration with your friends
I was standing in the cereal aisle of the local grocery store last October when the scent of cumin and roasted chilies hit me from the sample station. It wasn’t a planned smell, just a stray waft from a pop-up booth, and suddenly I was seven years old, hiding under the dining room table while my aunt wrapped toilet paper around my arms to keep me from touching the “witch’s brew.” That specific, humid smell of simmering beans and melting cheese instantly transported me back to her kitchen, where the lights were always dimmed for Halloween and the only rule was no screaming until the doorbell rang. I remember the way the steam would fog up the windows, blurring the outside world until it felt like we were the only people left on earth. My aunt, a woman who believed that food should be as spooky as it was delicious, would stir that pot with a wooden spoon that had a crack in the handle, humming tunes I can no longer recall. She never told me the secret ingredient, but I always suspected it was something that made the dip cling to the tortilla chips like a ghost to a sheet. I spent the next three decades trying to replicate that exact feeling, chasing a flavor profile that felt both comforting and thrillingly strange. Honestly, I failed at it for years, making dips that were either too thin or too bland, missing that crucial depth of flavor she had mastered. You know that feeling when you try to recreate a memory and it just doesn’t taste right? It’s frustrating, but it’s also what keeps you coming back to the stove. This recipe is my attempt to finally capture that Halloween magic, not just the taste, but the atmosphere. It’s about the warmth of the kitchen, the anticipation of the guests, and the joy of making something that looks a little bit scary but tastes like home. I mean, let me tell you, there is nothing quite like serving a dish that looks like a mummy but melts in your mouth like comfort food. Maybe you’ve been there, trying to impress friends with a themed meal that ends up being more stress than fun. I wanted to change that narrative with this creamy black bean mummy dip. It’s simple, it’s spooky, and it brings back that childhood wonder without the headache of complicated techniques. I hope making this brings you as much joy as it did for me to finally get it right.
Why You’ll Love This Recipe
Let’s be honest for a second. Halloween appetizers usually fall into two categories: overly complicated charcuterie boards that cost a fortune, or sugary treats that leave you with a headache by midnight. This creamy black bean mummy dip sits perfectly in the sweet spot in between. I’ve tested this recipe more times than I care to admit, tweaking the spice levels and cheese ratios until it was absolutely perfect. The result is a dip that is rich, smoky, and incredibly satisfying, yet it feels light enough to eat while you’re walking around your house checking the doorbell. Here is why this recipe has become my go-to for every October gathering:
- Quick & Easy: You can have this ready in under 30 minutes. It’s perfect for those busy weeknights when you want to celebrate the holiday but don’t have hours to spend in the kitchen. Just simmer, mash, and wrap.
- Simple Ingredients: You likely already have everything you need in your pantry. Black beans, cream cheese, shredded cheese, and a few spices. No fancy grocery trips needed, which is a huge win for your wallet.
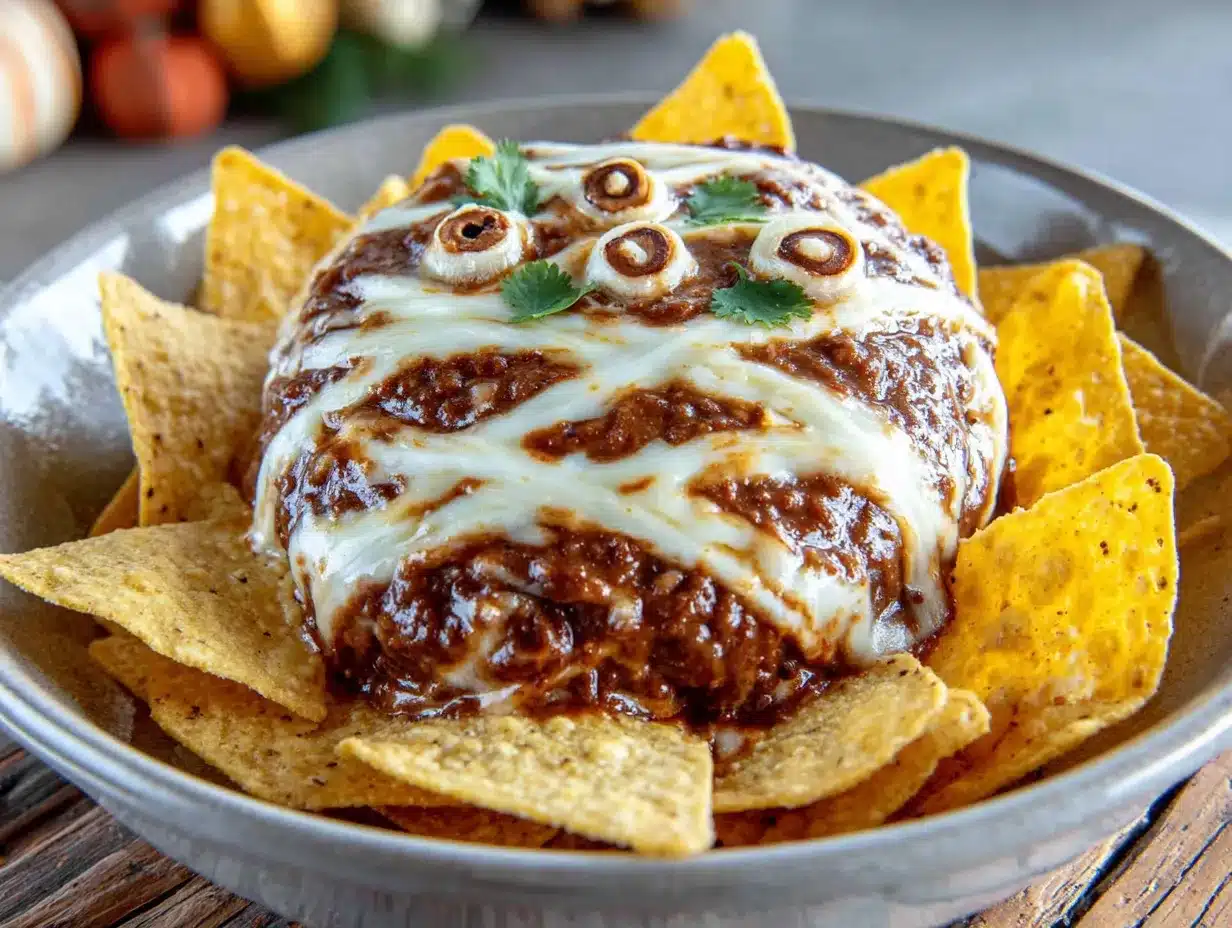
- Perfect for Halloween Parties: The visual appeal is unmatched. The white cheese strips look like bandages wrapped around the dark beans, creating a fun, spooky effect that kids and adults love. It’s great for potlucks, game nights, or cozy dinners.
- Crowd-Pleaser: I’ve served this to vegetarians, meat-lovers, and picky eaters alike, and it always gets rave reviews. The creamy texture masks the earthiness of the beans, making it approachable for everyone.
- Unbelievably Delicious: The combination of cumin, chili powder, and garlic creates a warm, savory profile that is next-level comfort food. It’s not just good for a “healthy” dip; it’s genuinely indulgent.
What makes this different from other bean dips is the texture. By using cream cheese as the base, you get a smooth, creamy consistency that holds the shape of the “mummy” strips better than oil-based dips. It’s the kind of recipe that makes you close your eyes after the first bite because it’s just so satisfying. It’s comfort food reimagined with a spooky twist. Whether you are impressing guests or just treating yourself, this dip turns a simple meal into something memorable without any stress.
What Ingredients You Will Need
This recipe relies on simple, wholesome ingredients to deliver bold flavor and satisfying texture without the fuss. The beauty of this dip lies in its accessibility, using pantry staples that most people already have on hand. Here is what you will need to create your own batch of spooky goodness:
- Canned Black Beans (15 oz cans, 2 cans): The star of the show. Look for low-sodium options if you prefer to control the salt level. Rinse and drain them thoroughly to remove the starchy liquid.
- Cream Cheese (8 oz block): This is crucial for the creamy texture. Use full-fat, softened cream cheese for the best results. I recommend brands like Philadelphia for their consistent quality.
- Shredded Mozzarella Cheese (2 cups): This provides the “bandage” effect. Mozzarella melts smoothly and has a mild flavor that lets the spices shine. Pre-shredded cheese works, but block cheese melted fresh tastes better.
- Shredded Cheddar Cheese (1 cup): Adds a sharp, savory depth to the dip. Use a medium or sharp cheddar for more flavor.
- Green Onions (3-4 stalks): Finely chopped, these add a fresh, oniony bite and a pop of green color that contrasts with the white cheese.
- Garlic (3 cloves): Fresh garlic is best here. Minced finely so you don’t get large chunks in the dip.
- Cumin (1 tsp): Ground cumin adds that warm, earthy note that defines Mexican-inspired dishes.
- Chili Powder (1 tsp): Provides mild heat and color. If you like it spicier, you can add a pinch of cayenne pepper.
- Salt and Pepper (to taste): Adjust based on your preference and the sodium content of your beans.
- Tortilla Chips: For dipping. Sturdy, thick-cut chips work best so they don’t break under the weight of the dip.
If you are dairy-free, you can swap the cream cheese and cheeses for dairy-free alternatives, though the melting properties may vary slightly. For a gluten-free option, ensure your tortilla chips are certified gluten-free. In summer, you might add some diced jalapeños for extra freshness, but this recipe shines brightest in the cool autumn air.
Equipment Needed
You don’t need a lot of fancy tools to make this dip, which is part of its charm. Here is what you will need:
- Medium Saucepan: A heavy-bottomed saucepan is ideal for heating the beans and cheese evenly without burning. I prefer my 3-quart saucepan for this.
- Wooden Spoon or Silicone Spatula: For stirring the mixture. A silicone spatula is great for scraping the sides of the pan to ensure everything is incorporated.
- Colander: To rinse and drain the black beans. This step is important to remove excess sodium and starch.
- Microplane or Fine Grater: Optional, but useful if you want to grate the garlic instead of mincing it for a smoother texture.
- Baking Dish (8×8 inch): To bake the dip. Any oven-safe dish will work, but a square dish helps create the right shape for the mummy strips.
- Parchment Paper: Not strictly necessary, but helpful if you want to line the baking dish for easier cleanup.
If you don’t have a saucepan, you can use a microwave-safe bowl and heat in intervals, stirring in between. For budget-friendly options, any standard non-stick skillet will do. Just make sure your baking dish is oven-safe up to 350°F.
Preparation Method
Getting this dip ready is straightforward, but there are a few key steps to ensure the texture and appearance are perfect. Follow these steps carefully:
- Preheat and Prep: Preheat your oven to 350°F (175°C). Grease an 8×8 inch baking dish with a little cooking spray or butter. This prevents sticking and helps the edges get slightly crispy.
- Rinse the Beans: Open the cans of black beans and pour them into a colander. Rinse them thoroughly under cold water for about 30 seconds. Shake off excess water. This step removes the viscous liquid and excess salt, ensuring a better flavor profile.
- Heat the Base: In your medium saucepan, combine the softened cream cheese, shredded mozzarella, and shredded cheddar cheese over low heat. Add the minced garlic, cumin, and chili powder. Stir constantly as the cheese melts. This should take about 5-7 minutes. Do not let the mixture boil, or the cheese may separate.
- Incorporate the Beans: Once the cheese mixture is smooth and creamy, add the rinsed black beans to the saucepan. Stir gently to coat the beans evenly with the cheese mixture. If the mixture is too thick, add a splash of milk or broth to loosen it up. Taste and adjust salt and pepper as needed.
- Transfer to Dish: Pour the bean and cheese mixture into the prepared baking dish. Spread it out evenly with a spatula, creating a flat surface. This will make it easier to place the “bandages” later.
- Apply the Bandages: Take the remaining shredded mozzarella cheese. Tear or cut it into thin, irregular strips. These will be your mummy bandages. Place the strips across the top of the dip in a crisscross pattern, leaving small gaps between them to show the dark beans underneath. This creates the mummy look. Be creative with the placement; irregular strips look more authentic than perfect lines.
- Bake: Place the dish in the preheated oven and bake for 15-20 minutes, or until the cheese is bubbly and slightly golden on top. Keep an eye on it after 15 minutes to prevent burning.
- Garnish and Serve: Remove from the oven and let it cool for 5 minutes. Sprinkle the chopped green onions over the top for color and freshness. Serve warm with tortilla chips.
If the cheese doesn’t melt evenly, you can cover the dish with foil for the first 10 minutes of baking to trap steam. This helps the cheese melt before it browns. Personal tip: Don’t skip the rinsing step! Wet beans can make the dip watery.
Cooking Tips & Techniques
There are a few tricks I’ve learned over the years to make this dip even better. First, always use room temperature cream cheese. Cold cream cheese takes longer to melt and can create lumps in your dip. If you forget to soften it, microwave it in 10-second intervals until it’s pliable. Second, when tearing the mozzarella strips, try to make them vary in width. Uniform strips look artificial, while irregular ones look like real bandages. I once spent 20 minutes cutting perfect strips, only to realize it looked like a school project. The messy look is more charming. Another common mistake is overcooking the dip. Cheese can become grainy if heated too long or at too high a temperature. Keep the heat low and steady. Also, if you want a spicier dip, add some diced jalapeños or a dash of hot sauce to the mixture before baking. Just be careful not to make it too wet, as this can affect the mummy structure. Multitasking is key here. While the dip is baking, you can prepare the chips and arrange them on a platter. This saves time and ensures everything is ready when the dip comes out of the oven. Consistency is everything. If the dip is too thick, add a little more cheese or a splash of milk. If it’s too thin, add a few more beans. Trust your senses. The dip should be thick enough to hold its shape but creamy enough to dip easily. I learned this the hard way when my first batch was more soup than dip. Now, I always aim for a consistency that coats the back of a spoon.
Variations & Adaptations
While the classic mummy dip is fantastic, there are many ways to customize it to suit your tastes or dietary needs. Here are a few variations I’ve tried:
- Spicy Version: Add diced jalapeños, a dash of cayenne pepper, or use pepper jack cheese instead of mozzarella for a kick. This is great for those who like heat.
- Veggie Boost: Mix in some diced bell peppers, corn, or spinach. This adds extra nutrients and color. Just make sure to sauté the vegetables first to remove excess moisture.
- Gluten-Free: Use certified gluten-free tortilla chips or serve with vegetable sticks like carrots and celery for a lighter option.
- Dairy-Free: Use dairy-free cream cheese and shredded cheese alternatives. Note that the melting properties may differ, so you might need to adjust the baking time.
- Protein-Packed: Add cooked ground turkey or chicken to the mixture for a heartier dip. This turns it into a main dish rather than just an appetizer.
One of my personal favorites is adding a layer of black olives sliced into strips under the cheese bandages. It adds a briny contrast that cuts through the richness of the cheese. You can also swap the black beans for pinto beans or kidney beans if you prefer a milder flavor. The key is to experiment and find what works best for your palate. Don’t be afraid to tweak the spice levels or add new ingredients. That’s the fun of cooking!
Serving & Storage Suggestions
Serving this dip warm is essential for the best experience. The cheese should be gooey and stretchy, which only happens when it’s fresh out of the oven. Place the baking dish in the center of the table and surround it with tortilla chips for a communal dining experience. For a more festive touch, serve it on a black platter to enhance the mummy contrast. You can also garnish with fresh cilantro or a drizzle of sour cream for added flavor. As for storage, any leftovers can be stored in an airtight container in the refrigerator for up to 3 days. The dip will thicken as it cools, so you may need to add a splash of milk or water when reheating. To reheat, place the dip in the oven at 350°F for 10-15 minutes or microwave in 30-second intervals, stirring in between. The flavors actually develop over time, so it often tastes even better the next day. However, the mummy appearance may lose its definition, so it’s best enjoyed fresh. If you want to freeze it, you can, but the texture may change slightly due to the dairy. It’s best to consume it within a month of freezing. For parties, make sure to keep the dip warm in a slow cooker on the low setting if serving over a long period. This prevents the cheese from hardening and keeps it appetizing for guests.
Nutritional Information & Benefits
While this dip is indulgent, it also has some nutritional benefits. Black beans are an excellent source of fiber and protein, which helps keep you full longer. They are also rich in antioxidants and minerals like magnesium and potassium. The cheese provides calcium and protein, though it is higher in saturated fat. Overall, this dip is a balanced option for a party snack, especially when paired with vegetable sticks. For those watching their calorie intake, be mindful of the portion size, as the cheese can add up quickly. It is not gluten-free by default, so check your chips. It is also not suitable for those with dairy allergies. From a wellness perspective, I love that this recipe allows me to enjoy a festive treat without feeling guilty. The fiber in the beans aids digestion, and the spices like cumin and chili powder have anti-inflammatory properties. It’s a great way to incorporate more plant-based proteins into your diet during the holidays. Just remember, moderation is key. Enjoy it as part of a balanced meal or as a special occasion treat.
Conclusion
This creamy black bean mummy dip is more than just a Halloween appetizer; it’s a celebration of comfort, creativity, and nostalgia. It brings together simple ingredients to create something visually striking and deliciously satisfying. I hope you try this recipe and make it your own. Feel free to adjust the spices, add extra veggies, or change up the cheese to suit your preferences. The beauty of cooking is in the experimentation. I love this recipe because it reminds me of those cozy autumn evenings, surrounded by friends and family, sharing good food and good stories. It’s a recipe that brings joy to the table, both literally and figuratively. So, grab your ingredients, preheat your oven, and let’s make some Halloween magic. Don’t forget to share your creations with me in the comments below. I’d love to see your mummy designs and hear how your party went. Happy Halloween, and happy cooking!
FAQs
Can I make this dip ahead of time?
Yes, you can prepare the dip up to the baking stage and store it in the refrigerator for up to 24 hours. Just add a few extra minutes to the baking time if you are baking it cold. The cheese strips should be added just before baking to maintain their appearance.
What can I use instead of black beans?
You can substitute black beans with pinto beans, kidney beans, or even chickpeas. Pinto beans offer a milder flavor, while kidney beans provide a heartier texture. Chickpeas will give it a slightly different taste but still work well with the cheese and spices.
How do I keep the mummy strips from falling apart?
Ensure the cheese mixture is thick enough to support the strips. If it’s too thin, add more cheese or cook it longer to reduce moisture. Also, pressing the strips gently into the dip helps them adhere. Using a mix of mozzarella and cheddar can also provide better structure.
Is this dip gluten-free?
The dip itself is naturally gluten-free, but you need to ensure your tortilla chips are certified gluten-free. Many corn tortilla chips are, but always check the label to avoid cross-contamination.
Can I freeze this dip?
While you can freeze it, the texture may change due to the dairy content. The cheese might become grainy or separate upon thawing. It’s best enjoyed fresh, but if you must freeze it, thaw it in the refrigerator and reheat gently on the stove, adding a splash of milk to restore creaminess.
Pin This Recipe!

Creamy Black Bean Mummy Dip: Easy Halloween Appetizer

A spooky yet comforting Halloween appetizer featuring a rich, smoky black bean and cheese dip topped with mozzarella ‘bandages’ to resemble a mummy. It is quick to make, uses simple pantry ingredients, and offers a perfect balance of savory flavor and festive presentation.
- Prep Time: 10 minutes
- Cook Time: 20 minutes
- Total Time: 30 minutes
- Yield: 6 servings 1x
- Category: Appetizer
- Cuisine: Mexican-Inspired
Ingredients
- 2 cans (15 oz each) black beans, rinsed and drained
- 8 oz block cream cheese, softened
- 2 cups shredded mozzarella cheese
- 1 cup shredded cheddar cheese
- 3–4 stalks green onions, finely chopped
- 3 cloves garlic, minced
- 1 tsp ground cumin
- 1 tsp chili powder
- Salt and pepper to taste
- Tortilla chips for serving
Instructions
- Preheat oven to 350°F (175°C) and grease an 8×8 inch baking dish.
- Rinse black beans thoroughly in a colander under cold water and shake off excess liquid.
- In a medium saucepan over low heat, combine softened cream cheese, shredded mozzarella, and cheddar cheese. Add minced garlic, cumin, and chili powder.
- Stir constantly until the cheese is melted and smooth (about 5-7 minutes). Do not let the mixture boil.
- Add the rinsed black beans to the cheese mixture and stir gently to coat evenly. Adjust seasoning with salt and pepper if needed.
- Pour the mixture into the prepared baking dish and spread evenly.
- Tear or cut the remaining shredded mozzarella into thin, irregular strips to create ‘bandages’. Place these strips in a crisscross pattern over the dip.
- Bake for 15-20 minutes until the cheese is bubbly and slightly golden.
- Remove from oven and let cool for 5 minutes. Garnish with chopped green onions and serve warm with tortilla chips.
Notes
Ensure cream cheese is at room temperature for smooth melting. Rinse beans well to remove excess starch and sodium. If the dip is too thick, add a splash of milk. For a spicy version, add diced jalapeños or cayenne pepper. The dip can be made ahead up to the baking stage and refrigerated for 24 hours.
Nutrition
- Serving Size: Approximately 1/6 of
- Calories: 350
- Sugar: 2
- Sodium: 450
- Fat: 22
- Saturated Fat: 12
- Carbohydrates: 25
- Fiber: 8
- Protein: 15
Keywords: Halloween appetizer, black bean dip, mummy dip, easy party food, vegetarian appetizer, cheese dip, holiday recipes


