Love this? Save it for later!
Share the inspiration with your friends
I was sorting through a box of old holiday decorations at a thrift store—the kind where everything smells faintly of cedar and someone else’s memories—when the woman running the cash register started talking about cookies. She was maybe seventy, with cat-eye glasses and a no-nonsense way of handling a roll of packing tape. “You want the ones that look like black cats,” she said, not looking up from pricing a set of teacups. “My mother made them every Halloween. Easiest cookie in the world, and kids lose their minds over them.” I wasn’t expecting baking advice from a thrift store clerk on a Tuesday afternoon, but there I was, holding a chipped ceramic pumpkin, listening to her describe exactly how to make black cat sugar cookies.
She scribbled the basics on a torn piece of receipt paper—no measurements, just “sugar cookie dough, black food coloring, candy eyes, and a lot of patience for little fingers.” I tucked that scrap into my wallet and honestly forgot about it for almost a year. Then last October, my nephew announced he wanted to “bake something scary” for his class party, and I remembered that crumpled receipt. Let me tell you, that first batch was a beautiful mess. The dough was too sticky, the cats looked more like lumpy blobs, and we ran out of candy eyes halfway through. But the kids didn’t care. They ate every single one, powdered sugar dusting their faces, arguing over who made the cutest cat.
That’s the thing about these easy black cat sugar cookies. They’re not about perfection. They’re about flour on the counter, tiny hands shaping dough, and that moment when a kid holds up a cookie and says, “Look, I made a cat!” They’re forgiving, they’re fun, and they use ingredients you probably already have. Maybe you’ve been there—staring down a box of cookie cutters wondering if you have the energy for another Pinterest fail. I promise, these are different. They come together fast, they actually look like cats (eventually), and they’re cheap enough that you don’t panic when someone eats the ears off before they’re baked.
Why You’ll Love This Recipe
After testing this recipe about four times in one week (my neighbors were very happy), I can tell you exactly why these cookies work for real families on a real budget. They’re not fussy, they don’t require special equipment, and they actually taste good—not just “cute but bland” like so many decorated cookies.
- Quick & Easy: From start to finish, you’re looking at about 45 minutes. The dough doesn’t need to chill for hours, which is huge when you’re baking with impatient little helpers. I’ve made these on a school night and still had time for cleanup before bedtime.
- Simple Ingredients: Butter, sugar, flour, eggs, vanilla, and black food coloring. That’s it. No specialty baking supplies or trips to three different stores. I tested this with store-brand butter and it worked perfectly—no need for fancy European butter here.
- Perfect for Halloween Parties: These are the kind of cookies that show up at school parties, neighborhood gatherings, and family get-togethers and disappear in minutes. Kids love them because they’re shaped like cats, and adults love them because they’re not loaded with artificial flavors or complicated fillings.
- Crowd-Pleaser: I brought a batch to my son’s cub scout meeting and the other parents actually asked for the recipe. One mom said her kid normally hates sugar cookies but ate three of these. The secret? A touch of almond extract that makes the flavor just a little more interesting than plain vanilla.
- Unbelievably Delicious: The texture is soft in the middle with slightly crispy edges—exactly what a good sugar cookie should be. And because the dough is naturally dark from the food coloring, you don’t need to overbake them to get that dramatic black color.
What makes this recipe different from the hundreds of other black cat cookie recipes out there? It’s the technique. Most recipes tell you to add black food coloring to a standard sugar cookie dough, which turns it grayish and sad. I figured out that using gel food coloring (not liquid) and letting the dough rest for 10 minutes after coloring gives you that deep, true black without needing half a bottle of dye. Plus, the dough is sturdy enough for little hands to shape without falling apart—a game changer when you’re baking with kids.
This recipe isn’t just good—it’s the kind that makes you close your eyes after the first bite. It’s Halloween comfort food, made simpler and more affordable, but with the same soul-soothing satisfaction as a cookie from your childhood. Perfect for making memories without the stress.
What Ingredients You Will Need
This recipe uses simple, budget-friendly ingredients that you likely already have in your pantry. The magic is in how they come together—and a few smart choices that make all the difference. Here’s what you’ll need:
- 1 cup (2 sticks) unsalted butter, softened — I prefer using unsalted so I can control the salt level. Let it sit out for about 30 minutes before starting, or microwave it in 10-second bursts if you’re in a hurry (just don’t melt it).
- 1 cup granulated sugar — Regular white sugar works best here. I’ve tried coconut sugar for a “healthier” version, but the texture was too gritty. Stick with the real stuff for these cookies.
- 1 large egg, room temperature — Cold eggs can make the dough seize up. If you forgot to take it out of the fridge, place it in a bowl of warm water for 5 minutes.
- 1 teaspoon vanilla extract — Pure vanilla is nice, but imitation works fine for this recipe since the black color hides any subtle differences. I’ve used both and honestly can’t tell the difference once they’re baked.
- 1/2 teaspoon almond extract — This is my secret weapon. It adds a subtle nutty flavor that makes these cookies taste more “bakery quality.” Totally optional, but highly recommended.
- 2 1/2 cups all-purpose flour — Spoon and level your flour—don’t scoop directly from the bag or you’ll end up with dense cookies. I learned this the hard way after a batch that came out like hockey pucks.
- 1/2 teaspoon baking powder — This gives the cookies a slight lift so they’re not flat and sad. Make sure it’s fresh—test it by dropping a little in water; if it fizzes, you’re good.
- 1/2 teaspoon salt — Balances the sweetness. I use fine sea salt, but table salt works too.
- Black gel food coloring — This is non-negotiable. Liquid food coloring won’t give you a true black—it’ll turn grayish-purple. Gel coloring from the baking aisle (I like Wilton or Americolor) gives that deep, dramatic black. You’ll need about 1-2 teaspoons depending on the brand.
- Candy eyes (edible) — These are the little white circles with black pupils you find at craft stores or online. A bag costs about $3 and will last you through several batches. You can also use black frosting in a piping bag to draw eyes if you can’t find them.
- Optional: black sanding sugar or sprinkles — For extra sparkle. My kids love the crunchy texture this adds, but plain cookies are just as cute.
Substitution Notes: If you need a dairy-free version, swap the butter for a good-quality vegan butter stick (not margarine in a tub—it has too much water). For an egg-free version, use a flax egg (1 tablespoon ground flaxseed mixed with 3 tablespoons water, let sit for 5 minutes). I’ve tested both and the texture is slightly less tender but still delicious. And if you can’t find almond extract, just double the vanilla—it’ll still taste great.
Equipment Needed
You don’t need a fancy bakery setup for these cookies. Here’s what you’ll actually use:
- Electric mixer — A stand mixer with paddle attachment is ideal, but a hand mixer works perfectly. I’ve even made these with a wooden spoon and some elbow grease when my mixer was broken—it’s doable, just takes longer.
- Large mixing bowl — Any bowl will do, but a wider one makes it easier to mix in the food coloring without splattering black dye everywhere. Ask me how I know.
- Baking sheets — Two standard half-sheet pans work best. If you only have one, let it cool completely between batches or the cookies will spread too much.
- Parchment paper or silicone baking mat — Parchment paper is cheap and makes cleanup a breeze. Silicone mats are reusable and give a slightly softer bottom to the cookies.
- Cooling rack — Wire racks let air circulate so the cookies don’t get soggy on the bottom. If you don’t have one, transfer them to a clean cutting board after a few minutes.
- Measuring cups and spoons — For accuracy. I’ve eyeballed ingredients before and ended up with cookies that spread into one giant blob.
- Cat-shaped cookie cutter — You can find these at craft stores, online, or even at dollar stores around Halloween. If you can’t find one, freehand the shape with a knife—it’ll look more rustic but still adorable.
- Small offset spatula — Helpful for transferring cut dough to the baking sheet without distorting the shape. A butter knife works in a pinch.
Budget tip: Don’t run out and buy a fancy cat cookie cutter. Check dollar stores or thrift shops first. I found my favorite one—an old Wilton cutter from the 90s—at a garage sale for 25 cents. It works better than any new one I’ve bought.
Preparation Method
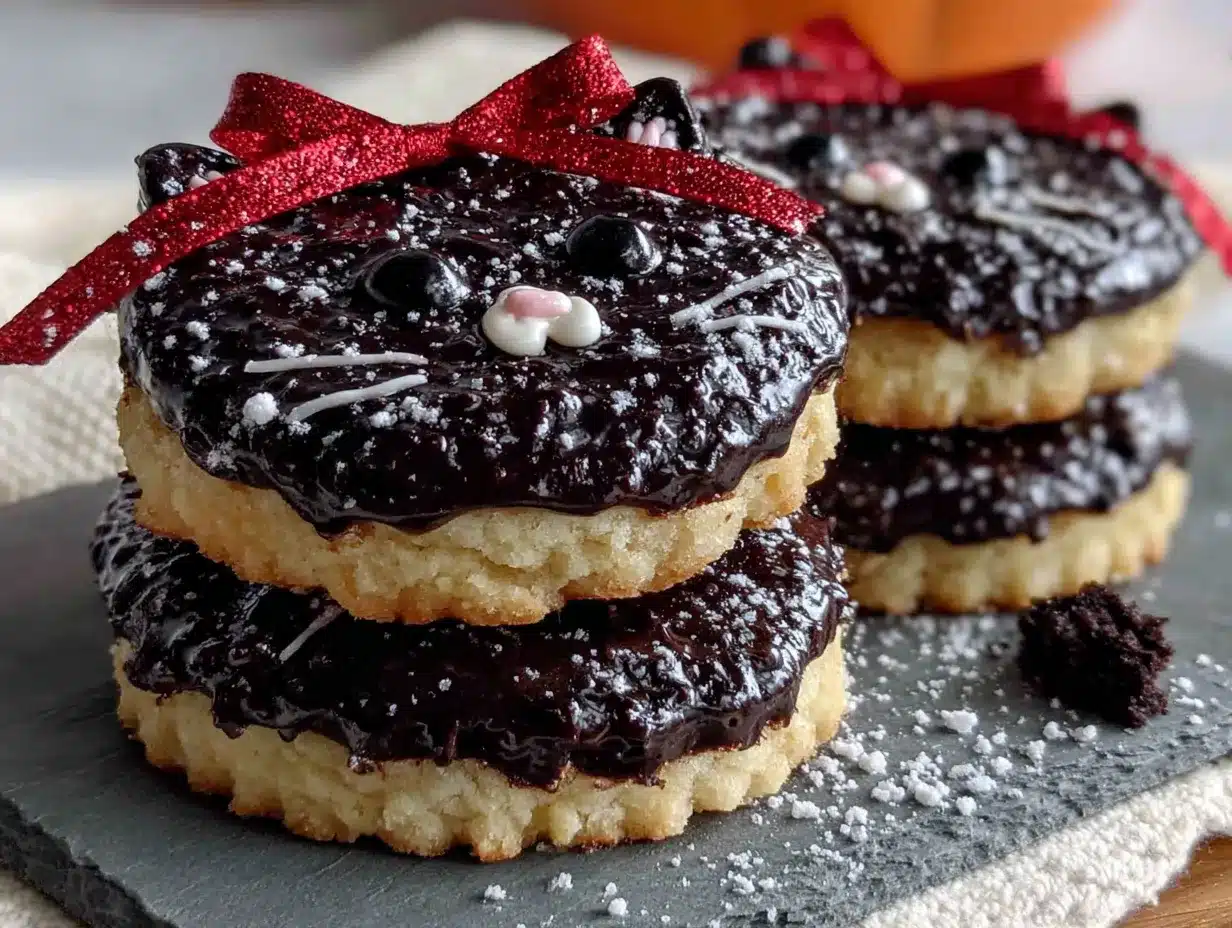
Let’s get to the fun part. Here’s how to make these cookies step by step, with all the little details I wish someone had told me the first time.
- Cream the butter and sugar — In your mixing bowl, beat the softened butter and granulated sugar together on medium speed until light and fluffy, about 3 minutes. You’re looking for a pale yellow color and a texture that looks like wet sand. Scrape down the sides of the bowl halfway through. Don’t rush this step—proper creaming gives the cookies their tender texture.
- Add the wet ingredients — Beat in the egg, vanilla extract, and almond extract (if using) until fully combined. The mixture might look slightly curdled at this point—that’s normal. Don’t panic. It’ll come together when you add the flour.
- Mix the dry ingredients separately — In a medium bowl, whisk together the flour, baking powder, and salt. This ensures the baking powder is evenly distributed so you don’t get one cookie that rises like a soufflé while the others stay flat.
- Combine wet and dry — Gradually add the flour mixture to the butter mixture, mixing on low speed. I add it in three additions, scraping the bowl between each. Stop mixing as soon as the dough comes together—overmixing develops gluten and makes tough cookies. The dough should be soft but not sticky. If it feels too sticky, add a tablespoon of flour.
- Add the black food coloring — This is where it gets messy. Switch to a spatula and add about 1 teaspoon of black gel food coloring. Fold it into the dough—don’t mix vigorously or you’ll incorporate too much air. The dough will look gray at first. Keep folding. Add more coloring, a few drops at a time, until you reach a deep black. I usually end up using about 1 1/2 teaspoons. Pro tip: Wear disposable gloves for this step unless you want black-stained hands for the next two days. Ask me how I know this too.
- Let the dough rest — Cover the bowl with plastic wrap and let it sit at room temperature for 10 minutes. This allows the color to deepen and the gluten to relax, making the dough easier to roll. The color will actually get darker as it rests—it’s like magic.
- Preheat and prep — Preheat your oven to 350°F (175°C). Line two baking sheets with parchment paper. If you only have one sheet, that’s fine—just let it cool between batches.
- Roll out the dough — Lightly flour your work surface and rolling pin. Roll the dough to about 1/4-inch thickness. Don’t go thinner or the cookies will be too crispy and might break. Don’t go thicker or they won’t bake through properly. I use two wooden dowels (or chopsticks) on either side of the dough to ensure even thickness—it’s a game changer.
- Cut the shapes — Dip your cat cookie cutter in flour before each cut to prevent sticking. Press straight down and give it a little wiggle to release the shape. Use an offset spatula to transfer the cut cookies to the baking sheet, leaving about 2 inches between them—they spread a little.
- Add the eyes (before baking) — Gently press two candy eyes into each cookie. Position them close together toward the front of the cat face. Don’t press too hard or they’ll sink into the dough. If the dough cracks around the eyes, just smooth it with your finger.
- Bake — Bake for 8-10 minutes, rotating the pan halfway through. The cookies are done when the edges look set and the bottoms are just barely golden. They’ll look slightly underdone in the center—that’s perfect. They continue baking on the hot pan. Overbaking turns them into crunchy disks that taste more like cardboard than cookies.
- Cool — Let the cookies cool on the baking sheet for 5 minutes, then transfer to a wire rack to cool completely. Don’t try to move them right away—they’re fragile when hot. I learned this when I lost an ear off my first batch.
First batch tip: Bake just one or two cookies first as a test. This lets you check the color, spread, and bake time without risking an entire batch. Adjust your rolling thickness or baking time based on the test cookies.
Cooking Tips & Techniques
After about six batches of these cookies (my family has been very supportive), here are the things I wish I’d known from the start:
The color secret. Black gel food coloring is expensive—about $5 a tube—but it’s worth every penny. Liquid food coloring will give you sad gray cookies that look like they’ve been through a dust storm. I tried using cocoa powder to darken the dough naturally, and while it made the cookies taste like chocolate (which isn’t bad), they came out brown, not black. Stick with gel. And store it in a cool, dark place—it lasts for years.
Don’t overwork the dough. I made this mistake twice. The first time, I kept re-rolling the scraps over and over until the dough got warm and sticky. The cookies came out tough and the cat shapes lost their definition. Now I gather the scraps, gently press them together, and roll only once more. After that, I bake the remaining dough as round “blob cats” that the kids actually prefer because they look more like cartoon characters.
Temperature matters. If the dough gets too warm while you’re rolling, it becomes sticky and impossible to work with. Pop it in the fridge for 10 minutes to firm up. If it’s too cold, it cracks when you try to roll it. Let it sit at room temperature for 5 minutes. You’re looking for Goldilocks dough—not too warm, not too cold.
Multitasking strategy. While the first batch bakes, roll and cut the next batch. While the second batch bakes, the first batch is cooling. This keeps the assembly line moving and cuts total time by about 15 minutes. I set a timer on my phone for each step so I don’t forget about the cookies in the oven—I’ve definitely burned a batch while answering a text before.
The candy eye problem. Sometimes the candy eyes fall off after baking. This happens when you press them in too lightly or the dough spreads away from them. Solution: press them in firmly (but gently) and make a tiny indent in the dough around each eye with your fingertip. This creates a little “nest” that holds them in place. If some still fall off, just press them back on while the cookies are still warm—they’ll stick.
Variations & Adaptations
One of the best things about this recipe is how flexible it is. Here are some variations I’ve tried and loved:
Gluten-free version: Swap the all-purpose flour for a 1:1 gluten-free baking flour (I like Bob’s Red Mill or King Arthur). Add 1/4 teaspoon xanthan gum if your blend doesn’t already include it. The texture will be slightly more crumbly, but the taste is still fantastic. I made these for a friend with celiac disease and she said they were the best gluten-free cookies she’d had in years.
Chocolate black cats: Replace 1/4 cup of the flour with unsweetened cocoa powder. This gives you a darker color naturally (so you need less food coloring) and a chocolatey flavor that kids go crazy for. The texture is slightly more tender. I add an extra tablespoon of butter to compensate for the cocoa powder’s dryness.
Spooky sprinkle cats: Before baking, sprinkle the cookies with black sanding sugar or orange and purple sprinkles. Press them in gently so they stick. This adds a fun crunch and makes the cookies look even more festive. My daughter calls these “party cats.”
Pumpkin spice version: Add 1 teaspoon pumpkin pie spice and 1/2 teaspoon cinnamon to the dry ingredients. The warm spices pair beautifully with the almond extract and give the cookies a fall flavor that’s perfect for Halloween. I made these for a fall festival and they were gone in 20 minutes.
No-cutter version: If you don’t have a cat cookie cutter, roll the dough into 1-inch balls, flatten slightly, and pinch two little triangles on top for ears. Press in candy eyes and you have round cat faces. They’re not as fancy, but they’re actually cuter in a silly way. My nephew calls them “chubby cats.”
Vegan adaptation: Use vegan butter sticks and a flax egg. The cookies will be slightly less tender, but the flavor is still great. I’ve made these for a vegan friend’s Halloween party and nobody guessed they were dairy-free.
Serving & Storage Suggestions
These cookies are best served at room temperature, which makes them perfect for parties—no last-minute heating or fussing. Arrange them on a platter with some orange and black napkins, maybe a few fake spiderwebs for atmosphere. Kids love seeing them lined up like a little cat parade.
Storage: Keep the cookies in an airtight container at room temperature for up to 5 days. Layer them with parchment paper between each layer to prevent the candy eyes from scratching the surface of the cookies below. Don’t store them in the refrigerator—the moisture will make them soft and the candy eyes will get sticky.
Freezing: These cookies freeze beautifully. Place them in a single layer on a baking sheet and freeze for 1 hour, then transfer to a freezer-safe bag or container. They’ll keep for up to 3 months. Thaw at room temperature for about 30 minutes before serving. I always make a double batch and freeze half for the next Halloween party or unexpected school event.
Freezing the dough: You can also freeze the unbaked dough. Roll it out, cut the shapes, and place them on a parchment-lined baking sheet. Freeze until solid, then transfer to a freezer bag. Bake from frozen, adding 2-3 minutes to the bake time. This is my favorite trick for last-minute Halloween treats—just pull out what you need and bake.
Reheating: If you want that just-baked warmth, pop the cookies in a 300°F oven for 3-4 minutes. Don’t microwave them—the sugar will melt and the candy eyes might slide off. I learned this when I tried to warm up a cookie for my son’s after-school snack and ended up with a cat that looked like it had melted in the sun.
Flavor development: These cookies actually taste better the next day. The flavors meld together and the texture softens slightly. If you’re making them for a party, bake them a day ahead. Your future self will thank you.
Nutritional Information & Benefits
Let’s be real—these are sugar cookies. They’re a treat, not a health food. But here’s what you’re getting per cookie (based on a standard 2-inch cat shape):
- Calories: 120-140 per cookie
- Total Fat: 6g (mostly from butter)
- Saturated Fat: 3.5g
- Carbohydrates: 17g
- Sugar: 9g
- Protein: 2g
- Fiber: 0.5g
Health highlights: The butter provides a small amount of vitamin A, and the egg adds protein. If you use almond extract, you’re getting a tiny bit of almond’s natural vitamin E. But honestly, the real benefit here is the joy factor—baking with kids, sharing treats, and creating Halloween memories. That’s worth more than any nutrient profile.
Dietary considerations: This recipe contains gluten, dairy, and eggs. For gluten-free, dairy-free, or vegan options, see the variations section above. The cookies are nut-free if you skip the almond extract (use extra vanilla instead). Always check your candy eyes for allergen warnings—some brands are made in facilities that process nuts.
My wellness perspective: I believe in balance. These cookies are part of a happy Halloween, not a daily habit. One or two with a glass of milk after trick-or-treating? Perfect. A whole batch in one sitting? Maybe not. But that’s true of any treat. Enjoy them, share them, and don’t stress about the numbers.
Conclusion
These easy black cat sugar cookies have become a Halloween tradition in my house, and I think they deserve a spot in yours too. They’re simple enough for a weeknight baking session, special enough for a party, and cheap enough that you don’t wince when the kids eat more dough than they shape into cats. The recipe came from an unexpected source—a thrift store clerk with a memory of her mother’s kitchen—and that’s part of what makes it special. It’s a recipe passed down not through fancy cookbooks, but through real people who just wanted to make something fun for the kids in their lives.
I love that these cookies don’t require perfection. The cats can be lopsided, the eyes can be crooked, and they’ll still be the hit of any Halloween gathering. That’s the beauty of baking with kids—it’s not about the final product looking like it came from a bakery. It’s about the flour on the floor, the giggles over a cat with one eye, and the pride in a child’s voice when they say, “I made that.”
So go ahead—grab that cat cookie cutter, dig out the food coloring, and make a mess. Your kitchen will be covered in black dough, your hands will be stained, and you’ll wonder why you ever thought this was a good idea. But then you’ll see those cookies cooling on the rack, little black cats with shiny eyes, and you’ll know exactly why it was worth it. I’d love to hear how your batch turns out—drop a comment below and tell me about your favorite Halloween baking memory. And if you try a fun variation, share that too! Happy Halloween, and happy baking!
Frequently Asked Questions
Can I make the dough ahead of time?
Absolutely. You can prepare the dough up to 3 days in advance and keep it wrapped tightly in the refrigerator. Let it sit at room temperature for about 10 minutes before rolling—it’ll be too firm to work with straight from the fridge. You can also freeze the dough for up to 3 months.
Why did my cookies turn out gray instead of black?
This usually happens when you use liquid food coloring instead of gel. Liquid coloring has too much water, which dilutes the color and makes the dough grayish. Gel food coloring is much more concentrated and gives that deep, true black. Also, let the dough rest for 10 minutes after adding the color—it deepens as it sits.
Can I use a different cookie cutter shape?
Of course! While these are designed for cat shapes, the dough works beautifully with any Halloween-themed cutter—pumpkins, ghosts, bats, or even simple circles. Just adjust the baking time slightly for smaller or larger shapes. Check them at 7 minutes for small cutters and 10 minutes for larger ones.
How do I keep the candy eyes from falling off?
Press them in gently but firmly before baking, and create a tiny indent around each eye with your fingertip. This gives the eyes a little “nest” to sit in. If some still fall off during baking, press them back on while the cookies are still warm—they’ll stick as the cookie cools.
Can I make these cookies without a mixer?
Yes! You can cream the butter and sugar by hand with a wooden spoon—it just takes more elbow grease and about 5 minutes of vigorous stirring. Make sure your butter is very soft (almost room temperature buttercream consistency) to make it easier. The rest of the recipe works exactly the same way.
Pin This Recipe!

Easy Black Cat Sugar Cookies: Best Halloween Treat for Kids

These easy black cat sugar cookies are a forgiving, fun, and budget-friendly Halloween treat that kids love. Made with simple ingredients and black gel food coloring, they come together in about 45 minutes and are perfect for parties and family baking.
- Prep Time: 15 minutes
- Cook Time: 10 minutes
- Total Time: 45 minutes
- Yield: 24 servings 1x
- Category: Dessert
- Cuisine: American
Ingredients
- 1 cup (2 sticks) unsalted butter, softened
- 1 cup granulated sugar
- 1 large egg, room temperature
- 1 teaspoon vanilla extract
- 1/2 teaspoon almond extract (optional)
- 2 1/2 cups all-purpose flour
- 1/2 teaspoon baking powder
- 1/2 teaspoon salt
- 1–2 teaspoons black gel food coloring
- Candy eyes (edible)
- Optional: black sanding sugar or sprinkles
Instructions
- Cream the butter and sugar: In a mixing bowl, beat the softened butter and granulated sugar together on medium speed until light and fluffy, about 3 minutes. Scrape down the sides halfway through.
- Add the wet ingredients: Beat in the egg, vanilla extract, and almond extract (if using) until fully combined. The mixture may look slightly curdled; that’s normal.
- Mix the dry ingredients separately: In a medium bowl, whisk together the flour, baking powder, and salt.
- Combine wet and dry: Gradually add the flour mixture to the butter mixture, mixing on low speed in three additions, scraping the bowl between each. Stop mixing as soon as the dough comes together. The dough should be soft but not sticky; if too sticky, add a tablespoon of flour.
- Add the black food coloring: Switch to a spatula and add about 1 teaspoon of black gel food coloring. Fold it into the dough until combined. Add more coloring, a few drops at a time, until you reach a deep black (about 1 1/2 teaspoons total). Wear disposable gloves to avoid staining hands.
- Let the dough rest: Cover the bowl with plastic wrap and let it sit at room temperature for 10 minutes. This allows the color to deepen and the gluten to relax.
- Preheat and prep: Preheat your oven to 350°F (175°C). Line two baking sheets with parchment paper.
- Roll out the dough: Lightly flour your work surface and rolling pin. Roll the dough to about 1/4-inch thickness. Use two wooden dowels or chopsticks on either side for even thickness.
- Cut the shapes: Dip a cat-shaped cookie cutter in flour before each cut. Press straight down and wiggle to release. Use an offset spatula to transfer cut cookies to the baking sheet, leaving about 2 inches between them.
- Add the eyes (before baking): Gently press two candy eyes into each cookie, positioned close together toward the front of the cat face. Create a tiny indent around each eye with your fingertip to help them stay in place.
- Bake: Bake for 8-10 minutes, rotating the pan halfway through. The cookies are done when the edges are set and the bottoms are just barely golden. They will look slightly underdone in the center.
- Cool: Let the cookies cool on the baking sheet for 5 minutes, then transfer to a wire rack to cool completely.
Notes
Use gel food coloring for true black color; liquid will turn gray. Let dough rest after coloring for deeper color. For best texture, don’t overmix or overbake. Cookies taste even better the next day. Store in an airtight container at room temperature for up to 5 days. Freeze baked cookies for up to 3 months.
Nutrition
- Serving Size: 1 cookie
- Calories: 130
- Sugar: 9
- Sodium: 75
- Fat: 6
- Saturated Fat: 3.5
- Carbohydrates: 17
- Fiber: 0.5
- Protein: 2
Keywords: black cat cookies, Halloween cookies, sugar cookies, easy Halloween treats, kid-friendly baking, black cat sugar cookies


