Love this? Save it for later!
Share the inspiration with your friends
The church bake sale was in twelve hours and I’d completely forgotten. My grandmother’s famous pecan pie was the one everyone expected from our family—the one that usually won the bidding war. But here’s the thing: I’d used the last of her handwritten recipe as a bookmark somewhere, and a single pie’s worth of pecans costs more than my weekly coffee budget. I stood in my kitchen at nine o’clock at night, staring at a half-empty jar of maple syrup, a splash of bourbon left from a party months ago, and a package of store-brand butter that was definitely on sale. Not exactly the stuff of blue-ribbon dreams.
I almost gave up and grabbed a box of brownies from the gas station. Honestly, I was this close. But then I thought about my neighbor, Mrs. Patterson, who always brings those perfectly layered lemon bars. The competitive side of me—the side I pretend doesn’t exist—kicked in. I started throwing things together, muttering the whole time about how this was going to be a disaster. I used a cheap 9×13 pan instead of a fancy tart dish. I pressed the crust in with the bottom of a measuring cup because I couldn’t find my rolling pin. It was messy, it was rushed, and I was pretty sure I’d added too much salt.
You know that feeling when you’re convinced something is going to flop, so you stop caring? That was me. I poured the filling, slid it in the oven, and didn’t even bother to peek. The next morning, I cut them into squares with a dull knife (the bars crumbled a bit at the edges, which I told myself added “rustic charm”). I carried them to the bake sale like a kid bringing a C- paper home. And then? They sold out in twenty minutes. Mrs. Patterson bought two pieces. Two. That’s when I knew this budget-friendly maple bourbon pecan pie bars recipe was something special—not because it’s fancy, but because it’s honest. It’s the recipe you make when you’re short on time, short on cash, but still want to show up with something that tastes like you planned it all along.
Why You’ll Love This Recipe
Let’s be real for a second. Traditional pecan pie is delicious, but it’s also a hassle. Between making a fussy pastry crust, toasting nuts that cost a small fortune, and worrying about the filling setting up just right, it’s not exactly a weeknight project. These bars flip all of that on its head, and I think you’re going to love them for a few very specific reasons.
- Budget-Friendly to the Core: This is the star of the show. By using a simple shortbread crust instead of a rolled pie dough, you skip the expensive butter and the stress. We’re also stretching the pecans further by chopping them, so a smaller bag goes a long way. The maple and bourbon are used as flavor accents, not the main event, meaning a little bottle lasts for multiple batches. Your wallet will thank you.
- Way Less Stress, Same Big Flavor: No rolling pin. No chilling the dough for an hour. No blind baking with pie weights. You literally press the crust into the pan with your fingers. It’s almost impossible to mess up. The filling is a one-bowl situation that you whisk together in under five minutes. This is pecan pie flavor for people who don’t have time for pecan pie drama.
- Perfect for Feeding a Crowd: A regular pie gives you eight slices, maybe ten if you’re being stingy. A 9×13 pan of these bars gives you twenty-four generous squares. That’s a game-changer for potlucks, holiday parties, or just having dessert on hand for a week without feeling like you’re rationing it.
- Picky Eater Approved: The texture is different from a traditional pie. The crust is more like a buttery shortbread cookie, and the filling is slightly firmer and less gooey. My own kids, who normally push a pecan pie around their plate, devoured these. Something about the bar format just makes it more approachable for little hands.
- That Bourbon-Maple Twist: It’s not just a gimmick. The bourbon adds a warm, slightly smoky depth that cuts through the sweetness, while the maple syrup brings a woodsy, complex sweetness that’s different from plain corn syrup. Together, they make these bars taste like you spent hours developing a signature recipe, when really, you just raided your pantry.
This isn’t just another version of a classic dessert. It’s the version you’ll actually make, because it respects your time, your budget, and your sanity.
What Ingredients You Will Need
This recipe uses simple, everyday ingredients to create something that feels surprisingly luxurious. Most of these are probably in your kitchen right now, which is exactly the point. Let’s walk through each one so you know exactly what to grab and why.
For the Shortbread Crust
- 2 cups all-purpose flour (240g): Standard all-purpose flour works perfectly here. No need for bread flour or pastry flour. It gives the crust that sturdy, buttery structure that holds up to the heavy filling.
- 1/2 cup granulated sugar (100g): Just enough sweetness to balance the salty butter. I’ve tried this with brown sugar, and it works, but it makes the crust a bit softer and less crisp. Stick with white sugar for the best texture.
- 3/4 cup cold unsalted butter, cubed (170g, 1.5 sticks): Cold butter is key. You want to cut it into the flour until the mixture looks like coarse meal. If the butter gets too warm, the crust can turn out greasy instead of flaky. I use Land O’Lakes because it has a consistent fat content, but any standard brand works.
- 1/4 teaspoon salt: Don’t skip this. Salt makes the butter taste butterier and prevents the crust from being flat.
For the Maple Bourbon Filling
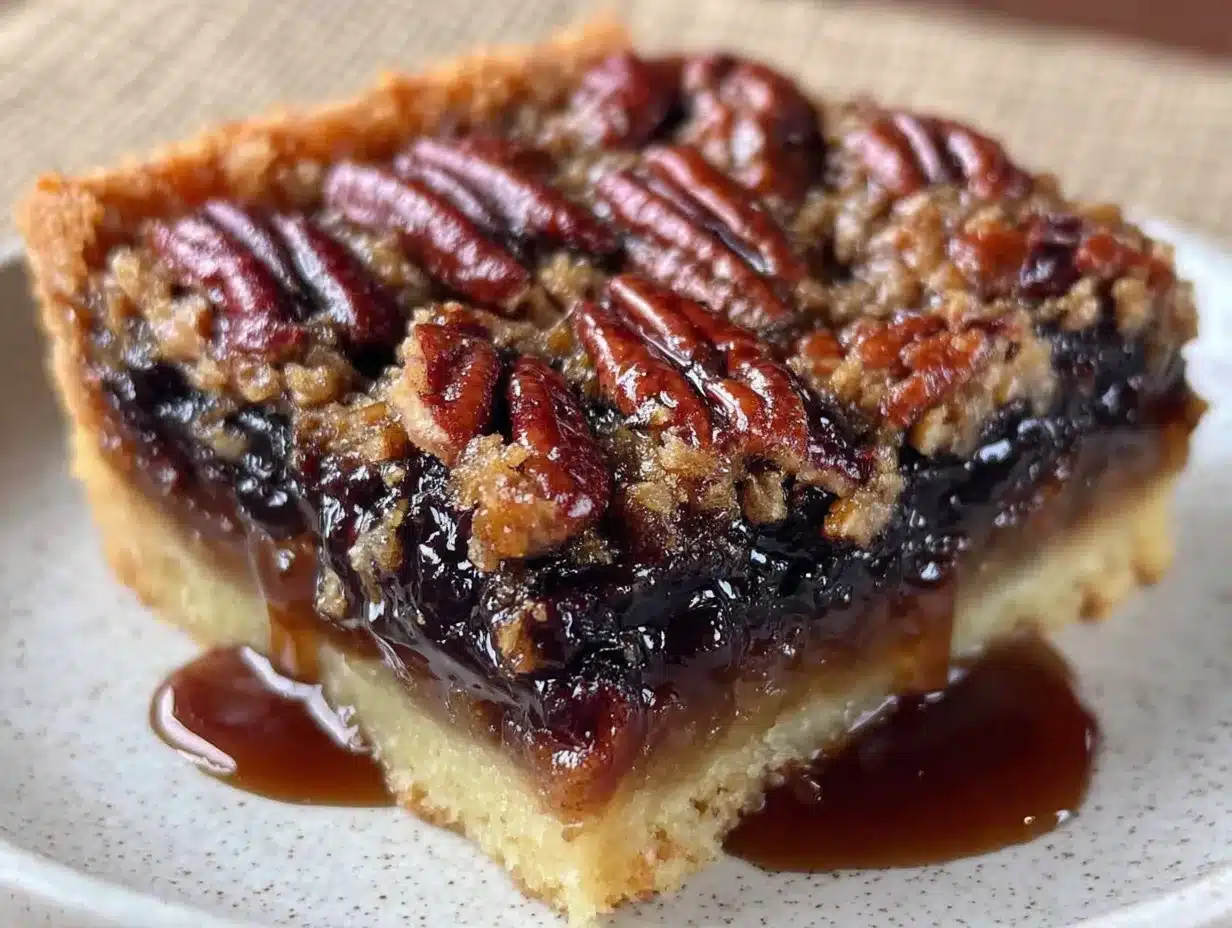
- 3 large eggs: These provide the structure for the filling. Make sure they’re at room temperature so they incorporate smoothly. If you forget to take them out, place them in a bowl of warm water for five minutes.
- 3/4 cup pure maple syrup (180ml): Please, please use real maple syrup, not pancake syrup. The flavor difference is night and day. That said, you don’t need the fancy Grade A Amber for baking. I use Grade A Dark Color for a more robust maple taste, and it’s usually a dollar or two cheaper.
- 1/2 cup packed light brown sugar (100g): This adds depth and a slight molasses note that pairs beautifully with the bourbon. Dark brown sugar works too, but it will make the filling a bit richer and darker.
- 1/4 cup unsalted butter, melted (57g, half a stick): Melted butter gives the filling a silky richness. Let it cool slightly before adding it to the eggs so you don’t accidentally scramble them.
- 2 tablespoons bourbon (30ml): This is where the magic happens. You don’t need top-shelf bourbon here. A budget-friendly brand like Evan Williams or Jim Beam works perfectly. The alcohol mostly cooks off, leaving behind that warm, vanilla-oak flavor. If you’re serving kids or avoiding alcohol, substitute 1 teaspoon of vanilla extract plus 1 tablespoon of water.
- 1 teaspoon vanilla extract: It rounds out the flavors and makes everything taste more cohesive. Use pure vanilla if you have it, but imitation is fine for baking.
- 2 cups pecan halves or pieces (200g): Here’s a money-saving tip: buy pecan pieces instead of perfect halves. They’re significantly cheaper, and since you’re chopping them anyway, nobody will know the difference. Toast them lightly in a dry pan for 3-4 minutes to wake up their oils and deepen the flavor.
- 1 tablespoon all-purpose flour: This is my secret trick. Adding a tiny bit of flour to the filling helps stabilize it, preventing that dreaded runny, soupy texture that pecan pies sometimes get. It makes the bars slice cleanly.
Equipment Needed
You don’t need a fancy pastry setup for these bars, which is honestly one of my favorite things about them. Here’s what you’ll need to pull this off:
- 9×13-inch baking pan: A metal pan works best because it conducts heat evenly and gives you a crisper crust. Glass pans can work, but you might need to add 5 minutes to the baking time. If you only have an 8×8 pan, you can halve the recipe, but honestly, you’ll want the full batch.
- Parchment paper: This is non-negotiable for easy removal. Cut two long strips that overhang the pan on opposite sides, creating a sling. It makes lifting the entire block of bars out a breeze.
- Large mixing bowls: One for the crust, one for the filling. Nothing fancy needed.
- Pastry cutter or two forks: For cutting the butter into the flour. You can also use your hands, but work quickly so the butter doesn’t soften too much. I’ve even used a food processor in a pinch (pulse just until crumbly).
- Measuring cups and spoons: For accuracy, especially with the flour and sugar. Baking is a science, even when it’s forgiving.
- Whisk: For combining the filling ingredients smoothly.
- Sharp knife: For cutting clean squares. A dull knife will drag through the filling and make a mess. Run the knife under hot water and wipe it dry between cuts for the neatest results.
Preparation Method
Alright, let’s get baking. I’ll walk you through this step by step, including all the little things I’ve learned from making these bars at least a dozen times. Trust me on the details.
- Preheat and Prep the Pan. Set your oven to 350°F (175°C). Line your 9×13 pan with parchment paper, leaving a couple inches of overhang on the long sides. Lightly spray the parchment with non-stick cooking spray, just to be safe. This is your insurance policy against stuck bars.
- Make the Shortbread Crust. In a large bowl, whisk together 2 cups of flour, 1/2 cup of sugar, and 1/4 teaspoon of salt. Add the 3/4 cup of cold, cubed butter. Using a pastry cutter or two forks, cut the butter into the flour mixture until it looks like coarse sand with a few pea-sized butter lumps remaining. Don’t overwork it—you want those little pockets of butter to create a tender, flaky texture. Dump the mixture into your prepared pan and press it firmly into an even layer. I use the bottom of a flat measuring cup to really pack it down. This is important because a loosely packed crust will crumble when you cut the bars.
- Bake the Crust. Pop the pan into the oven and bake for 18-20 minutes, until the edges are just starting to turn a light golden brown. The center will still look a bit pale, and that’s perfect. You want it partially baked so it doesn’t get soggy when you add the filling. Set the pan on a wire rack to cool slightly while you make the filling. Leave the oven on.
- Toast the Pecans (Optional but Recommended). While the crust bakes, spread your 2 cups of pecan pieces on a separate baking sheet. Toast them in the oven for 4-5 minutes, until they smell fragrant and nutty. Watch them closely—they go from toasted to burnt in about 30 seconds. Let them cool while you mix the filling. This step deepens the flavor immensely.
- Whisk the Filling. In a medium bowl, whisk together the 3 eggs until they’re frothy and light yellow. Add the 3/4 cup of maple syrup, 1/2 cup of brown sugar, 1/4 cup of melted butter, 2 tablespoons of bourbon, and 1 teaspoon of vanilla. Whisk until everything is smooth and well combined. Sprinkle the 1 tablespoon of flour over the top and whisk it in until no lumps remain. This flour trick really does make a difference in the final texture.
- Assemble the Bars. Sprinkle the toasted pecans evenly over the warm pre-baked crust. Pour the filling over the pecans, making sure it spreads to all the corners. Don’t worry if some pecans float to the top—that’s actually what you want for a pretty presentation. Gently tap the pan on the counter a couple of times to release any air bubbles.
- Bake the Bars. Place the pan back in the oven and bake for 25-30 minutes. The filling should be set around the edges but still have a slight jiggle in the center when you gently shake the pan. It will continue to set as it cools. If you overbake it, the filling can become grainy and hard, so err on the side of under-done. Your kitchen is going to smell like heaven right now—maple, bourbon, and toasted nuts.
- Cool Completely. This is the hardest part. Let the bars cool on a wire rack for at least 2 hours at room temperature. Then, transfer the pan to the refrigerator and chill for another 2 hours, or until the filling is completely firm. I know you want to dig in, but cutting warm bars is a recipe for a gooey mess. Patience pays off here.
- Slice and Serve. Once fully chilled, use the parchment sling to lift the entire block of bars out of the pan. Place it on a cutting board. Use a sharp knife to cut into 24 squares (6 rows by 4 rows). For the cleanest cuts, wipe the knife blade clean between each slice. Serve cold or at room temperature. They’re amazing either way.
Cooking Tips & Techniques
I’ve made a lot of mistakes in the kitchen so you don’t have to. Here are the lessons I learned the hard way when it comes to these bars.
Don’t Overmix the Crust. I know it’s tempting to keep working the butter into the flour until it looks like a uniform dough. Stop earlier than you think. The little chunks of butter create steam pockets in the oven, which gives you that tender, shortbread texture. If you overmix, you’ll end up with a tough, cracker-like crust. I once did this while distracted by a phone call, and the crust came out hard enough to use as a hockey puck.
Room Temperature Eggs Matter. This isn’t just food snobbery. Cold eggs don’t emulsify well with the melted butter and syrup, which can lead to a slightly greasy or separated filling. If you’re in a rush, place the eggs in a bowl of warm tap water for 5 minutes before cracking them. Problem solved.
The Jiggle Test is Your Friend. Every oven runs a little differently. My ancient oven runs about 25 degrees hot, so I start checking the bars at the 20-minute mark. The edges should be puffed and set, while the center should wobble like Jell-O when you gently shake the pan. If the center looks liquidy and sloshes around, give it more time. If it’s completely firm, you’ve gone too far.
Chill Before Cutting. I cannot stress this enough. I once brought these to a friend’s house straight from the oven (because I was running late, as usual). Cutting them was a disaster. The filling oozed out everywhere, the crust crumbled, and they looked like a sad pile of dessert rubble. Tasted fine, but presentation? A solid zero. Give them the full chill time, and you’ll get those beautiful, clean squares that look bakery-bought.
Use a Hot Knife for Clean Cuts. Run your knife under hot water and dry it off before each cut. The heat helps the blade glide through the sticky filling without dragging. It’s a small step that makes a huge difference, especially if you’re serving these for a holiday or special occasion.
Variations & Adaptations
One of the best things about this recipe is how flexible it is. Here are a few ways to make it your own, depending on what you have on hand or who you’re feeding.
- Bourbon-Free Version: If you’re making these for kids, a school bake sale, or just don’t have bourbon, replace the 2 tablespoons of bourbon with 1 tablespoon of water and 1 teaspoon of vanilla extract. You’ll lose a bit of that warm, oaky depth, but the maple flavor will shine through beautifully. I’ve also used a splash of apple cider in a pinch, and it was surprisingly good.
- Chocolate Lover’s Twist: Sprinkle 1/2 cup of semi-sweet chocolate chips over the crust before adding the pecans and filling. The chocolate melts into the bars as they bake, creating little pockets of richness. My sister-in-law requests this version every Thanksgiving, and I can’t blame her.
- Gluten-Free Adaptation: Substitute the all-purpose flour in the crust with a 1:1 gluten-free baking flour blend (like King Arthur’s Measure for Measure). The texture will be slightly more crumbly, but still delicious. Don’t skip the flour in the filling, though—it’s needed for structure. Use a gluten-free blend there as well.
- Nut-Free Alternative: I know, pecan pie without pecans sounds crazy. But if you’re dealing with allergies, try using roasted pumpkin seeds (pepitas) or sunflower seeds instead. They won’t have the same buttery texture, but they’ll give you a nice crunch and nutty flavor without the risk. Toast them first for best results.
- Spiced-Up Version: Add 1/2 teaspoon of cinnamon and a pinch of nutmeg to the filling for a cozy, fall-inspired twist. It’s especially good around the holidays and pairs beautifully with the maple and bourbon. You can also add a pinch of cayenne for a surprising kick that cuts the sweetness.
Serving & Storage Suggestions
These bars are incredibly versatile when it comes to serving. Here’s how to make the most of them, from the moment they come out of the fridge to a few days later.
Serving Temperature: I prefer these bars cold, straight from the fridge. The filling firms up nicely and the crust stays crisp. But they’re also wonderful at room temperature, especially if you’re serving them as part of a dessert table. If you want to get fancy, warm a square in the microwave for about 10 seconds and top it with a scoop of vanilla ice cream. The warm-cold contrast is absolutely dreamy.
Presentation Ideas: Dust the tops with a little powdered sugar just before serving for a pretty, snowy look. Or drizzle them with a simple glaze made from 1/2 cup of powdered sugar and 1 tablespoon of milk. For a holiday spread, arrange them on a platter with fresh rosemary sprigs and a few extra pecan halves for garnish.
Storage Instructions: Store leftover bars in an airtight container in the refrigerator for up to 5 days. Place a sheet of parchment paper between layers to prevent sticking. They actually get better on day two, as the flavors meld together. Do not leave them at room temperature for more than 2 hours, as the filling is egg-based and can spoil.
Freezing Instructions: These bars freeze beautifully. Once they’re fully chilled and cut, place the squares on a baking sheet and freeze for 1 hour until solid. Transfer them to a freezer-safe bag or container, separating layers with parchment. They’ll keep for up to 3 months. To thaw, simply move them to the refrigerator overnight. They’ll taste just as fresh as the day you made them.
Reheating: If you prefer them warm, pop a frozen or refrigerated bar in a 300°F oven for 5-7 minutes. The microwave works in a pinch (15-20 seconds), but the oven keeps the crust crisper. Avoid reheating the whole batch at once—just warm what you plan to eat.
Nutritional Information & Benefits
Let’s be honest: these are a treat, not a health food. But there are a few bright spots worth mentioning. Here’s a rough breakdown per bar (based on 24 servings):
| Nutrient | Amount Per Bar |
|---|---|
| Calories | 210 |
| Total Fat | 12g |
| Saturated Fat | 5g |
| Carbohydrates | 24g |
| Sugar | 16g |
| Protein | 3g |
| Fiber | 1g |
| Sodium | 95mg |
Pecans are actually a good source of healthy monounsaturated fats, magnesium, and zinc. Maple syrup contains antioxidants and minerals like manganese and zinc, though it’s still sugar, so moderation is key. The eggs provide high-quality protein and choline, which is great for brain health. If you’re watching your sugar intake, you could reduce the brown sugar to 1/3 cup, but the texture will be slightly less gooey. These bars are not gluten-free, dairy-free, or low-carb as written, but the variations above can help adapt them.
Conclusion
So there you have it. A dessert that started as a frantic, last-minute panic bake turned into one of my most-requested recipes. These budget-friendly maple bourbon pecan pie bars prove that you don’t need expensive ingredients or hours of free time to create something truly memorable. They’re proof that a little creativity, a dash of resourcefulness, and a willingness to just go for it can lead to something delicious.
I hope you give these a try, whether it’s for a holiday gathering, a potluck, or just a Tuesday night when you need a little sweetness. Don’t be afraid to tweak them—swap the nuts, adjust the bourbon, add some chocolate. The best recipes are the ones that become yours. And honestly, the fact that they’re easy on the wallet? That’s just the icing on the cake. Or in this case, the maple-bourbon glaze on the bar.
If you make these, I’d love to hear about it. Leave a comment below and tell me how they turned out, or share a photo on social media and tag me. Happy baking, friends. You’ve got this.
Frequently Asked Questions
Can I use pancake syrup instead of maple syrup?
I wouldn’t recommend it. Pancake syrup is mostly corn syrup and artificial flavoring, which will make the bars overly sweet and one-dimensional. Real maple syrup provides a complex, woodsy sweetness that’s essential to the flavor profile. Save the pancake syrup for, well, pancakes.
Do I have to use bourbon, or can I skip it?
The bourbon adds a warm, vanilla-oak depth that really elevates these bars, but you can absolutely skip it. Replace it with 1 tablespoon of water and 1 teaspoon of vanilla extract, or simply leave it out and add an extra tablespoon of maple syrup. The bars will still be delicious, just slightly less complex.
Why did my filling turn out runny?
A runny filling usually means one of two things: you didn’t bake it long enough, or you cut the bars before they were fully cooled and set. Make sure you’re doing the jiggle test (the center should wobble slightly, not slosh) and give them the full 2-hour chill in the fridge. The flour in the filling also helps prevent this, so don’t skip it.
Can I make these bars ahead of time?
Absolutely. In fact, they’re better on day two. You can make them up to three days in advance and store them in the refrigerator. They also freeze beautifully for up to three months. Just make sure they’re fully cooled and chilled before wrapping them tightly for storage.
How do I get clean, neat cuts without the filling sticking to the knife?
The secret is a hot, wet knife. Run your knife under hot water, dry it off quickly, and make your cut. Wipe the blade clean between each slice, and repeat the hot water step every few cuts. This prevents the sticky filling from dragging and gives you those perfect, bakery-style squares.
PrintBudget-Friendly Maple Bourbon Pecan Pie Bars
These budget-friendly maple bourbon pecan pie bars are a last-minute bake sale hero. With a simple shortbread crust, a rich maple-bourbon filling, and toasted pecans, they deliver classic pecan pie flavor without the fuss or high cost.
- Prep Time: 20 minutes
- Cook Time: 50 minutes
- Total Time: 4 hours 10 minutes (includes cooling and chilling)
- Yield: 24 servings 1x
- Category: Dessert
- Cuisine: American
Ingredients
- 2 cups all-purpose flour (240g)
- 1/2 cup granulated sugar (100g)
- 3/4 cup cold unsalted butter, cubed (170g, 1.5 sticks)
- 1/4 teaspoon salt
- 3 large eggs
- 3/4 cup pure maple syrup (180ml)
- 1/2 cup packed light brown sugar (100g)
- 1/4 cup unsalted butter, melted (57g, half a stick)
- 2 tablespoons bourbon (30ml)
- 1 teaspoon vanilla extract
- 2 cups pecan halves or pieces (200g)
- 1 tablespoon all-purpose flour
Instructions
- Preheat oven to 350°F (175°C). Line a 9×13-inch baking pan with parchment paper, leaving overhang on the long sides. Lightly spray with non-stick cooking spray.
- Make the shortbread crust: In a large bowl, whisk together 2 cups flour, 1/2 cup sugar, and 1/4 teaspoon salt. Add cold cubed butter. Using a pastry cutter or two forks, cut butter into flour mixture until it resembles coarse sand with a few pea-sized butter lumps. Press firmly into an even layer in the prepared pan.
- Bake the crust for 18-20 minutes, until edges are light golden brown. Set on a wire rack to cool slightly. Leave oven on.
- Toast the pecans (optional but recommended): Spread 2 cups pecan pieces on a baking sheet and toast in the oven for 4-5 minutes until fragrant. Let cool.
- Make the filling: In a medium bowl, whisk 3 eggs until frothy. Add 3/4 cup maple syrup, 1/2 cup brown sugar, 1/4 cup melted butter, 2 tablespoons bourbon, and 1 teaspoon vanilla. Whisk until smooth. Sprinkle 1 tablespoon flour over the top and whisk until no lumps remain.
- Assemble the bars: Sprinkle toasted pecans evenly over the warm pre-baked crust. Pour filling over pecans, spreading to all corners. Tap the pan on the counter to release air bubbles.
- Bake for 25-30 minutes, until edges are set and center jiggles slightly when shaken.
- Cool completely on a wire rack for at least 2 hours at room temperature, then refrigerate for another 2 hours until fully firm.
- Use parchment sling to lift bars out of pan. Cut into 24 squares (6 rows by 4 rows) with a sharp knife, wiping blade clean between cuts.
Notes
For clean cuts, run knife under hot water and wipe dry between slices. Chill bars completely before cutting. If avoiding bourbon, substitute 1 tablespoon water and 1 teaspoon vanilla extract. Bars can be stored in the refrigerator for up to 5 days or frozen for up to 3 months.
Nutrition
- Serving Size: 1 bar
- Calories: 210
- Sugar: 16
- Sodium: 95
- Fat: 12
- Saturated Fat: 5
- Carbohydrates: 24
- Fiber: 1
- Protein: 3
Keywords: pecan pie bars, maple bourbon, budget-friendly, shortbread crust, bake sale, easy dessert


