Love this? Save it for later!
Share the inspiration with your friends
I was stuck in rush hour traffic, which is honestly the last place you expect to find culinary inspiration. My patience was wearing thin, and I was mentally running through my to-do list for the Halloween party I was hosting that weekend. I needed a dessert that was impressive but not fussy, spooky but not scary, and something that would make my guests actually say “wow” instead of just politely nibbling. As I sat there, watching the rain streak down my windshield, I started scrolling through a vintage baking group I’d joined on a whim. And there it was—a photo of the most adorable little ghost-shaped meringues, posted by a woman named Carol who, judging by her profile picture, was someone’s sweet grandmother. She’d scribbled the recipe on a napkin and photographed it right there in her kitchen, next to a slightly chipped ceramic cat cookie jar. I mean, talk about unexpected. Here I was, stressed and stuck in traffic, and the perfect Halloween party treat had just found me from a complete stranger’s kitchen. I wrote down the ingredients on the back of an old receipt, and let me tell you, I almost rear-ended the car in front of me when I saw how simple they were.
Honestly, I was a little skeptical. Meringues can be finicky, right? They’re known for being temperamental, weeping in the oven, or just not turning out right. But Carol’s napkin recipe promised something different. She called them “Ghost Meringue Cookies,” and the secret, she said, was in the technique and the patience. I made them that very night, and the result was nothing short of magical. These little ghosts puffed up in the oven with perfect little peaks, and when I piped on tiny chocolate eyes, they literally came to life. They were light as air, sweet as candy, and absolutely perfect for a Halloween party. Since then, I’ve made them for every single gathering, and they’ve never failed to steal the show. Maybe you’ve been there—searching for that one dessert that looks like you spent hours on it but actually comes together in a snap. Well, this is it. These ghost meringues are my secret weapon for being the host with the most, and I’m so excited to finally share Carol’s legacy with you.
Why You’ll Love This Recipe
Let’s be honest, hosting a Halloween party is a lot of work. You’re thinking about decorations, costumes, drinks, and a whole spread of food. The last thing you need is a complicated dessert that takes over your kitchen. That’s where these Ghost Meringue Cookies come in. They’re the perfect blend of show-stopping and simple, and here’s why they’ll become your go-to party trick:
- Unbelievably Easy: With just a handful of ingredients, these come together in about 20 minutes of active prep time. The oven does the rest of the work.
- Naturally Gluten-Free & Low-Fat: Meringues are made from egg whites and sugar, so they’re a lighter option that fits almost any dietary need. Your guests with gluten sensitivities will thank you!
- Perfect for a Crowd: This recipe makes about 24 to 30 ghost cookies, depending on how you pipe them. It’s the ideal batch size for a party.
- Make-Ahead Magic: You can bake these days in advance. They store perfectly in an airtight container, which means one less thing to worry about on party day.
- Instant Crowd-Pleaser: I’ve served these to adults and kids alike, and the reaction is always the same—a huge grin and a request for the recipe. They’re just so darn cute and delicious.
What makes this version different from the rest? It’s all in the technique. Carol’s napkin recipe had a few key tricks that ensure your meringues are crisp, stable, and perfectly shaped. We’re talking about using room-temperature egg whites, a touch of cornstarch for stability, and a low-and-slow baking method that prevents cracking. This isn’t just another meringue recipe—it’s the one that works every single time. And when you see those little ghost faces staring back at you from the baking sheet, you’ll feel a genuine sense of accomplishment. It’s the kind of recipe that makes you look like a pastry chef without all the stress, perfect for impressing your guests and making your Halloween party truly memorable.
What Ingredients You Will Need
This recipe uses the simplest of ingredients to create something truly special. Most of these are likely already in your pantry, which is another reason to love it. Here’s what you’ll need to summon these little ghosts:
- For the Meringue:
- 4 large egg whites, at room temperature: This is non-negotiable. Cold egg whites won’t whip up to the same volume, and they’ll be much harder to stabilize. Separate your eggs when they’re cold, then let the whites sit on the counter for about 30 minutes. (I usually set them out while I’m prepping the rest of my party food.)
- 1 cup (200g) granulated sugar: Regular white sugar works best. You’ll want to use superfine sugar if you can find it, as it dissolves more easily. If you only have regular granulated sugar, just give it a quick blitz in a food processor for about 10 seconds.
- 1/2 teaspoon cream of tartar: This acid helps stabilize the egg whites and gives you a fluffier, more voluminous meringue. It’s the secret to preventing your ghosts from deflating.
- 1/4 teaspoon salt: A tiny bit of salt balances the sweetness and helps the egg whites hold their structure.
- 1 teaspoon vanilla extract: Pure vanilla extract adds warmth and depth. I recommend using a good quality one, like Nielsen-Massey, for the best flavor. Avoid imitation vanilla, as it can leave a slightly chemical aftertaste.
- 1 teaspoon cornstarch: This is Carol’s secret weapon. A little cornstarch helps absorb any excess moisture and ensures your meringues are perfectly crisp, not chewy or sticky.
- For the Ghost Faces:
- 1/4 cup (about 45g) semi-sweet or dark chocolate chips: You’ll use these to pipe on the eyes and mouths. I prefer dark chocolate for a nice contrast against the white meringue, but semi-sweet works beautifully too. Ghirardelli or Guittard are my go-to brands for consistent melting.
- Optional: A few drops of orange or black food coloring gel: If you want to add a little color to your ghosts (like a spooky orange blush on their cheeks), you can use a toothpick to swirl in a tiny bit of gel coloring into the meringue before piping. Just be careful not to overmix.
Ingredient Selection Tips: For the best results, use fresh eggs. Older egg whites are actually thinner and whip up to a greater volume, but they can also be less stable. I find that eggs that are about a week old are the sweet spot. Also, make sure your mixing bowl and whisk attachment are completely clean and free of any grease. A tiny bit of fat from a previous recipe can prevent your egg whites from whipping up properly. I always wipe my bowl down with a little lemon juice or white vinegar on a paper towel just to be safe.
Substitution Guidance: If you need a vegan option, you can try using aquafaba (the liquid from a can of chickpeas) in place of the egg whites. Use about 1/2 cup (120ml) of aquafaba for this recipe. The process is similar, but it may take a little longer to whip up. For a sugar-free version, you can substitute the granulated sugar with a powdered monk fruit sweetener, though the texture will be slightly different and less crisp.
Equipment Needed
You don’t need a lot of fancy gear to make these ghost meringues, but a few key tools will make the process much easier. Here’s what you’ll need:
- Stand Mixer or Hand Mixer: A stand mixer with a whisk attachment is ideal because you can let it run while you prep other things. However, a sturdy hand mixer works just fine—you’ll just need to hold it for a few minutes. I’ve used both, and honestly, the hand mixer builds character (and arm muscles).
- Large Glass or Metal Mixing Bowl: Avoid plastic bowls, as they can retain a tiny bit of grease that will sabotage your meringue. Glass, stainless steel, or copper are all excellent choices.
- Baking Sheets: Two large, rimmed baking sheets. I recommend lining them with parchment paper or a silicone baking mat. The silicone mat provides a little extra grip and prevents the meringues from sliding around.
- Piping Bags and Tips: You’ll need a large piping bag (disposable or reusable) fitted with a large round tip (like a Wilton 1A or 2A) or a star tip for a more textured ghost. If you don’t have a piping bag, you can use a sturdy zip-top bag with a corner snipped off—it’s a little messier, but it gets the job done.
- Small Piping Bag for Chocolate: A small disposable piping bag or a zip-top bag with a tiny corner cut off for drawing the faces. You can also use a toothpick to dot on the chocolate, but a bag is much neater.
- Wire Rack: For cooling the meringues completely after baking.
Budget-Friendly Options: If you’re just starting out, don’t run out and buy a top-of-the-line stand mixer. A hand mixer that costs around $20 will do the job perfectly. Similarly, you can skip the fancy piping tips and just use a zip-top bag. The ghosts might look a little more rustic, but they’ll taste just as good.
Preparation Method
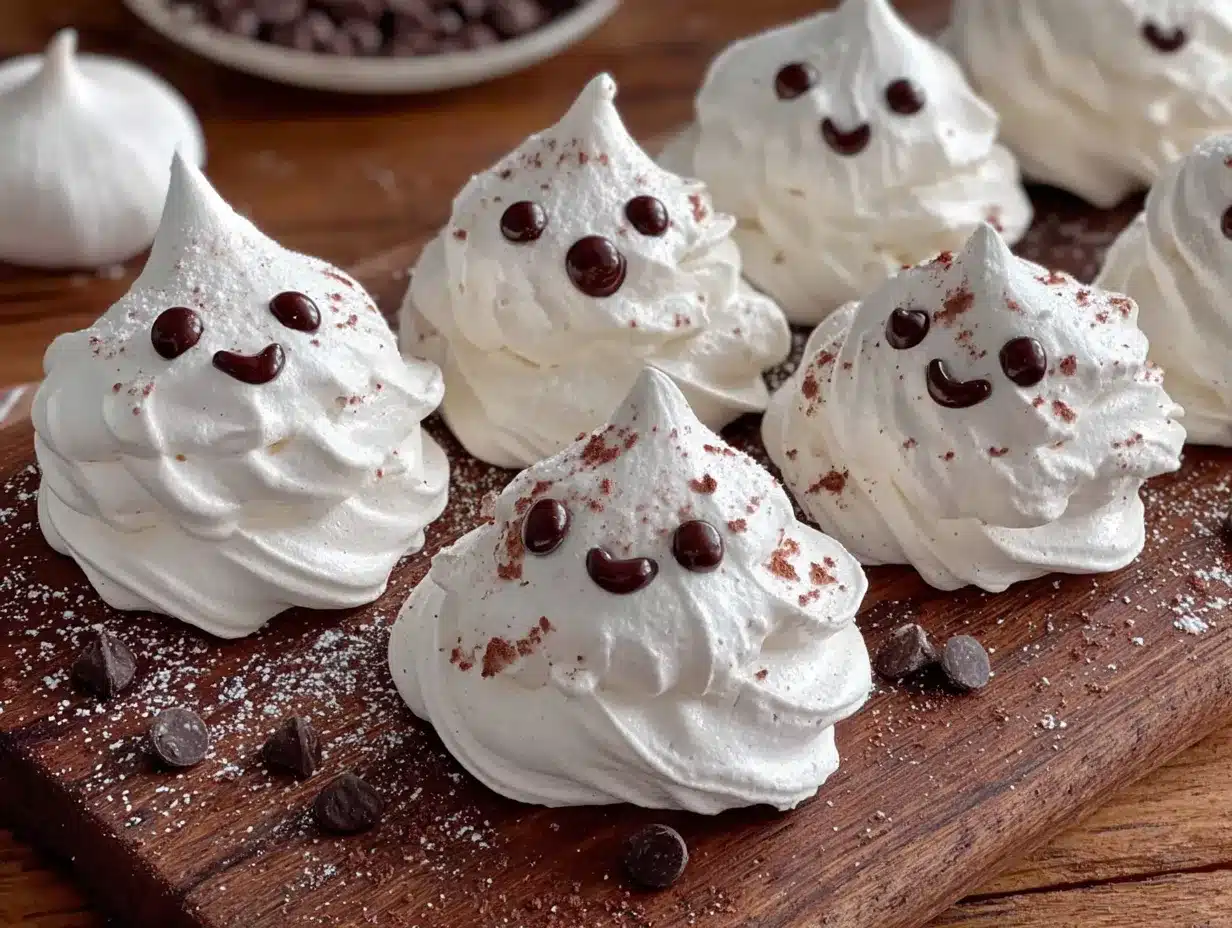
Alright, let’s get to the fun part. Follow these steps carefully, and you’ll have a batch of adorable ghost meringues ready to haunt your party table. Remember, patience is key here—we’re going low and slow.
- Preheat and Prep: Preheat your oven to 200°F (93°C). Yes, that’s very low. This is the secret to perfectly dried, crisp meringues. Line two large baking sheets with parchment paper or silicone baking mats. Set them aside.
- Whip the Egg Whites: In your completely clean, grease-free mixing bowl, combine the room-temperature egg whites and the cream of tartar. Using your stand mixer fitted with the whisk attachment (or a hand mixer), start whipping on medium speed. After about 1-2 minutes, the mixture will become frothy and bubbly, like a bubble bath. This is when you add the salt.
- Gradually Add the Sugar: This is the most important step. With the mixer running on medium-high speed, start adding the granulated sugar, one tablespoon at a time. I know it’s tedious, but adding it slowly ensures it dissolves completely. If you dump it all in at once, your meringue will be gritty and unstable. Wait about 15-20 seconds between each addition. The mixture will start to look glossy and white.
- Whip to Stiff Peaks: Once all the sugar is added, increase the speed to high and whip for another 5-7 minutes. You’re looking for “stiff peaks”—when you lift the whisk attachment, the meringue should stand straight up without flopping over. The mixture should be thick, glossy, and feel completely smooth when you rub a tiny bit between your fingers (no graininess from undissolved sugar). This is the moment of truth.
- Add the Flavorings: On low speed, beat in the vanilla extract and the cornstarch. Mix just until combined, about 10 seconds. If you’re using any food coloring, now is the time to gently swirl it in with a spatula. Do not overmix, or you’ll deflate all that beautiful air.
- Pipe the Ghosts: Transfer the meringue to your prepared piping bag fitted with the round tip. Hold the bag straight up and down, about 1/2 inch above the baking sheet. Squeeze out a base, then slowly pull the bag straight up while continuing to squeeze, creating a tall, teardrop-like shape. When you reach the desired height, stop squeezing and pull the bag away with a quick flick of your wrist to create a little peak on top. (This peak will look like the ghost’s head.) Space them about 2 inches apart, as they don’t spread much. If you want a more classic ghost shape, you can make them shorter and rounder.
- Bake Low and Slow: Place the baking sheets in the preheated oven and bake for 60 to 75 minutes. Do not open the oven door during this time! The meringues need a steady, dry heat. They are done when they are firm to the touch and can be easily lifted off the parchment paper. They should be completely dry, not sticky. The bottoms should be pale and not browned at all.
- Cool Completely: Turn off the oven and leave the meringues inside to cool completely with the door slightly ajar (you can prop it open with a wooden spoon). This gradual cooling prevents them from cracking. Let them sit for at least an hour, or even overnight if you have the time. They will continue to dry out and become perfectly crisp.
- Draw the Faces: Once the meringues are completely cool, melt your chocolate chips. You can do this in a microwave-safe bowl in 30-second bursts, stirring in between, or in a double boiler on the stove. Transfer the melted chocolate to your small piping bag or zip-top bag. Snip off a tiny corner. Now, carefully pipe two small dots for eyes and a little “O” shape for a mouth on each ghost. You can also make them look scared or happy—get creative! Let the chocolate set for about 15 minutes at room temperature, or pop them in the fridge for 5 minutes.
Sensory Cue: When you’re whipping the meringue, you’ll hear the sound change from a sloshy, liquidy noise to a thick, swooshing sound as it reaches stiff peaks. The bowl will also feel warm to the touch from the friction. When you lift the whisk, the peak should look like a perfect, glossy mountain top.
Cooking Tips & Techniques
I’ve learned a few things the hard way over the years, so let me save you some trouble. Here are my top tips for perfect ghost meringues every time:
- The Humidity Enemy: Meringues are hygroscopic, meaning they love to absorb moisture from the air. Do not make these on a rainy or humid day. They will likely turn out sticky and chewy instead of crisp. Wait for a dry, low-humidity day for the best results.
- Don’t Overwhip: It is possible to over-whip meringue. If you go past stiff peaks, the mixture will start to look grainy and curdled, and it will separate. If this happens, you can try to salvage it by adding one more fresh egg white and whipping it back up, but it’s often easier to just start over. Watch for that glossy, smooth look.
- My Biggest Failure: The first time I made these, I forgot to add the cream of tartar. I was so excited to pipe the ghosts that I just skipped that step. The result was a flat, weepy mess that looked more like sad pancakes than cute ghosts. Don’t be like me. The acid is essential for stability.
- Multitasking Strategy: While the meringues are baking for that long hour, you can get a head start on the rest of your party prep. Clean up the kitchen, set out your appetizers, or start arranging your Halloween decorations. The oven is doing all the work, so you can focus on other things.
- Consistency is Key: For uniform-looking ghosts, use a cookie scoop or a measuring spoon to portion out the meringue before piping. This isn’t strictly necessary, but it helps if you’re a perfectionist. I usually just go by eye, and I think the slight variations in size make them look even more charming and handmade.
Variations & Adaptations
Once you’ve mastered the basic ghost, the possibilities are endless. Here are a few fun ways to customize them for your Halloween party:
- Spooky Swirl: Before piping, use a toothpick to gently swirl a tiny bit of black or orange food coloring gel into the meringue in the piping bag. This will create a marbled effect that looks really cool and otherworldly.
- Chocolate Dipped: After the meringues are baked and cooled, dip the bottoms into melted dark or white chocolate. You can then roll them in crushed graham crackers, sprinkles, or even a little bit of orange zest for a fun flavor twist. It adds a lovely richness.
- Minty Ghosts: Instead of vanilla extract, use 1/2 teaspoon of peppermint extract. The cool, refreshing flavor is perfect for a Halloween treat and pairs wonderfully with the dark chocolate faces. Just be careful—peppermint is strong, so don’t add too much.
- Pumpkin Spice Ghosts: Add 1 teaspoon of pumpkin pie spice and a pinch of cinnamon to the sugar before you start whipping. This gives the meringues a warm, autumnal flavor that’s perfect for a fall party. You can also add a tiny drop of orange food coloring to make them look like little pumpkins.
- For a Crowd (Scaling Up): This recipe doubles beautifully. If you’re expecting a big party, just double all the ingredients. You might need to bake them in batches, as your oven only has so much space. The baking time might increase slightly, so keep an eye on them.
Serving & Storage Suggestions
These ghost meringues are best served at room temperature. Their crisp, airy texture is what makes them so delightful. Here’s how to present and store them:
- Presentation: Arrange them on a large, dark platter or a cake stand to make the white ghosts pop. I like to scatter a few candy eyeballs or some dark chocolate shavings around the base for a spooky graveyard effect. You could also stand them up in a small vase or a glass jar filled with black beans or crushed Oreo “dirt” for a fun, interactive display.
- What to Serve Alongside: These cookies are sweet, so they pair beautifully with something tart or savory. Consider serving them with a platter of sharp cheddar cheese and apple slices, or alongside a bowl of spicy guacamole and tortilla chips. For drinks, a warm mug of spiced apple cider or a dark, rich hot chocolate is a perfect match.
- Storage: This is crucial. Store the completely cooled meringues in an airtight container at room temperature. Do not refrigerate them! The fridge is a humid environment that will ruin their texture. They will stay crisp for up to 2 weeks if stored properly. I usually keep them in a tin or a glass jar with a tight-fitting lid.
- Freezing: You can freeze baked meringues for up to 3 months. Place them in a single layer in a freezer-safe container, with parchment paper between layers to prevent them from sticking. Thaw them at room temperature for about 15 minutes before serving. They will be just as crisp as the day you made them.
- Flavor Development: Honestly, these taste best the day after they’re made. The flavors have a chance to meld, and the texture becomes perfectly dry and crisp. So, making them a day or two ahead of your party is actually the ideal strategy.
Nutritional Information & Benefits
While these are a treat, they’re a lighter option compared to many other Halloween desserts. Here’s a rough estimate per ghost cookie (based on 24 cookies):
| Nutrient | Per Cookie |
|---|---|
| Calories | 45-55 |
| Total Fat | 0g |
| Saturated Fat | 0g |
| Cholesterol | 0mg |
| Sodium | 15mg |
| Total Carbohydrates | 11g |
| Sugars | 10g |
| Protein | 1g |
Health Benefits: The main ingredient, egg whites, are a fantastic source of high-quality protein and contain zero fat or cholesterol. They’re also rich in riboflavin and selenium. While this is still a sugary treat, it’s a much lighter option than a slice of frosted cake or a chocolate bar. For my own wellness perspective, I see these as a perfect “sometimes food”—they satisfy a sweet craving without weighing you down, which is exactly what you want when you’re hosting a party and want to feel energized, not sluggish.
Dietary Considerations: This recipe is naturally gluten-free, dairy-free, and nut-free (as long as you use a nut-free chocolate). The only potential allergen is eggs. For a vegan option, see the aquafaba substitution mentioned in the ingredients section.
Conclusion
So there you have it—my secret weapon for Halloween hosting, straight from a napkin scribbled in a stranger’s kitchen. These Ghost Meringue Cookies are more than just a dessert; they’re a conversation starter, a little piece of edible art that brings a smile to everyone’s face. They’re proof that you don’t need complicated techniques or a long list of exotic ingredients to create something truly memorable. With a little patience and a bit of love, you can whip up a batch of these adorable little spirits that will absolutely steal the show at your party.
I honestly love making these because they make me feel like a kitchen magician. I take something as simple as egg whites and sugar and turn it into something that looks like it belongs in a bakery window. And when I see my guests’ faces light up as they bite into one, well, that’s the best feeling in the world. I really encourage you to make these your own. Play with the flavors, experiment with the faces, and don’t be afraid to get a little messy. That’s what cooking—and hosting—is all about.
Now, I’d love to hear from you! Have you ever made meringues before? What’s your go-to Halloween party trick? Drop a comment below and share your ghost stories. And if you make these, please tag me in your photos—I can’t wait to see your spooky creations! Happy haunting and happy baking!
Frequently Asked Questions
Can I make these ghost meringues without a piping bag?
Absolutely! If you don’t have a piping bag, you can use a sturdy zip-top plastic bag. Just spoon the meringue into the bag, seal it, and snip off a small corner. The ghosts will look a little more rustic, but they’ll taste just as delicious. You can also use two spoons to drop dollops of meringue onto the baking sheet and then shape them slightly with the back of a spoon.
Why did my meringues turn out sticky or chewy?
This is usually a sign of humidity or under-baking. Meringues are very sensitive to moisture. If it’s a rainy or humid day, they will absorb water from the air and become sticky. Also, make sure you’ve baked them long enough. They should be completely dry and firm to the touch. If they still feel tacky, pop them back in the oven at 200°F (93°C) for another 15-20 minutes.
Can I use liquid food coloring instead of gel?
I wouldn’t recommend it. Liquid food coloring adds extra moisture to the meringue, which can make it difficult to whip to stiff peaks and can cause the meringues to deflate or become sticky. Gel or paste food colors are much more concentrated and won’t affect the texture. If you only have liquid, use it very sparingly—just a drop or two.
How far in advance can I make these for a party?
You can make them up to two weeks in advance! As long as you store them in an airtight container at room temperature, they will stay perfectly crisp. In fact, they often taste better after a day or two. This makes them the ultimate make-ahead party treat—one less thing to stress about on the day of your event.
My meringue is grainy. What went wrong?
A grainy meringue means the sugar didn’t dissolve completely. This usually happens when you add the sugar too quickly. Remember to add it one tablespoon at a time, and make sure each addition is fully incorporated before adding the next. Also, using superfine sugar or blitzing your regular sugar in a food processor can help it dissolve more easily. You can test it by rubbing a tiny bit of the meringue between your fingers—it should feel smooth, not gritty.
PrintBest Ghost Meringue Cookies for Easy Halloween Party Treats
These adorable ghost-shaped meringues are light, airy, and perfect for Halloween parties. With just a few simple ingredients and a low-and-slow baking method, they come together easily and are sure to impress your guests.
- Prep Time: 20 minutes
- Cook Time: 60-75 minutes
- Total Time: 1 hour 35 minutes to 1 hour 50 minutes
- Yield: 24-30 cookies 1x
- Category: Dessert
- Cuisine: American
Ingredients
- 4 large egg whites, at room temperature
- 1 cup (200g) granulated sugar
- 1/2 teaspoon cream of tartar
- 1/4 teaspoon salt
- 1 teaspoon vanilla extract
- 1 teaspoon cornstarch
- 1/4 cup (about 45g) semi-sweet or dark chocolate chips
- Optional: a few drops of orange or black food coloring gel
Instructions
- Preheat your oven to 200°F (93°C). Line two large baking sheets with parchment paper or silicone baking mats.
- In a completely clean, grease-free mixing bowl, combine the room-temperature egg whites and cream of tartar. Whip on medium speed until frothy and bubbly, about 1-2 minutes. Add the salt.
- With the mixer running on medium-high speed, gradually add the granulated sugar, one tablespoon at a time, waiting about 15-20 seconds between each addition.
- Once all sugar is added, increase speed to high and whip for 5-7 minutes until stiff peaks form. The mixture should be thick, glossy, and smooth when rubbed between your fingers.
- On low speed, beat in the vanilla extract and cornstarch until just combined, about 10 seconds. If using food coloring, gently swirl it in with a spatula.
- Transfer the meringue to a piping bag fitted with a large round tip. Pipe ghost shapes onto the prepared baking sheets: squeeze out a base, then slowly pull the bag straight up while continuing to squeeze, creating a tall teardrop shape. Space them about 2 inches apart.
- Bake for 60 to 75 minutes without opening the oven door. Meringues are done when firm to the touch and easily lift off the parchment.
- Turn off the oven and leave the meringues inside to cool completely with the door slightly ajar, at least 1 hour or overnight.
- Once completely cool, melt the chocolate chips in a microwave-safe bowl in 30-second bursts, stirring in between. Transfer to a small piping bag or zip-top bag with a tiny corner cut off. Pipe two small dots for eyes and an ‘O’ shape for a mouth on each ghost. Let the chocolate set for about 15 minutes at room temperature.
Notes
Do not make meringues on a rainy or humid day, as they will absorb moisture and become sticky. Ensure all equipment is completely clean and grease-free. For best results, use room-temperature egg whites and add sugar slowly. Store in an airtight container at room temperature for up to 2 weeks.
Nutrition
- Serving Size: 1 cookie
- Calories: 50
- Sugar: 10
- Sodium: 15
- Carbohydrates: 11
- Protein: 1
Keywords: ghost meringue cookies, Halloween cookies, meringue cookies, easy Halloween dessert, gluten-free cookies, low-fat cookies


