Love this? Save it for later!
Share the inspiration with your friends
It was 11:47 PM on a Tuesday in late October, and I was hit with the most specific craving for something that felt like a hug and a Halloween party all at once. I didn’t have the energy for a layered cake, and honestly, I didn’t have the right cocoa powder for a classic red velvet either. But I had black cocoa powder from a failed attempt at Oreo-style cookies a few months back, and the idea for a black velvet cupcake just arrived, fully formed, in that sleepy, impulsive way things do at that hour. I started pulling out butter and eggs before I could talk myself out of it, and let me tell you, the kitchen felt like my own little cozy cave against the dark autumn night.
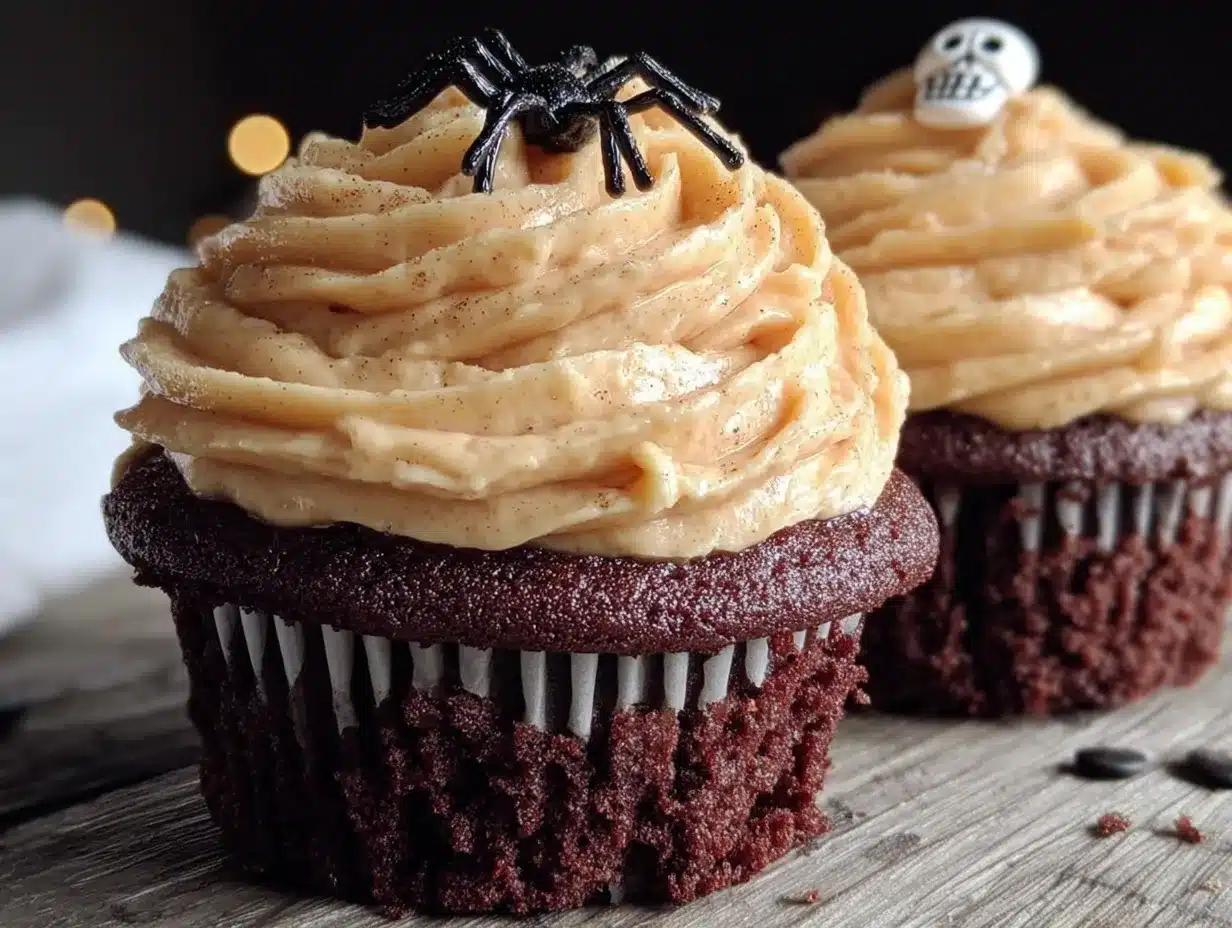
The orange buttercream wasn’t planned either. I was just staring into the fridge, and there was a lone navel orange that looked way too cheerful to ignore. I zested it into the buttercream, and the whole thing suddenly made sense. It was like the cupcake was wearing a little costume—dark and mysterious on the inside, bright and playful on top. Maybe you’ve been there, standing in your kitchen late at night, making something that doesn’t follow any rules, just because it feels right. That’s exactly how these Cozy Black Velvet Halloween Cupcakes with Orange Buttercream were born. I almost forgot to take a picture before I ate one, which is always the sign of a good recipe.
Why You’ll Love This Recipe
These aren’t just another Halloween cupcake that’s all looks and no substance. I’ve tested this recipe four times now—once when I accidentally used baking soda instead of powder (don’t ask), and I can tell you this version is the one. It’s the kind of recipe that makes you look like a hero at a party without spending your whole day in the kitchen.
- Quick & Easy: From start to finish, you’re looking at about 45 minutes. The batter comes together in one bowl, no mixer required if you’ve got a strong whisking arm.
- Simple Ingredients: Besides the black cocoa powder, which you can find at most grocery stores or online, everything else is a pantry staple. No weird extracts or hard-to-find decorations.
- Perfect for Halloween: These cupcakes are the star of any Halloween gathering, potluck, or cozy night in watching spooky movies. They’re festive without being gimmicky.
- Crowd-Pleaser: The kids love the bright orange frosting, and adults appreciate the sophisticated, slightly dark chocolate flavor. I’ve seen a dozen of these disappear in ten minutes flat.
- Unbelievably Delicious: The black velvet cake is incredibly moist with a tender crumb, and that orange buttercream? It’s the perfect bright, citrusy counterpoint to the deep cocoa. It’s comfort food that’s also a little bit fancy.
What makes this recipe different from all the other Halloween cupcakes out there is the texture. The combination of buttermilk and a touch of vinegar gives the cake a velvety softness that’s hard to beat. It’s not just a chocolate cake dyed black—it’s a genuinely different cake. And that orange buttercream isn’t just colored orange; it’s infused with real orange zest, so every bite tastes like sunshine and autumn rolled into one. This is the kind of cupcake that makes you close your eyes after the first bite, I swear.
What Ingredients You Will Need
This recipe uses simple, wholesome ingredients to deliver a cupcake that’s both deeply comforting and surprisingly elegant. You probably have most of these in your kitchen already, which is the best kind of recipe.
For the Black Velvet Cupcakes
- All-purpose flour, 1 ½ cups (190g) – Spoon and level it for the best results. Too much flour makes the cake dense.
- Black cocoa powder, ½ cup (50g) – This is the secret to the color and the deep Oreo-like flavor. I use the brand from King Arthur Flour, but any Dutch-process black cocoa works.
- Granulated sugar, 1 cup (200g) – Adds sweetness and helps with the tender crumb.
- Baking soda, 1 teaspoon – The main leavening agent here. Make sure it’s fresh.
- Salt, ½ teaspoon – Balances the sweetness and enhances the chocolate flavor.
- Buttermilk, 1 cup (240ml), room temperature – This is non-negotiable for the velvet texture. If you don’t have buttermilk, you can make a quick version by adding 1 tablespoon of lemon juice or vinegar to 1 cup of milk and letting it sit for 5 minutes.
- Vegetable oil, ½ cup (120ml) – Keeps the cupcakes incredibly moist. You won’t taste it, I promise.
- Large eggs, 2, room temperature – Room temperature eggs emulsify better, giving you a smoother batter.
- Vanilla extract, 2 teaspoons – Pure vanilla makes a difference here.
- White vinegar, 1 teaspoon – Sounds weird, but it reacts with the baking soda for extra lift and tenderness.
- Brewed coffee, ½ cup (120ml), cooled – Don’t skip this! The coffee doesn’t make the cupcakes taste like coffee; it just deepens the chocolate flavor. Use decaf if you’re sensitive.
For the Orange Buttercream
- Unsalted butter, 1 cup (226g), softened – Let it sit out for at least an hour. It should be soft but not melty.
- Powdered sugar, 3 ½ cups (440g) – Sift it if you want the smoothest frosting, but I’m usually too lazy and it still turns out fine.
- Fresh orange zest, 2 tablespoons – From about 2 large oranges. This is where all the flavor lives.
- Fresh orange juice, 2 tablespoons – Adds a bit of tang and thins the frosting to the perfect consistency.
- Vanilla extract, 1 teaspoon – Just a touch to round things out.
- Salt, a pinch – Trust me on this one. It makes the orange flavor pop.
- Orange food coloring (optional) – I use a natural one from India Tree, but a few drops of gel coloring work great too.
For Decoration (Optional but Fun)
- Black sprinkles or orange jimmies
- Candy eyeballs – For a spooky touch.
- Mini chocolate spiders or bats – Found these at a specialty baking store once, and they were a hit.
Equipment Needed
You don’t need a fancy bakery setup for these. I’ve made them with the bare minimum and they still turn out gorgeous.
- Muffin tin (12-cup) – A standard one works perfectly. I’ve had the same non-stick one for years, and it’s never let me down.
- Paper cupcake liners – I like using black or orange ones for the occasion, but white works too.
- Mixing bowls (one large, one medium)
- Whisk – For the dry ingredients and the batter.
- Rubber spatula – For scraping the bowl and folding in the last bits.
- Electric hand mixer or stand mixer – For the buttercream. You can do it by hand, but your arm will get a workout.
- Piping bag with a star tip (like Wilton 1M) – For that pretty swirl. If you don’t have one, a zip-top bag with the corner snipped off works in a pinch.
- Cooling rack – Essential for even cooling so the frosting doesn’t melt.
- Microplane or zester – For getting all that lovely orange zest without the bitter white pith.
Preparation Method
- Preheat and prep. Preheat your oven to 350°F (175°C). Line your muffin tin with 12 cupcake liners. This is a small step that makes a big difference—don’t skip it.
- Whisk the dry ingredients. In a large bowl, whisk together the flour, black cocoa powder, sugar, baking soda, and salt. Make sure there are no lumps of cocoa; sometimes it clumps up. Just press them against the side of the bowl with your whisk.
- Mix the wet ingredients. In a separate medium bowl or a large liquid measuring cup, whisk together the buttermilk, vegetable oil, eggs, vanilla extract, and white vinegar until smooth. The mixture will look a bit separated at first, but keep whisking until it’s homogenous.
- Combine wet and dry. Pour the wet ingredients into the dry ingredients. Stir with a rubber spatula or whisk until just combined. A few streaks of flour are okay at this point—overmixing will make the cupcakes tough.
- Add the coffee. Pour in the cooled brewed coffee and gently fold it into the batter. The batter will be very thin, almost like a pancake batter. Don’t panic—that’s exactly how it should look. It’s what gives you that velvety texture.
- Fill the liners. Divide the batter evenly among the 12 liners. I use a ¼-cup measure, filling each about ⅔ full. They will rise nicely but not overflow.
- Bake. Bake for 15-18 minutes, or until a toothpick inserted into the center of a cupcake comes out with just a few moist crumbs. Mine are usually perfect at 17 minutes. Let them cool in the pan for 5 minutes, then transfer to a cooling rack to cool completely. This is crucial—if you frost them while they’re warm, you’ll have a melty mess.
- Make the buttercream. While the cupcakes are cooling, make the frosting. In a large bowl, beat the softened butter with an electric mixer on medium speed until smooth and creamy, about 2 minutes. Scrape down the sides of the bowl.
- Add the sugar and flavor. With the mixer on low, gradually add the powdered sugar, about ½ cup at a time. It will look dry and crumbly at first—that’s normal. Add the orange zest, orange juice, vanilla extract, and a pinch of salt. Increase the speed to medium-high and beat for 2-3 minutes until the frosting is light, fluffy, and spreadable. If it’s too thick, add another teaspoon of orange juice. If it’s too thin, add a bit more powdered sugar. Add a drop or two of orange food coloring if you want that bright Halloween color.
- Frost and decorate. Once the cupcakes are completely cool, pipe the buttercream onto each one with a star tip, starting from the outside and working your way in. Top with sprinkles, candy eyeballs, or whatever spooky decorations you like. I always add a few black sprinkles on top for that little crunch.
Cooking Tips & Techniques
I learned a few things the hard way so you don’t have to. The first time I made these, I used regular cocoa powder instead of black cocoa, and they turned out a sad, dark brown. Black cocoa is a different beast—it’s less acidic and has that unmistakable Oreo flavor. Don’t substitute it with regular cocoa if you want that true black velvet look.
The coffee trick is something I picked up from a bakery I used to work at. It doesn’t make the cupcakes taste like coffee at all; it just makes the chocolate taste more chocolaty. I’ve had people swear they could taste hints of espresso, but it’s just the magic of the chemical reaction. Also, make sure your buttermilk and eggs are at room temperature. I’ve made the mistake of using cold ingredients straight from the fridge, and the batter curdles slightly. It still bakes up okay, but the texture isn’t as tender. Just set them out on the counter about 30 minutes before you start.
For the buttercream, the biggest mistake is not beating the butter long enough. It needs to be truly creamy and pale before you add the sugar. And don’t skip the salt—it sounds like a small thing, but it makes the orange flavor sing. I forgot the salt once and the frosting tasted flat. Now I add it every time without fail.
Variations & Adaptations
One of the best things about this recipe is how flexible it is. I’ve played around with it quite a bit, and here are some of my favorite variations.
- Gluten-Free Version: Substitute the all-purpose flour with a good 1:1 gluten-free baking flour blend. I’ve used Bob’s Red Mill with great success. The texture is slightly more delicate, so handle the batter gently.
- Dairy-Free Adaptation: Use a plant-based buttermilk (like almond milk with a splash of lemon juice) and vegan butter for the frosting. The cake still comes out moist and delicious.
- Spooky Spiderweb Design: Instead of piping a swirl, spread a thin layer of orange buttercream on each cupcake, then pipe concentric circles of melted dark chocolate on top. Drag a toothpick from the center outward to create a web effect. It’s super impressive with very little effort.
- Pumpkin Spice Twist: Add 1 teaspoon of pumpkin pie spice to the dry ingredients for a fall-flavored version. The warmth of the spices pairs beautifully with the orange buttercream.
- Mini Cupcakes: Use a mini muffin tin and bake for 8-10 minutes. You’ll get about 36 mini cupcakes, which are perfect for parties. Just reduce the frosting amount slightly.
Serving & Storage Suggestions
These cupcakes are best served at room temperature. The cake is most tender, and the buttercream is perfectly soft and creamy. If you’ve made them ahead of time, just let them sit out on the counter for about 30 minutes before serving.
For a Halloween party, I like to arrange them on a black cake stand with some fake cobwebs and plastic spiders scattered around. It makes for a great centerpiece. They also pair wonderfully with a glass of cold milk or a warm cup of spiced apple cider. Honestly, I’ve even had one with my morning coffee, and it was a fantastic decision.
To store leftovers (if you have any!), place them in an airtight container at room temperature for up to 2 days. If you need to keep them longer, you can refrigerate them for up to 5 days, but let them come to room temperature before eating. The fridge tends to dry out the cake a bit. These cupcakes also freeze beautifully. Freeze them unfrosted in a single layer on a baking sheet, then transfer to a freezer bag for up to 3 months. Thaw at room temperature, then make the frosting fresh. The flavors actually seem to get better after a day in the fridge—the orange zest really melds with the cake.
Nutritional Information & Benefits
Let’s be real—these are a treat, not a health food. But I do believe in knowing what you’re eating. Here’s an estimated breakdown per cupcake (with frosting):
- Calories: ~380
- Fat: 18g
- Carbohydrates: 52g
- Protein: 4g
- Sugar: 38g
On the bright side, black cocoa powder is rich in antioxidants—more so than regular cocoa, actually. And oranges are packed with vitamin C, so there’s that! If you’re watching your sugar intake, you can reduce the sugar in the cake to ¾ cup without sacrificing too much texture, and use a less sweet buttercream recipe. For a lower-carb option, you could try a sugar substitute, but I haven’t tested that myself, so proceed with caution. These cupcakes do contain gluten, dairy, and eggs, so they’re not suitable for those with allergies to those ingredients.
Conclusion
These Cozy Black Velvet Halloween Cupcakes with Orange Buttercream have become my go-to for every fall gathering. They’re the perfect balance of spooky and cozy, of indulgence and comfort. The deep, dark cake with that bright, sunny frosting just makes me happy every single time. I love that I stumbled onto this combination late that Tuesday night—it felt like a little secret I was sharing with myself. Now I’m sharing it with you.
I really hope you give these a try. Don’t be afraid to make them your own—add extra orange zest, pile on the sprinkles, or even swap the frosting for a cream cheese version if that’s your thing. The best recipes are the ones that feel like yours. If you make them, I’d love to hear about it. Leave a comment below and tell me how they turned out, or tag me in your photos. Happy Halloween, and happy baking!
Frequently Asked Questions
Can I make these cupcakes ahead of time?
Absolutely! You can bake the cupcakes up to 2 days in advance and store them in an airtight container at room temperature. I recommend making the buttercream fresh on the day you plan to serve them for the best texture and flavor. If you need to prep even further ahead, freeze the unfrosted cupcakes for up to 3 months.
Why did my cupcakes turn out dry?
The most common reason is overbaking. Start checking them at the 15-minute mark. They should spring back when lightly touched and a toothpick should come out with a few moist crumbs. Also, make sure you’re measuring your flour correctly—scooping directly from the bag can pack in too much flour. Always spoon it into the measuring cup and level it off.
Can I use regular cocoa powder instead of black cocoa?
You can, but the results will be different. Regular cocoa powder will give you a dark brown cupcake, not black. The flavor will also be more like a standard chocolate cake rather than that deep, Oreo-like taste. If you’re set on the black color, I really recommend tracking down black cocoa powder. It’s worth it for the visual effect alone.
My buttercream is too runny. What did I do wrong?
This usually happens if the butter was too soft or if you added too much orange juice. Try popping the bowl in the fridge for 10-15 minutes to firm it up, then beat it again. If it’s still too soft, add a couple more tablespoons of powdered sugar. On the flip side, if it’s too thick, add another teaspoon of orange juice or a splash of milk.
Can I make this recipe into a cake instead of cupcakes?
Yes! Pour the batter into two greased and floured 8-inch round cake pans. Bake at 350°F (175°C) for 22-28 minutes, or until a toothpick comes out clean. You’ll need to double the buttercream recipe to have enough for a layer cake. The cake layers are a bit more delicate than the cupcakes, so let them cool completely in the pans before trying to remove them.
PrintCozy Black Velvet Halloween Cupcakes with Orange Buttercream
These moist black velvet cupcakes with a tender crumb are topped with a bright, citrusy orange buttercream, making them the perfect spooky yet cozy treat for Halloween.
- Prep Time: 15 minutes
- Cook Time: 17 minutes
- Total Time: 45 minutes
- Yield: 12 servings
- Category: Dessert
- Cuisine: American
Ingredients
- All-purpose flour, 1 ½ cups (190g)
- Black cocoa powder, ½ cup (50g)
- Granulated sugar, 1 cup (200g)
- Baking soda, 1 teaspoon
- Salt, ½ teaspoon
- Buttermilk, 1 cup (240ml), room temperature
- Vegetable oil, ½ cup (120ml)
- Large eggs, 2, room temperature
- Vanilla extract, 2 teaspoons
- White vinegar, 1 teaspoon
- Brewed coffee, ½ cup (120ml), cooled
- Unsalted butter, 1 cup (226g), softened
- Powdered sugar, 3 ½ cups (440g)
- Fresh orange zest, 2 tablespoons
- Fresh orange juice, 2 tablespoons
- Vanilla extract, 1 teaspoon
- Salt, a pinch
- Orange food coloring (optional)
- Black sprinkles or orange jimmies (optional)
- Candy eyeballs (optional)
- Mini chocolate spiders or bats (optional)
Instructions
- Preheat your oven to 350°F (175°C). Line your muffin tin with 12 cupcake liners.
- In a large bowl, whisk together the flour, black cocoa powder, sugar, baking soda, and salt until no lumps remain.
- In a separate medium bowl, whisk together the buttermilk, vegetable oil, eggs, vanilla extract, and white vinegar until smooth.
- Pour the wet ingredients into the dry ingredients and stir until just combined. A few streaks of flour are okay.
- Pour in the cooled brewed coffee and gently fold it into the batter. The batter will be thin.
- Divide the batter evenly among the 12 liners, filling each about ⅔ full.
- Bake for 15-18 minutes, or until a toothpick inserted into the center comes out with a few moist crumbs. Let cool in the pan for 5 minutes, then transfer to a cooling rack to cool completely.
- While the cupcakes cool, make the buttercream: In a large bowl, beat the softened butter with an electric mixer on medium speed until smooth and creamy, about 2 minutes.
- With the mixer on low, gradually add the powdered sugar, about ½ cup at a time. Add the orange zest, orange juice, vanilla extract, and a pinch of salt. Increase speed to medium-high and beat for 2-3 minutes until light and fluffy. Add orange food coloring if desired.
- Once the cupcakes are completely cool, pipe the buttercream onto each one with a star tip. Top with sprinkles, candy eyeballs, or other decorations.
Notes
Black cocoa powder is essential for the deep color and Oreo-like flavor. Do not substitute with regular cocoa. The coffee deepens the chocolate flavor without making it taste like coffee. Ensure buttermilk and eggs are at room temperature for best texture. For the buttercream, beat the butter until truly creamy and pale before adding sugar; don’t skip the salt. Cupcakes are best served at room temperature. Store in an airtight container at room temperature for up to 2 days, or refrigerate for up to 5 days. Unfrosted cupcakes can be frozen for up to 3 months.
Nutrition
- Serving Size: 1 cupcake
- Calories: 380
- Sugar: 38
- Fat: 18
- Carbohydrates: 52
- Protein: 4
Keywords: Halloween cupcakes, black velvet, orange buttercream, black cocoa, spooky cupcakes, fall dessert


