Love this? Save it for later!
Share the inspiration with your friends
The Halloween party was in six hours and I’d completely forgotten. My son came home from school with a crumpled flyer, grinning ear to ear, announcing the class party that afternoon. Everyone else would be bringing elaborate cupcakes with piped frosting, homemade caramel apples, or those creepy monster cookies that take three days to perfect. I had a box of instant chocolate pudding, some crushed-up Oreos I’d been sneaking from the pantry, and a bag of gummy worms leftover from a movie night. Honestly, I almost just sent him with a bag of store-bought candy and called it a day.
But then I remembered a trick my aunt used to pull at family cookouts. She’d layer pudding and crushed cookies in clear cups, call them “dirt,” and the kids would lose their minds. It was so simple it almost felt like cheating. I mean, we’re talking zero baking, zero fuss, and maybe ten minutes of actual work. The panic started to fade as I grabbed the ingredients and started layering. I didn’t even have time to chill them properly before we walked out the door.
So there I was, walking into that classroom with a tray of wobbly, barely-set pudding cups, feeling like I’d shown up empty-handed. You know that feeling when everyone else has clearly put in hours of effort? Yeah, that was me. But here’s the thing—those dirt cups disappeared in minutes. The kids fought over the gummy worms poking out of the “dirt.” The teacher asked for the recipe. And my son looked at me like I was some kind of kitchen wizard. That’s the moment I learned that sometimes the simplest idea is the one that sticks. And that’s why I keep making these no-bake Halloween dirt cups every single year.
Why You’ll Love This Recipe
Let me tell you why these no-bake Halloween dirt cups have become my secret weapon for every spooky season event. I’ve tested this recipe through school parties, neighborhood gatherings, and even a few grown-up Halloween dinners where the adults secretly loved them more than the kids.
- Quick & Easy: You can have these assembled in under 15 minutes. No oven, no stovetop, no complicated steps. Perfect for those last-minute “oh no, the party is today” moments we all experience.
- Simple Ingredients: You probably already have most of what you need in your kitchen. Chocolate pudding mix, milk, Oreos, and gummy worms. That’s it. No fancy grocery store trips required.
- Perfect for Halloween Parties: Whether it’s a classroom celebration, a trunk-or-treat event, or a spooky movie night, these dirt cups fit right in. They’re portable, individual servings make them ideal for gatherings.
- Crowd-Pleaser: I’ve yet to meet a kid who doesn’t light up seeing gummy worms crawling out of chocolate “dirt.” And honestly? Adults sneak seconds when they think no one is looking.
- Unbelievably Delicious: The combination of creamy chocolate pudding, crunchy cookie crumbs, and chewy gummy worms creates a texture party in your mouth. It’s comfort food with a spooky twist.
What makes these different from every other dirt cup recipe out there is the layering technique I’ve perfected over years of trial and error. I use a specific ratio of pudding to cookie crumbs that keeps the texture just right—not too soggy, not too dry. Plus, I’ve figured out the best way to position the gummy worms so they look like they’re genuinely crawling out of the dirt. It’s a small detail, but it makes all the difference when you’re trying to impress a room full of six-year-olds.
This recipe is the kind that makes you feel like a Halloween hero without breaking a sweat. It’s perfect for busy parents who want to contribute something memorable without spending hours in the kitchen. And honestly, watching someone’s face light up when they see those gummy worms poking through the “dirt” is pure magic.
What Ingredients You Will Need
This recipe uses simple, everyday ingredients to create something that looks way more impressive than it actually is. Here’s what you’ll need to grab from your pantry and fridge.
For the Pudding Base
- 1 (3.9 oz) box instant chocolate pudding mix – I recommend Jell-O brand for the smoothest texture, but any instant chocolate pudding works fine. Do not use cook-and-serve pudding; it won’t set properly for this no-bake recipe.
- 2 cups cold milk – Whole milk gives the creamiest result, but 2% works well too. For a dairy-free version, use unsweetened almond milk or oat milk. Just know the pudding might be slightly less thick.
For the “Dirt” Layer
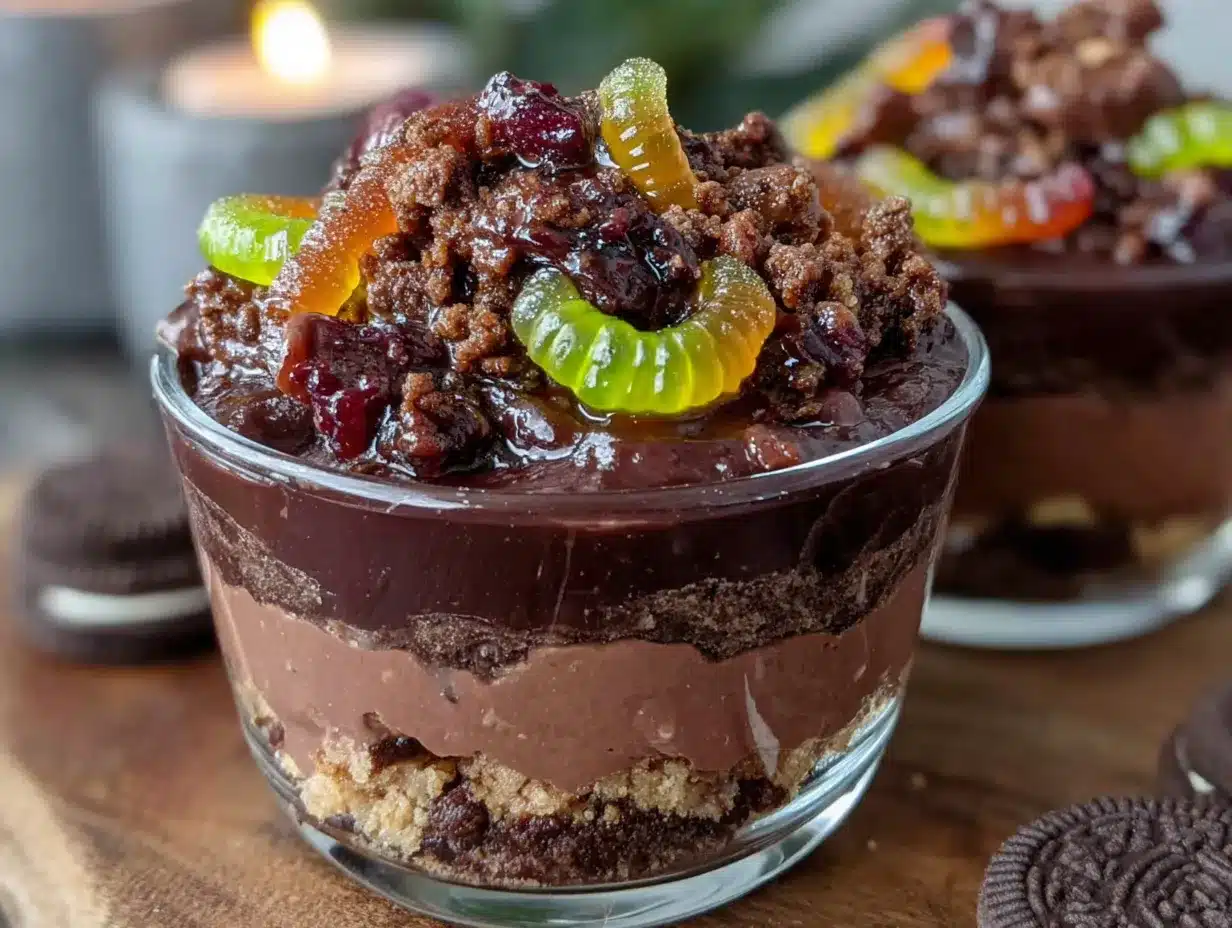
- 1 package (about 15-20) chocolate sandwich cookies – Oreos are the classic choice, but any chocolate cream-filled cookie works. You’ll need about 1.5 cups of finely crushed crumbs.
- Optional: 2 tablespoons melted butter – This helps the cookie crumbs hold together slightly and gives them a richer flavor. Not strictly necessary, but I love the texture it adds.
For the Spooky Decorations
- 1 bag gummy worms – Get the colorful sour ones for extra visual pop. I prefer the classic gummy worms from Trolli or Haribo. You’ll need about 2-3 worms per cup.
- Optional decorations: Candy eyeballs, crushed graham crackers for extra “dirt” texture, or even small plastic spiders for a fun surprise.
Ingredient Selection Tips
When choosing your chocolate pudding mix, look for boxes that say “instant” on the front. This is crucial because instant pudding sets up quickly in the fridge without needing to be cooked. I learned this the hard way when I grabbed cook-and-serve pudding by accident and ended up with soupy dirt cups that never set.
For the cookies, I’ve found that generic store-brand chocolate sandwich cookies work just as well as name-brand Oreos. The key is to crush them finely enough that they resemble actual dirt. You can do this in a food processor, or my preferred method—seal them in a zip-top bag and go to town with a rolling pin. It’s oddly satisfying.
As for the gummy worms, don’t skimp on quality. Cheap gummy worms can be hard and unpleasantly chewy. Spend the extra dollar for the good stuff—your dirt cups will thank you.
Equipment Needed
You don’t need fancy kitchen gadgets for this recipe, which is part of its beauty. Here’s what you’ll need:
- 6-8 small clear cups or glasses – Clear cups are essential for showing off those spooky layers. I use 8-ounce plastic cups from the party supply store, but small mason jars or even clear tumblers work great.
- Mixing bowl – Any medium-sized bowl works for whisking the pudding.
- Whisk or electric mixer – A whisk works fine, but an electric mixer makes the pudding come together faster and smoother. I’ve done it both ways.
- Rolling pin or food processor – For crushing the cookies. A rolling pin and zip-top bag is my go-to because it requires less cleanup.
- Measuring cups and spoons – For accurate pudding and milk measurements.
- Spatula or spoon – For layering the pudding and crumbs.
If you don’t have clear cups, don’t worry. You can use any small bowl or container. The presentation won’t be as dramatic, but the taste is exactly the same. I’ve even made these in small disposable coffee cups for a fun, on-the-go Halloween treat.
Preparation Method
Follow these steps carefully, and you’ll have spooky dirt cups ready in no time. I’ve included all my little tricks and sensory cues so you know exactly what to look for at each stage.
- Crush the cookies. Place your chocolate sandwich cookies in a large zip-top bag. Seal it tight, then use a rolling pin to crush them into fine crumbs. You want the texture of coarse sand—some smaller pieces are fine, but avoid large chunks. If you’re using a food processor, pulse 5-6 times until you get the right consistency. Set the crumbs aside in a small bowl. (Pro tip: If you’re adding melted butter, mix it into the crumbs now with a fork.)
- Make the pudding. Pour the cold milk into your mixing bowl. Add the instant chocolate pudding mix. Whisk vigorously for about 2 minutes, or until the mixture starts to thicken. You’ll notice it going from liquid to a slightly thicker, glossy consistency. If using an electric mixer, beat on low speed for 1-2 minutes. The pudding should be smooth with no lumps. Let it sit for 5 minutes to fully set up. (Sensory cue: The pudding should look like thick, silky chocolate sauce when it’s ready.)
- Prepare your cups. Arrange your clear cups on a baking sheet or tray. This makes them easier to transport to the fridge later. If you want to be extra fancy, wipe the inside of each cup with a paper towel to remove any dust or fingerprints.
- Layer the first “dirt” layer. Spoon about 2 tablespoons of crushed cookie crumbs into the bottom of each cup. Gently tap the cup on the counter to level the crumbs. This creates the foundation of your dirt cup.
- Add the pudding layer. Carefully spoon or pour the chocolate pudding over the cookie crumbs, filling each cup about halfway. Use the back of your spoon to spread the pudding evenly. (Sensory cue: The pudding should be thick enough that it doesn’t immediately soak into the cookie crumbs. If it does, your pudding might need more time to set.)
- Position the gummy worms. Here’s where the magic happens. Take 2-3 gummy worms per cup and gently push them into the pudding layer, leaving about half of each worm sticking out. Position them at different angles so it looks like they’re crawling out of the dirt. Some can be fully submerged with just a head poking out, while others can be halfway out.
- Add the final layer. Spoon the remaining pudding over the gummy worms, filling each cup almost to the top. Leave about half an inch of space for the final cookie crumb layer.
- Top with “dirt.” Sprinkle a generous layer of crushed cookie crumbs over the top of each cup. Use enough to completely cover the pudding surface. This is where the “dirt” effect really comes to life.
- Add final decorations. If using candy eyeballs or extra decorations, place them on top of the cookie crumbs now. You can also add a few extra gummy worms on top for visual interest.
- Chill and set. Place the tray of dirt cups in the refrigerator for at least 30 minutes, but 1-2 hours is better. This allows the pudding to fully set and the cookie crumbs to soften slightly, creating that perfect dirt-like texture. (Sensory cue: After chilling, the cups should feel firm when gently shaken. The cookie crumbs should look slightly moist but not soggy.)
One thing I learned the hard way—don’t skip the chilling step. I once served these immediately at a party, and the pudding was too loose. The gummy worms slid right out, and the “dirt” layer just looked like wet sand. Give them time to set, and you’ll get that perfect, dramatic presentation.
Cooking Tips & Techniques
Over the years, I’ve made plenty of mistakes with these dirt cups. Here are the tips I wish someone had told me from the start.
The biggest mistake people make is using warm milk. Instant pudding needs cold milk to set properly. If your milk is even slightly warm, the pudding won’t thicken correctly. I keep a carton of milk in the fridge specifically for this recipe. If you forget to chill your milk, pop it in the freezer for 10 minutes before using it.
Don’t overmix the pudding. I know it’s tempting to keep whisking until it’s perfectly smooth, but overmixing can actually break down the pudding’s structure. Mix just until the powder is incorporated and the mixture starts to thicken. Stop whisking when you see the first signs of thickening—usually around 2 minutes.
Crush your cookies finely enough. Chunks of cookie in the “dirt” layer look unappealing and don’t create that realistic soil texture. I aim for crumbs that are about the size of coarse sand. If you see large pieces, pick them out or crush them further. Your food processor or rolling pin should do the job in about 30 seconds.
Timing is everything. I like to make these about 2-3 hours before serving. This gives the pudding enough time to set completely while keeping the cookie crumbs from getting too soggy. If you make them the night before, the crumbs might soften too much, and the gummy worms can lose their shape.
Multitask like a pro. While the pudding is setting for those 5 minutes after mixing, use that time to crush your cookies and arrange your cups. This keeps the whole process under 15 minutes. I’ve timed myself—12 minutes flat from start to fridge.
One more thing—gummy worm placement matters. I’ve found that pushing the worms in at a 45-degree angle creates the most natural “crawling out of dirt” effect. Straight up and down looks fake. Experiment with different angles to find what looks most convincing to you.
Variations & Adaptations
One of the best things about this recipe is how easy it is to customize. Here are some variations I’ve tried and loved.
Dairy-Free Version
Swap the whole milk for unsweetened almond milk, oat milk, or coconut milk. I’ve had the best luck with oat milk—it creates a creamier pudding than almond milk. Just be aware that dairy-free puddings can be slightly less thick. Let them chill for an extra 30 minutes to compensate.
Gluten-Free Option
Use gluten-free chocolate sandwich cookies for the “dirt” layer. Brands like Kinnikinnick or Goodie Girl make excellent gluten-free versions that taste almost identical to Oreos. Everything else in the recipe is naturally gluten-free.
Spooky Flavor Twists
Try using white chocolate or vanilla pudding instead of chocolate for a “sandy” look. Add a few drops of green or purple food coloring to the pudding for an extra spooky effect. I made a batch with neon green pudding last year, and the kids called them “slime cups.” They were a hit.
Adult Halloween Version
For grown-up gatherings, add a splash of coffee liqueur or Irish cream to the pudding mixture before layering. Use dark chocolate pudding for a more sophisticated flavor. Top with edible glitter for a magical, grown-up presentation.
Different “Dirt” Options
Not a fan of chocolate cookies? Try crushed graham crackers, vanilla wafers, or even crushed pretzels for a salty-sweet twist. I once used crushed chocolate wafer cookies, and the darker color made the “dirt” look even more realistic.
Serving & Storage Suggestions
These dirt cups are best served chilled, straight from the fridge. The cold pudding contrasts beautifully with the chewy gummy worms and crunchy cookie crumbs. I like to serve them on a tray lined with Halloween napkins or a spooky tablecloth for maximum effect.
For presentation: Place a few extra gummy worms on top of each cup, draped over the edge as if they’re escaping. Add a small plastic spider or candy eyeball for an extra creepy touch. If you’re serving at a party, label them with a cute sign like “Worm Dirt” or “Graveyard Pudding.”
What to serve alongside: These pair perfectly with other no-bake Halloween treats like popcorn balls, caramel apples, or pumpkin-shaped Rice Krispie treats. For drinks, serve with apple cider, pumpkin punch, or warm hot chocolate.
Storage instructions: Keep leftover dirt cups covered in the refrigerator for up to 3 days. Cover each cup with plastic wrap or transfer to an airtight container. The cookie crumbs will soften over time, but the flavor remains delicious. I actually prefer them the next day when the flavors have melded together.
Freezing: I don’t recommend freezing these dirt cups. The pudding becomes icy and grainy when thawed, and the gummy worms turn rock-hard. Stick to refrigeration only.
Reheating: No reheating needed—these are meant to be enjoyed cold. If your dirt cups have been sitting out for more than 2 hours, pop them back in the fridge for 15 minutes before serving to refresh the texture.
Nutritional Information & Benefits
While these dirt cups are definitely a treat, I like to remind myself (and my readers) that they’re made with real ingredients and can fit into a balanced lifestyle.
Estimated nutrition per serving (1 dirt cup): Calories: 280-320 | Fat: 10g | Carbohydrates: 48g | Protein: 5g | Sugar: 32g | Fiber: 2g
Health highlights: Milk provides calcium and vitamin D for bone health. Dark chocolate pudding contains antioxidants from cocoa. And believe it or not, gummy worms are fat-free (though they are high in sugar).
Dietary considerations: This recipe can easily be made dairy-free and gluten-free with simple substitutions. It’s naturally nut-free (check your cookie and gummy worm labels to be sure). For lower sugar options, use sugar-free pudding mix and sugar-free cookies.
Allergen warning: This recipe contains dairy (milk) and wheat (cookies). Gummy worms may contain corn syrup and artificial colors. Always check labels if serving to guests with allergies.
I personally love that this recipe lets me create something fun and festive without spending hours in the kitchen. It’s a treat, yes, but sometimes a treat is exactly what a Halloween party needs.
Conclusion
Look, I’m not going to pretend these no-bake Halloween dirt cups are going to win any culinary awards. But honestly? They don’t need to. What they lack in sophistication, they make up for in pure, unadulterated fun. There’s something magical about watching a kid’s face light up when they see gummy worms crawling out of chocolate “dirt.” And the best part is, you can create that magic in under 15 minutes with ingredients you probably already have in your kitchen.
I’ve made these for school parties, neighborhood gatherings, and even a few Halloween dinners where the adults secretly loved them more than the kids. Every single time, someone asks for the recipe. And every single time, I smile and say, “It’s literally just pudding, cookies, and gummy worms.”
So go ahead—give these a try. Customize them with your favorite cookies, experiment with different pudding flavors, or add your own spooky decorations. The beauty of this recipe is that it’s impossible to mess up. And if you do somehow manage to mess it up? Well, you still end up with chocolate pudding, and that’s never a bad thing.
I’d love to hear how your dirt cups turn out! Drop a comment below and let me know what creative twists you came up with. Did you add candy spiders? Use green pudding? Make a giant dirt cup for a party centerpiece? Share your photos and stories—I read every single comment, and nothing makes me happier than seeing your Halloween creations.
Happy Halloween, and happy no-baking!
Frequently Asked Questions
Can I make these dirt cups ahead of time?
Yes, absolutely! You can make them up to 24 hours in advance. Just keep them covered in the refrigerator. I actually think they taste even better the next day when the flavors have had time to meld together. Just note that the cookie crumbs will soften over time, so the “dirt” texture won’t be quite as crunchy.
Can I use homemade pudding instead of instant?
You can, but I don’t recommend it for this recipe. Homemade pudding requires cooking and cooling, which defeats the “quick and easy” purpose of these dirt cups. Plus, homemade pudding tends to be thinner than instant, so it won’t hold up as well in the layered presentation. Stick with instant pudding for the best results.
What if I don’t have clear cups?
No problem at all! You can use any small bowl, cup, or container. The presentation won’t be as dramatic since you won’t see the layers, but the taste is exactly the same. I’ve even made these in small disposable coffee cups for a fun, on-the-go treat. Mason jars work great too.
How do I keep the gummy worms from sinking to the bottom?
This is a common issue, and I’ve got a simple fix. After you add the first layer of pudding, let it sit for 2-3 minutes to thicken slightly before adding the gummy worms. The thicker pudding will hold them in place. Also, don’t push the worms all the way down—gently insert them so they’re anchored but still visible.
Can I use different types of candy for the “dirt”?
Absolutely! While crushed chocolate cookies are the classic choice, you can get creative. Try crushed graham crackers for a lighter “dirt,” crushed chocolate wafer cookies for darker “soil,” or even crushed pretzels for a salty-sweet twist. I’ve even used crushed chocolate cereal in a pinch, and it worked great.
PrintEasy No-Bake Halloween Dirt Cups with Gummy Worms
These no-bake Halloween dirt cups are a quick and easy treat made with chocolate pudding, crushed Oreos, and gummy worms. Perfect for last-minute parties, they come together in under 15 minutes and are always a crowd-pleaser.
- Prep Time: 15 minutes
- Cook Time: 0 minutes
- Total Time: 45 minutes (including chilling)
- Yield: 6-8 servings 1x
- Category: Dessert
- Cuisine: American
Ingredients
- 1 (3.9 oz) box instant chocolate pudding mix
- 2 cups cold milk
- 1 package (about 15-20) chocolate sandwich cookies (e.g., Oreos)
- Optional: 2 tablespoons melted butter
- 1 bag gummy worms
- Optional decorations: candy eyeballs, crushed graham crackers, small plastic spiders
Instructions
- Crush the cookies: Place chocolate sandwich cookies in a large zip-top bag and crush with a rolling pin into fine crumbs (coarse sand texture). If using a food processor, pulse 5-6 times. Set aside. If adding melted butter, mix it into the crumbs with a fork.
- Make the pudding: Pour cold milk into a mixing bowl. Add instant chocolate pudding mix. Whisk vigorously for about 2 minutes until mixture thickens and becomes glossy. Let sit for 5 minutes to fully set.
- Prepare your cups: Arrange clear cups on a baking sheet or tray. Optionally wipe inside of cups with a paper towel.
- Layer the first ‘dirt’ layer: Spoon about 2 tablespoons of crushed cookie crumbs into the bottom of each cup. Gently tap the cup on the counter to level.
- Add the pudding layer: Carefully spoon or pour chocolate pudding over the cookie crumbs, filling each cup about halfway. Spread evenly with the back of a spoon.
- Position the gummy worms: Take 2-3 gummy worms per cup and gently push them into the pudding layer, leaving about half of each worm sticking out. Position at different angles for a crawling effect.
- Add the final layer: Spoon remaining pudding over the gummy worms, filling each cup almost to the top, leaving about half an inch of space.
- Top with ‘dirt’: Sprinkle a generous layer of crushed cookie crumbs over the top of each cup to completely cover the pudding surface.
- Add final decorations: If using candy eyeballs or extra decorations, place them on top of the cookie crumbs. Add extra gummy worms on top if desired.
- Chill and set: Refrigerate for at least 30 minutes, preferably 1-2 hours, until pudding is fully set and cookie crumbs soften slightly.
Notes
Use cold milk for proper pudding set. Do not overmix pudding. Crush cookies finely for realistic ‘dirt’ texture. For best results, chill 2-3 hours before serving. Gummy worms should be inserted at a 45-degree angle for natural look. Can be made up to 24 hours ahead; cookie crumbs will soften over time.
Nutrition
- Serving Size: 1 dirt cup
- Calories: 300
- Sugar: 32
- Sodium: 350
- Fat: 10
- Saturated Fat: 5
- Carbohydrates: 48
- Fiber: 2
- Protein: 5
Keywords: Halloween dirt cups, no-bake dessert, chocolate pudding, gummy worms, easy Halloween treat, kid-friendly, last-minute dessert


