Love this? Save it for later!
Share the inspiration with your friends
My sister asked why I couldn’t just microwave the acorn squash. I started to explain why that wouldn’t work—something about texture and caramelization and the integrity of the dish. Then I stopped. I had no good answer. Honestly, I was just being stubborn. That was a Tuesday night, she was eight months pregnant, and dinner needed to happen in twenty minutes or less. So I sliced that squash into rings, threw it on a sheet pan, and microwaved it for exactly four minutes before hitting it with high heat. And you know what? It worked. The edges got that golden, almost-burnt sweetness, the centers turned silky, and the brown butter came together while the squash was doing its thing. I felt like a fool for all those years of insisting on the “proper” method. Sometimes the shortcut wins, and it takes someone who doesn’t know any better to show you that.
That night changed how I approach weeknight cooking. I mean, I still love a slow-roasted squash situation on a lazy Sunday. But for a regular Tuesday? Give me the microwave start every single time. This quick roasted acorn squash with brown butter has become my go-to side dish for exactly those nights when you’re tired, hungry, and staring at the fridge wondering what to do. The butter browns while the squash finishes in the oven, and somehow the whole thing tastes like you spent an hour on it. Maybe you’ve been there—standing in the kitchen at 6:30 PM with no plan and a hungry family. This one’s for you.
Why You’ll Love This Recipe
Let me tell you why this quick roasted acorn squash has earned a permanent spot in my weeknight rotation. I tested this method about a dozen times before I got it right, and I can honestly say it’s the most forgiving squash recipe I’ve ever made. Here’s what makes it special:
- Ready in 25 Minutes: From fridge to table in under half an hour. The microwave jump-start cuts roasting time by more than half, which is a game-changer on busy nights.
- Pantry-Friendly Ingredients: You probably have everything already. Acorn squash, butter, salt, pepper, maybe some maple syrup or sage if you’re feeling fancy. No specialty trips required.
- Perfect for Weeknight Dinners: This isn’t a holiday-only side dish. It’s simple enough for a Tuesday but impressive enough for company. I’ve served it alongside roast chicken, pork chops, and even just a big salad.
- Picky Eater Approved: My niece, who swears she hates squash, ate three servings the first time I made this. Something about the brown butter and the slightly caramelized edges wins people over.
- Minimal Cleanup: One sheet pan, one small saucepan. That’s it. No multiple bowls, no complicated gadgets. Your future self will thank you.
What makes this version different from the rest? It’s the combination of that quick microwave start with a high-heat finish. Most recipes have you roasting acorn squash for forty-five minutes to an hour. This one gets you there in less than half that time without sacrificing texture or flavor. The brown butter adds this nutty, almost toffee-like richness that makes the squash taste decadent, even though it’s about as simple as cooking gets. I’ve tested this with ghee, with olive oil, even with coconut oil, and nothing beats real butter here. Trust me on that.
What Ingredients You Will Need
This recipe uses simple, honest ingredients to create something that tastes much more complex than it is. The magic happens when the brown butter meets the roasted squash, and each component plays a specific role in making that happen.
For the Squash
- 1 medium acorn squash (about 1.5 to 2 pounds) — Look for one that feels heavy for its size with a deep green color and some orange patches. Those orange spots mean it’s ripe and will be sweeter.
- 2 tablespoons olive oil — Use a good quality extra virgin here. It helps the squash brown and adds its own fruity notes. I like California Olive Ranch for everyday cooking.
- ½ teaspoon salt — I prefer kosher salt for its clean flavor and easy pinch-ability. Diamond Crystal is my go-to.
- ¼ teaspoon black pepper — Freshly ground makes a difference here. The little flecks of pepper add warmth without overwhelming.
For the Brown Butter
- 4 tablespoons unsalted butter — Use the real stuff. Margarine or spreads won’t brown properly and will change the flavor completely. I use Kerrygold when I can find it.
- 1 tablespoon maple syrup (optional but recommended) — This adds a subtle sweetness that plays beautifully with the nutty butter. Grade A dark amber works great.
- 4-6 fresh sage leaves (optional) — If you have them, they’re wonderful. The sage crisps up in the butter and adds an earthy, aromatic note.
- Pinch of flaky sea salt — For finishing. Maldon is my favorite, but any flaky salt will do that lovely crunch thing.
Ingredient Tips I’ve Learned the Hard Way
Don’t skip salting the squash before roasting. I did that once thinking I’d add salt later, and the flavor never quite integrated the same way. Also, if you’re using salted butter, reduce the added salt by about a quarter teaspoon. I learned that one from a very salty batch that taught me to pay attention to what’s in my butter. And honestly, the maple syrup is optional but it really does take this over the top. I’ve made it without when I was out, and it was still delicious. But with it? That’s the version that gets requested for Thanksgiving.
Equipment Needed
You don’t need much for this recipe, which is exactly how I like it on a weeknight. Here’s what you’ll need:
- Sheet pan — A rimmed baking sheet works best. I use a half-sheet pan (18×13 inches) that I’ve had for years. No need for anything fancy.
- Small saucepan — For browning the butter. Light-colored pans work best so you can see the butter change color. My stainless steel pan is perfect for this.
- Chef’s knife — A sharp one. Acorn squash is tough, and a dull knife is dangerous. I use my 8-inch Wusthof, but any sharp knife works.
- Cutting board — Something sturdy that won’t slide around. Place a damp paper towel underneath if yours tends to move.
- Measuring spoons — For the oil, syrup, and salt.
- Microwave-safe plate — For the quick-start step. Any microwave-safe plate or dish will do.
If you don’t have a microwave, you can steam the squash on the stovetop for about 5 minutes instead. Just place the slices in a steamer basket over boiling water and cover. I’ve done it that way when my microwave was broken, and it works fine. Also, if you don’t have a small saucepan, use whatever you have. Just keep a close eye on the butter because it can go from brown to burnt fast in a wider pan.
Preparation Method
Alright, let’s get cooking. This comes together fast, so I like to have everything prepped before I start. Trust me, you don’t want to be hunting for the maple syrup while your butter is browning.
Step 1: Prep the Squash
Preheat your oven to 425°F (220°C). Wash the acorn squash well—you’re eating the skin, so make sure it’s clean. Using a sharp chef’s knife, carefully cut off the stem end and the tip. Then cut the squash crosswise into ½-inch thick rings. You’ll get about 5 to 6 rings from a medium squash. Scoop out the seeds and stringy bits from the center of each ring using a spoon. Don’t stress about getting every last seed—a few left behind won’t hurt anything.
Step 2: Quick-Start in the Microwave
Arrange the squash rings on a microwave-safe plate in a single layer. Microwave on high for 4 minutes. This step is what makes the whole recipe so fast. The squash comes out partially cooked and steamy, which means it needs much less time in the oven. Let it sit for a minute while you get the sheet pan ready. Careful—the plate will be hot.
Step 3: Season and Roast
Transfer the partially cooked squash rings to your sheet pan. Drizzle with the olive oil and sprinkle with salt and pepper. Use your hands to rub the oil and seasoning all over both sides of each ring—yes, get your hands in there. Arrange them in a single layer, not touching each other. Roast for 12 minutes, then flip each ring and roast for another 5 to 8 minutes. You’re looking for deep golden brown edges and a tender center that yields easily when pierced with a fork.
Step 4: Make the Brown Butter
While the squash roasts, make the brown butter. Place the butter in your small saucepan over medium heat. Let it melt completely, then swirl the pan occasionally. The butter will foam up, then the foam will subside, and you’ll see little brown specks forming at the bottom. This takes about 4 to 6 minutes total. Watch it carefully—the moment it smells nutty and looks golden brown with those specks, remove it from the heat. If you’re using sage, add the leaves right when you take the pan off the heat. They’ll crisp up in the residual heat. Stir in the maple syrup if using.
Step 5: Finish and Serve
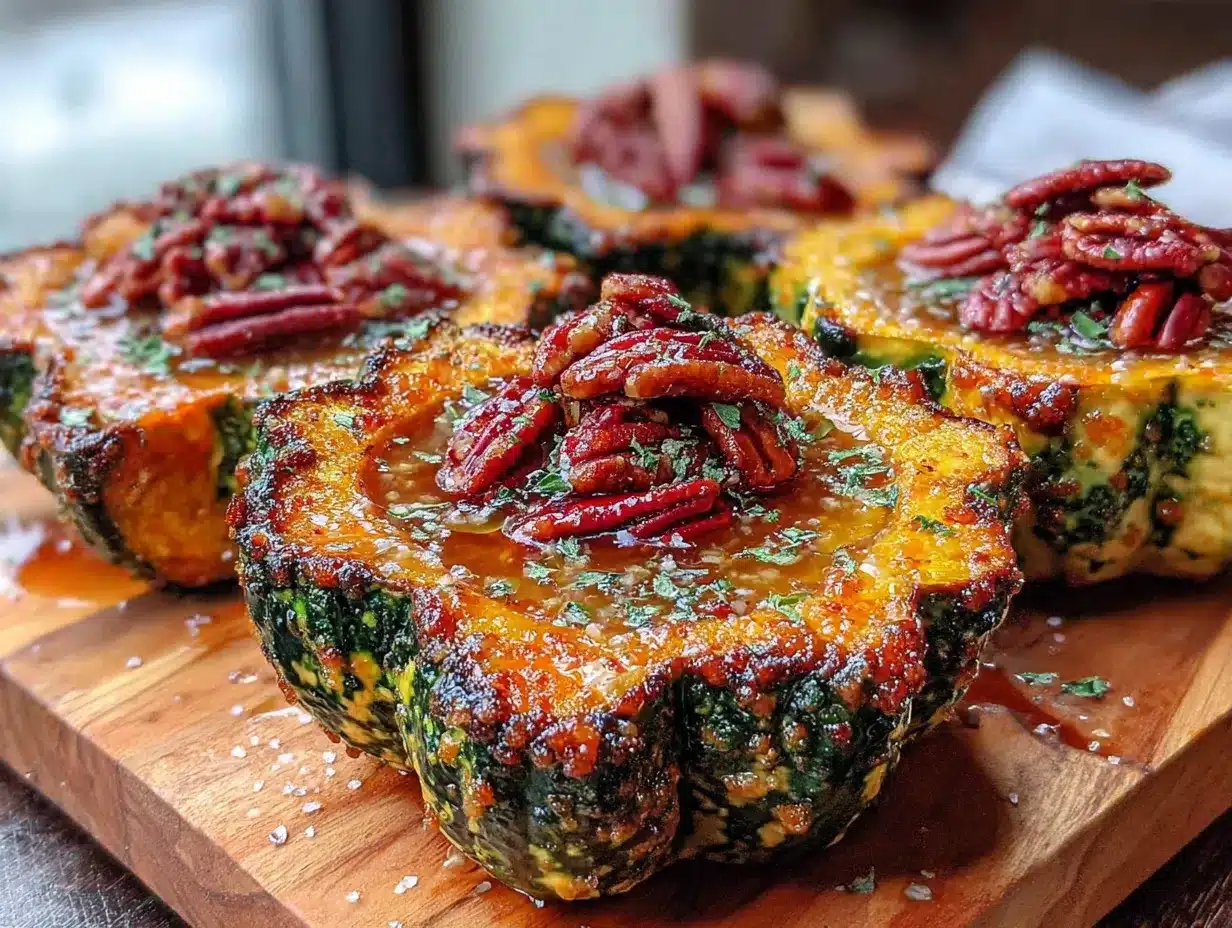
Transfer the roasted squash rings to a serving platter. Drizzle the brown butter over the top, making sure each ring gets some of those lovely brown bits. Sprinkle with flaky sea salt and serve immediately. The squash should be tender but still hold its shape, with those caramelized edges that are honestly the best part.
One thing I learned the hard way: don’t overcrowd the sheet pan. If the rings are touching, they’ll steam instead of roast, and you’ll miss out on that caramelization. If your squash is on the larger side, use two sheet pans or roast in batches. Also, the brown butter will continue to darken after you remove it from the heat, so pull it off a shade lighter than you think you want. Burnt brown butter tastes bitter and acrid, and there’s no coming back from that.
Cooking Tips & Techniques
I’ve made this quick roasted acorn squash more times than I can count, and I’ve definitely made my share of mistakes along the way. Here are the things I wish someone had told me.
Watch the butter like a hawk. I cannot stress this enough. The first time I made brown butter, I walked away to check on the squash and came back to a smoking, blackened mess. Brown butter goes from perfect to ruined in about thirty seconds. Stay at the stove, keep swirling, and trust your nose. When it smells like toasted nuts, you’re there.
Cut consistent rings. Try to keep your squash slices the same thickness. Half-inch is ideal. If some are thicker and some are thinner, the thin ones will burn before the thick ones are done. I use my knuckles as a guide—if my knife is about half an inch from my knuckles, I’m cutting the right thickness.
Don’t skip the microwave step. I know it feels wrong, but it genuinely works. The microwave starts cooking the squash from the inside while the oven handles the outside. This is the secret to getting tender, fully cooked squash in under 25 minutes. Without it, you’re looking at 40 to 45 minutes minimum.
Use a light-colored pan for the butter. Dark nonstick pans make it almost impossible to see the color change. I learned this when I used my favorite dark pan and ended up with burnt butter three times in a row. A stainless steel or light-colored pan lets you actually see what’s happening.
Let the squash rest after microwaving. That minute of resting time lets the steam distribute evenly through the squash. If you go straight to the sheet pan, the outside might start cooking faster than the inside. Patience pays off here, even if it’s just sixty seconds.
Variations & Adaptations
One of the things I love about this recipe is how flexible it is. Here are some ways I’ve adapted it depending on what I have on hand or who I’m cooking for.
Maple-Cinnamon Version
Skip the sage and add ½ teaspoon of cinnamon to the brown butter along with the maple syrup. This version tastes almost like dessert and is incredible alongside roasted pork tenderloin. I made this for a fall dinner party and got asked for the recipe three times.
Savory Herb Version
Add 2 sprigs of fresh thyme and 1 crushed garlic clove to the butter as it browns. Remove them before drizzling over the squash. The thyme adds an earthy, almost floral note that pairs beautifully with the sweetness of the roasted squash. This is my go-to when I’m serving it with roast chicken.
Spicy Version
Add a pinch of red pepper flakes and a drizzle of honey to the brown butter. The heat cuts through the richness in a way that’s honestly addictive. I did this on a whim one night when I had a cold and wanted something with a kick, and it’s become a regular rotation ever since.
Dairy-Free Adaptation
Use a high-quality vegan butter or ghee (which is lactose-free) for the brown butter. I’ve tested this with Miyoko’s European Style Cultured Vegan Butter, and it browns surprisingly well. The flavor is slightly different—less nutty, more toasty—but still delicious.
Air Fryer Version
After the microwave step, transfer the squash rings to your air fryer basket. Cook at 375°F for 8 to 10 minutes, flipping halfway through. The air fryer gives you even more caramelization and slightly crispier edges. I do this when I’m making a smaller batch and don’t want to heat up the whole oven.
Serving & Storage Suggestions
This quick roasted acorn squash is best served hot, right when the brown butter hits it. The contrast between the warm, tender squash and the nutty, fragrant butter is at its peak in that first ten minutes. I like to arrange the rings on a large platter, slightly overlapping, and drizzle the butter over the top so every piece gets some love.
It pairs beautifully with so many main dishes. I’ve served it alongside roasted chicken, pan-seared pork chops, grilled salmon, and even a simple lentil stew for a vegetarian meal. The sweetness of the squash and the richness of the brown butter complement pretty much any protein. If you’re building a plate, I’d also add something green—a simple arugula salad with lemon vinaigrette cuts through the richness perfectly.
For leftovers, store the squash in an airtight container in the refrigerator for up to 4 days. The brown butter will solidify as it cools, but don’t worry—that’s normal. To reheat, place the squash on a sheet pan in a 350°F oven for about 8 minutes, or until warmed through. You can also use the microwave in a pinch, but the texture won’t be quite as good. The squash tends to soften more with each reheat, so it’s best to only reheat what you plan to eat.
One thing I’ve noticed: the flavors actually deepen overnight. The brown butter soaks into the squash, and the maple and sage become more pronounced. I’ve been known to make extra on purpose just so I can have cold leftovers straight from the fridge the next day. Don’t judge until you try it.
Nutritional Information & Benefits
Here’s a rough breakdown per serving (about 1 ring with brown butter):
- Calories: 180
- Fat: 12g
- Carbohydrates: 18g
- Fiber: 3g
- Sugar: 6g
- Protein: 2g
Acorn squash is a nutritional powerhouse, honestly. It’s packed with vitamin A (great for your eyes and immune system), vitamin C, and potassium. The fiber content helps keep you full and supports digestive health. And while butter isn’t exactly a health food, the small amount used here adds a lot of flavor without going overboard. If you’re watching your saturated fat intake, you can use half the butter or swap in a plant-based alternative.
This recipe is naturally gluten-free, vegetarian, and can be made dairy-free with the substitutions I mentioned earlier. It’s also relatively low in sugar for a dish that tastes this sweet—most of that sweetness comes from the squash itself, not added sugar. The maple syrup adds just a touch, but you can absolutely leave it out if you’re cutting back.
Conclusion
This quick roasted acorn squash with brown butter has become my secret weapon for busy weeknights. It’s the dish that makes me look like I put in way more effort than I actually did, and honestly, isn’t that what we all want sometimes? The microwave trick changed everything for me, and I hope it does the same for you. It’s proof that you don’t have to sacrifice flavor for speed, and that sometimes the best cooking lessons come from being wrong.
I’d love to hear how this turns out for you. Did you try the sage? The maple? Did you discover a variation I haven’t thought of yet? Drop a comment below and let me know. And if you’re looking for another quick weeknight side, you might also enjoy this roasted broccoli with garlic and lemon—it’s another one of those recipes that comes together fast but tastes like you fussed. Happy cooking, friends. You’ve got this.
Frequently Asked Questions
Can I make this recipe ahead of time?
You can roast the squash and make the brown butter separately up to a day ahead. Store them in the refrigerator, then reheat the squash in a 350°F oven and warm the brown butter gently on the stovetop before serving. The texture won’t be quite as perfect as fresh, but it’s still delicious.
Do I have to peel the acorn squash?
No, the skin is completely edible and becomes tender when roasted. It’s also where a lot of the fiber is. Just make sure to wash the squash well before cutting. If you really don’t like the texture of the skin, you can peel it before roasting, but it’s extra work and I don’t think it’s necessary.
Can I use butternut squash instead?
Yes, but the cooking time will be different. Butternut squash is denser and takes longer to cook through. You’ll need to increase the microwave time to 5 or 6 minutes and the roasting time by about 5 minutes. Also, butternut squash is sweeter and less nutty than acorn, so the flavor profile shifts a bit.
Why did my brown butter burn?
Brown butter burns when it’s heated too long or at too high a temperature. Use medium heat, not high, and keep the pan moving. The moment you see golden brown specks and smell that nutty aroma, pull it off the heat immediately. The butter continues to cook from the residual heat of the pan, so err on the side of pulling it early.
Can I freeze the roasted squash?
You can, but the texture will suffer. Squash has a high water content, and freezing and thawing breaks down the cell structure, making it mushy. If you have leftovers you won’t eat within 4 days, freezing is better than wasting, but I’d recommend using them in a soup or blended dish rather than serving them as rings.
PrintQuick Roasted Acorn Squash with Easy Brown Butter
A quick and easy weeknight side dish featuring acorn squash rings that are partially microwaved then roasted to perfection, finished with a nutty brown butter sauce. Ready in just 25 minutes, this recipe is perfect for busy nights and picky eaters.
- Prep Time: 10 minutes
- Cook Time: 15 minutes
- Total Time: 25 minutes
- Yield: 4 servings 1x
- Category: Side Dish
- Cuisine: American
Ingredients
- 1 medium acorn squash (about 1.5 to 2 pounds)
- 2 tablespoons olive oil
- ½ teaspoon kosher salt
- ¼ teaspoon freshly ground black pepper
- 4 tablespoons unsalted butter
- 1 tablespoon maple syrup (optional but recommended)
- 4–6 fresh sage leaves (optional)
- Pinch of flaky sea salt (for finishing)
Instructions
- Preheat oven to 425°F (220°C). Wash the acorn squash well. Cut off the stem end and tip, then cut crosswise into ½-inch thick rings (about 5-6 rings). Scoop out seeds and stringy bits.
- Arrange squash rings in a single layer on a microwave-safe plate. Microwave on high for 4 minutes. Let rest for 1 minute.
- Transfer partially cooked rings to a sheet pan. Drizzle with olive oil, sprinkle with salt and pepper, and rub both sides. Arrange in a single layer without touching.
- Roast for 12 minutes, flip each ring, and roast another 5-8 minutes until deep golden brown and tender.
- While squash roasts, make brown butter: Place butter in a small saucepan over medium heat. Melt, then swirl occasionally. Butter will foam, then subside, and brown specks will form (about 4-6 minutes). Remove from heat when nutty and golden. Add sage leaves if using. Stir in maple syrup if using.
- Transfer roasted squash to a platter, drizzle with brown butter, sprinkle with flaky sea salt, and serve immediately.
Notes
Don’t overcrowd the sheet pan; rings should not touch. Watch brown butter carefully—it goes from perfect to burnt in seconds. For dairy-free, use vegan butter or ghee. Leftovers keep in the fridge for up to 4 days; reheat in a 350°F oven for 8 minutes.
Nutrition
- Serving Size: 1 ring with brown bu
- Calories: 180
- Sugar: 6
- Sodium: 300
- Fat: 12
- Saturated Fat: 7
- Carbohydrates: 18
- Fiber: 3
- Protein: 2
Keywords: acorn squash, brown butter, quick, weeknight, side dish, roasted, microwave shortcut


