Love this? Save it for later!
Share the inspiration with your friends
I was standing in line at the DMV—the one on Elm Street that always smells faintly of burnt coffee and desperation—when the woman behind me started talking about deviled eggs. Not just any deviled eggs, mind you. She was telling the clerk about the ones she makes every Halloween, the ones her grandson calls “eyeballs.” I turned around, and there she was, this tiny woman named Mrs. Kowalski, clutching a folder of paperwork and describing how she pipes the filling to look like a spooky iris. I wasn’t expecting cooking advice from a stranger at the DMV, but there I was, my number still twenty-three away from being called, listening to her describe exactly how to make the most brilliant Halloween appetizer I’d ever heard of. Honestly, it made the forty-minute wait feel like five.
I scribbled her instructions on the back of an expired registration form. She laughed and said the secret was in the paprika—smoked, not regular—and that you had to chill the whites just right so they don’t wobble when you pipe. I mean, who thinks about deviled egg structural integrity at the DMV? Mrs. Kowalski, apparently. She told me she’d been making these for thirty years, ever since her grandson was terrified of the neighbor’s inflatable spider. She wanted something spooky but edible, something that made him laugh instead of hide. And honestly, that’s the kind of energy I want at my Halloween table.
So I went home, boiled a dozen eggs, and got to work. The first batch looked more like sad, lumpy frogs than monster eyeballs. But by the third try (and a lot of cursing over the piping bag), I nailed it. These Spooky Monster Eyeball Deviled Eggs are now my go-to Halloween party trick. They’re creepy in the best way, surprisingly simple to pull off, and they disappear faster than the candy bowl. Maybe you’ve been there—staring at a Pinterest board full of over-the-top Halloween snacks that look like they require a culinary degree and a steady hand you definitely don’t have. These are not those. These are doable. And they’re honestly the most fun I’ve had with a dozen eggs in years.
Why You’ll Love This Recipe
Let me tell you why these Spooky Monster Eyeball Deviled Eggs have earned a permanent spot in my Halloween rotation. I’ve tested this recipe at three different parties now, and every single time, people stop mid-conversation to grab one. They’re that good—and that visually weird.
- Quick & Easy: Comes together in about 35 minutes, including boiling and chilling time. Perfect for last-minute Halloween plans or when you realize the party is tomorrow and you have nothing spooky to bring.
- Simple Ingredients: No fancy grocery trips needed. Eggs, mayo, mustard, paprika, and a few olives or capers are all you need. You probably have most of this in your kitchen right now.
- Perfect for Halloween Parties: Great for potlucks, classroom celebrations, spooky movie nights, or even just surprising your family on October 31st. They’re the appetizer that gets photographed before it gets eaten.
- Crowd-Pleaser: Kids love the “gross” factor, and adults love the creamy, classic deviled egg taste. It’s a win-win. I’ve seen picky eaters reach for three in a row.
- Unbelievably Delicious: The texture is silky, the filling is tangy and rich, and the smoky paprika finish ties it all together. It’s next-level comfort food disguised as something terrifying.
What makes this recipe different from the rest? It’s the balance. So many spooky deviled eggs either taste bland because the filling gets watered down, or they’re so elaborate you need a pastry chef’s precision. This version uses a simple trick—blending the yolks with a touch of cream cheese for extra stability—so the filling pipes perfectly into those creepy eyeball shapes without sliding off. Plus, the smoked paprika adds a depth that regular paprika just can’t touch. It’s not just another Halloween gimmick. It’s a genuinely great deviled egg that happens to look like it’s staring into your soul.
This recipe is comfort food reimagined—familiar, creamy, and satisfying, but with a spooky twist that makes everyone smile. Perfect for impressing guests without stress, or turning a simple appetizer into the most memorable thing on the table.
What Ingredients You Will Need
This recipe uses simple, everyday ingredients to deliver bold flavor and a seriously spooky look. Most of these are pantry staples, so you probably won’t need a special trip to the store—unless you’re out of olives, in which case, prioritize that.
- 12 large eggs (room temperature works best for even boiling; if they’re cold, let them sit on the counter for 15 minutes first)
- 1/3 cup mayonnaise (I prefer Hellmann’s or Duke’s for the creamiest texture; avoid Miracle Whip here—it’s too tangy)
- 2 tablespoons cream cheese, softened (this is my secret ingredient—it stabilizes the filling and makes it pipe-able without being runny)
- 1 teaspoon Dijon mustard (adds a subtle tang; yellow mustard works in a pinch but use a little less)
- 1/2 teaspoon smoked paprika, plus more for garnish (this is non-negotiable for that deep, savory flavor—regular paprika is too mild)
- 1/4 teaspoon salt (fine sea salt dissolves best)
- 1/8 teaspoon black pepper (freshly ground preferred)
- 1 tablespoon pickle juice or white vinegar (optional, but adds brightness and cuts through the richness)
- 12 pitted black olives, sliced into rounds (for the “pupils”—look for large, firm olives; I like Lindsay brand)
- 12 small caper berries or green olive slices (for the “iris” detail, optional but highly recommended for extra creepiness)
- Red food coloring or beet juice (for tinting the filling a faint “bloodshot” pink, optional but fun)
Ingredient Selection Tips: Look for eggs that are at least a week old—they peel much easier than super fresh ones. I know it sounds backwards, but it’s true. If you’re using farm-fresh eggs, boil them with a teaspoon of baking soda in the water to help the shells release. For the olives, avoid the pre-sliced canned ones—they’re too soft and fall apart. Whole pitted olives are sturdier and slice cleaner. And please, please don’t skip the smoked paprika. It’s the difference between a deviled egg that tastes “meh” and one that tastes like you spent hours perfecting it.
Substitution Guidance: Need a dairy-free option? Swap the cream cheese for vegan cream cheese or just omit it and add an extra tablespoon of mayo (the filling will be a bit softer, so chill it longer before piping). For a mustard-free version, use a pinch of turmeric for color and a splash of apple cider vinegar for tang. If you can’t find smoked paprika, use regular paprika plus a tiny drop of liquid smoke—but honestly, just buy the smoked stuff. It’s worth it.
Equipment Needed
You don’t need a professional kitchen to pull these off. Here’s what you’ll need, along with some honest talk about what works and what doesn’t.
- Medium saucepan with lid: For boiling the eggs. Any saucepan works, but a wider pan helps the eggs cook evenly.
- Large bowl of ice water: For shocking the eggs after boiling. This stops the cooking and makes peeling easier.
- Sharp knife and cutting board: A sharp knife gives you clean cuts on the eggs and olives. A dull knife will squish the whites.
- Small mixing bowl: For mashing the yolks and mixing the filling.
- Fork or potato masher: For breaking up the yolks. A fork works fine, but a potato masher is faster and gives you a smoother start.
- Piping bag with a star or round tip: For piping the filling into the egg whites. I use a Wilton 1M tip for the ridged “eyeball” effect. No piping bag? Use a zip-top bag with the corner snipped off—it’s not as pretty, but it works in a pinch.
- Small offset spatula or butter knife: For smoothing the filling if you’re not piping.
- Toothpicks: For placing the olive “pupils” precisely. Trust me, your fingers will thank you.
- Platter or egg dish: For serving. A white platter makes the colors pop.
Budget-Friendly Options: Don’t own a piping bag? A sturdy zip-top bag is your friend. Just fill it, seal it, and snip a small corner. The ridges from a star tip are prettier, but a round tip or even just a snipped corner will still give you a great eyeball shape. I’ve done it both ways, and honestly, no one at the party noticed the difference.
Preparation Method

Let’s get into the nitty-gritty. Follow these steps carefully, and you’ll have a platter of spooky, delicious eyeballs that will steal the show.
- Boil the eggs: Place the eggs in a single layer in your saucepan. Cover them with cold water by about an inch. Bring the water to a rolling boil over high heat. Once it’s boiling, cover the pan, remove it from the heat, and let it sit for exactly 12 minutes. Set a timer—don’t guess. This gives you hard-boiled eggs with firm, fully set yolks but no green ring around the outside.
- Ice bath: While the eggs are sitting, fill a large bowl with ice and cold water. As soon as the 12 minutes are up, transfer the eggs to the ice bath using a slotted spoon. Let them chill for at least 10 minutes. This stops the cooking and makes peeling infinitely easier. I’ve skipped this step before out of impatience, and I regretted every torn, pockmarked egg white.
- Peel the eggs: Gently tap each egg on the counter to crack the shell all over, then roll it between your palms to loosen the shell. Start peeling from the wider end (where the air pocket is). Rinse the peeled eggs under cold water to remove any tiny shell fragments. Pat them dry with a paper towel.
- Slice the eggs: Using a sharp knife, slice each egg in half lengthwise. Wipe the knife clean between cuts for the neatest results. Gently pop out the yolks into your mixing bowl. Arrange the egg white halves on your serving platter, cut-side up.
- Make the filling: Add the mayonnaise, softened cream cheese, Dijon mustard, smoked paprika, salt, pepper, and pickle juice (if using) to the bowl with the yolks. Mash everything together with a fork until it’s mostly smooth, then switch to a spatula and stir until the mixture is silky and uniform. Taste it. Adjust the salt or paprika if needed. This is your moment to get the flavor exactly right.
- Optional: tint the filling: If you want a faint “bloodshot” look, add one or two drops of red food coloring or a teaspoon of beet juice and stir until evenly distributed. The color should be a very pale pink, not bright red. You want it to look unsettling, not like a science experiment.
- Fill the eggs: Spoon the filling into your piping bag fitted with a star tip. Pipe a generous swirl of filling into each egg white half, mounding it slightly above the rim. You want it to look rounded, like an eyeball. If you’re using a zip-top bag, snip a 1/2-inch corner and pipe a round mound instead of a swirl. Both work, but the swirl gives a more convincing “iris” texture.
- Add the “pupils”: Take a slice of black olive and gently press it into the center of each filling mound. Use a toothpick to adjust it if needed. For an extra-creepy touch, place a tiny caper berry or green olive slice off-center on the black olive to look like a dilated or irregular pupil. This is where the monster vibe really comes alive.
- Garnish and finish: Lightly dust the filled eggs with a pinch of smoked paprika. If you want a “bloodshot” effect, use a toothpick to drag a tiny line of red food coloring from the olive outward into the filling. Go easy—less is more. Refrigerate the platter for at least 20 minutes before serving to let the filling firm up.
Sensory Cues: When you pipe the filling, it should hold its shape without slumping. If it’s too soft, pop the bowl in the fridge for 10 minutes before filling. The finished eggs should look plump and glossy, with the paprika adding a warm, smoky aroma. The olive pupils should sit proudly in the center, not sink into the filling.
Cooking Tips & Techniques
I’ve made these Spooky Monster Eyeball Deviled Eggs about a dozen times now, and I’ve learned a few things the hard way. Here’s what I wish someone had told me before my first attempt.
The Perfect Boil is Everything: Overcooked eggs develop that greenish-gray ring around the yolk, and they smell… sulfurous. It’s not a dealbreaker, but it’s not ideal. The 12-minute off-heat method I shared above is bulletproof. I once got distracted by a phone call and left the eggs on the heat for 15 minutes. The yolks were dry and crumbly, and the filling was gritty no matter how much mayo I added. Don’t be me. Set the timer.
Chill the Whites Before Filling: This is a tip I picked up from Mrs. Kowalski’s DMV wisdom, and it’s a game-changer. After you slice the eggs and arrange them on the platter, pop them in the fridge for 10 minutes. Cold egg whites hold the filling better and don’t get slippery. I skipped this once when I was in a rush, and the filling kept sliding off the whites like they were greased. Not a good look.
Pipe with Confidence: If you’re nervous about piping, practice on a plate first. Seriously. Pipe a few swirls onto a clean plate to get a feel for the pressure and speed. You want a steady, even flow. If the filling is too stiff to pipe easily, add a teaspoon of mayo or a splash of pickle juice to loosen it. If it’s too runny, add a tablespoon of cream cheese or a few extra mashed yolks. The texture should be like thick frosting—firm enough to hold a peak, but soft enough to pipe smoothly.
Don’t Overdo the “Bloodshot” Effect: I went overboard with the red food coloring on my second batch, and the eggs looked like they’d been in a horror movie. A little goes a long way. One tiny drop stirred into the filling, or a single streak dragged outward from the olive, is plenty. You want “spooky,” not “graphic.”
Multitasking Strategy: Boil the eggs and make the filling while the whites are chilling. That way, everything is ready to assemble at once. I like to prep the olive slices while the eggs are in the ice bath, too. It keeps the workflow smooth and prevents that frantic “where’s the paprika?” moment right before guests arrive.
Variations & Adaptations
One of the best things about this recipe is how easy it is to twist it into something new. Here are a few variations I’ve tried and loved.
Spicy Sriracha Eyeballs: Add 1 teaspoon of sriracha or sambal oelek to the filling for a spicy kick. The heat cuts through the richness beautifully, and the red color adds to the “bloodshot” effect naturally. My brother-in-law, who claims he “doesn’t do spicy,” ate four of these before admitting they were his favorite.
Avocado “Green Monster” Version: Swap the mayonnaise for 1/2 cup of mashed ripe avocado and add a squeeze of lime juice. The filling turns a pale green, which looks perfectly monstrous. Use green olives or pickled jalapeño slices for the pupils. This version is dairy-free and feels slightly healthier, though honestly, it’s still deviled eggs. Let’s not kid ourselves.
Smoky Bacon Eyeballs: Crumble 3 slices of cooked bacon and fold them into the filling before piping. The smoky, salty crunch adds texture and depth. Top each egg with a tiny piece of bacon before adding the olive pupil. It’s not exactly subtle, but Halloween is not the time for subtlety.
Vegan “Egg” Eyeballs: Use firm tofu or chickpea flour to make vegan “eggs,” or simply serve the filling in small endive leaves for a low-carb, plant-based option. The filling works beautifully with vegan mayo and cashew cream cheese. I tested this for a friend with egg allergies, and honestly, the filling was so good I almost preferred it.
Kid-Friendly “Friendly Monster” Version: Skip the red food coloring and use mild paprika. Let kids help place the olive pupils—they love the hands-on part. You can also swap the olives for halved cherry tomatoes or cucumber slices if olives aren’t a hit with the little ones.
Serving & Storage Suggestions
These Spooky Monster Eyeball Deviled Eggs are best served cold, straight from the fridge. The filling is firm and creamy at this temperature, and the flavors are clean and bright. Arrange them on a white or black platter for maximum visual impact—the contrast makes the eyeballs pop. I like to garnish the platter with a few fresh rosemary sprigs to look like “spooky trees,” or scatter some edible glitter for a witchy vibe.
What to Serve With Them: These deviled eggs pair beautifully with other Halloween finger foods. Think mini mummy hot dogs, pumpkin-shaped cheese balls, or a bowl of “witches’ brew” punch. For drinks, a crisp lager or a dry hard cider cuts through the richness of the eggs nicely. If you’re serving a crowd, put out a bowl of crunchy potato chips or pretzels alongside—the salt and crunch balance the creamy eggs perfectly.
Storage Instructions: Store leftover deviled eggs in an airtight container in the refrigerator for up to 2 days. Place them in a single layer, or use a deviled egg carrier if you have one. Do not freeze them—the texture will be watery and sad when thawed. I speak from experience. It’s not worth it.
Reheating: Don’t. These are served cold. If you’ve refrigerated them and they seem a bit dry on top, let them sit at room temperature for 10 minutes before serving. The filling will soften slightly and taste fresher.
Flavor Development: Interestingly, the flavors meld and deepen after a few hours in the fridge. The smoked paprika becomes more pronounced, and the tang from the mustard and pickle juice mellows into the background. I actually prefer these made a day ahead for this reason. Just add the olive pupils and paprika garnish right before serving, so they look fresh.
Nutritional Information & Benefits
Let’s be real—deviled eggs are not health food. But they’re not junk food either. Here’s a rough breakdown per egg half (based on the standard recipe, before any variations):
- Calories: Approximately 70-80 calories
- Protein: 6 grams
- Fat: 5 grams (mostly from the yolk and mayo)
- Carbohydrates: 1 gram
- Fiber: 0 grams
- Sugar: 0.5 grams
- Sodium: 120-150 mg
Health Benefits: Eggs are a fantastic source of high-quality protein and contain essential nutrients like choline (great for brain health), vitamin D, and B vitamins. The yolks are where most of the vitamins live, so don’t skip them. The cream cheese adds a small amount of calcium, and the smoked paprika provides a tiny dose of antioxidants. Is this a superfood? No. But as a once-a-year Halloween treat, it’s a perfectly reasonable indulgence.
Dietary Considerations: This recipe is naturally gluten-free and low-carb (keto-friendly at about 1 gram of carbs per serving). It’s not dairy-free unless you swap the cream cheese, and it’s obviously not vegan or vegetarian (unless you use the tofu variation). The main allergen is eggs, followed by dairy. If you’re serving a crowd, label the platter clearly so guests with allergies know what they’re dealing with.
My Wellness Perspective: I’m a big believer in the “everything in moderation” approach. Halloween is one night a year. If you want to eat a few deviled eggs that look like eyeballs, go for it. Balance comes from the rest of your week, not from one platter of spooky snacks. Enjoy them, share them, and don’t stress about the numbers.
Conclusion
These Spooky Monster Eyeball Deviled Eggs are the Halloween appetizer you didn’t know you needed. They’re creepy, they’re delicious, and they’re honestly the easiest way to make a statement at any spooky gathering. The filling is creamy and tangy, the olive pupils add a perfect briny pop, and the whole thing comes together with ingredients you probably already have in your kitchen. No fancy tools, no complicated techniques—just a little patience and a sense of humor.
What I love most about this recipe is how it brings people together. Every time I serve them, someone laughs, someone takes a photo, and someone asks for the recipe. It’s the kind of food that sparks conversation and makes memories. And honestly, isn’t that what Halloween is all about? A little bit of spooky, a whole lot of fun, and a table full of food that makes everyone smile.
I’d love to hear how yours turn out. Did you add a twist? Did your kids help with the olive placement? Did anyone refuse to eat them because they looked “too real”? Drop a comment below and let me know. Share this recipe with your fellow Halloween lovers, and tag me in your photos—I can’t wait to see your spooky creations. Happy Halloween, and happy cooking!
Frequently Asked Questions
Can I make these deviled eggs a day ahead of time?
Yes, absolutely. You can prepare the filling and boil the eggs up to 24 hours in advance. Store the whites and filling separately in the fridge, then assemble and garnish right before serving. The filling actually tastes better after it’s had time to meld overnight.
How do I get the eggs to peel easily?
Use eggs that are at least a week old—fresh eggs are notoriously hard to peel. Add a teaspoon of baking soda to the boiling water to help loosen the shells. And don’t skip the ice bath! Shocking the eggs in ice water stops the cooking and creates steam between the egg and the shell, making peeling much easier.
What can I use instead of black olives for the pupils?
If you’re not an olive fan, try using sliced black beans, capers, or even small rounds of nori (seaweed) cut with a tiny circle punch. For a less salty option, use halved cherry tomatoes or cucumber slices. The key is something dark and round that contrasts with the pale filling.
Can I make these without a piping bag?
Yes, definitely. Use a sturdy zip-top bag with a small corner snipped off. It won’t give you the ridged “iris” effect, but it will still look like a round eyeball. Alternatively, you can just spoon the filling into the whites and smooth it with a small offset spatula. It’s less polished, but it’s still delicious.
How long do these deviled eggs last at a party?
Deviled eggs should not sit out at room temperature for more than 2 hours. If you’re serving them at a party, keep the platter on ice or in the refrigerator until serving time. After 2 hours, any leftovers should be discarded for food safety reasons. Trust me, though—they’ll be gone long before that.
Pin This Recipe!
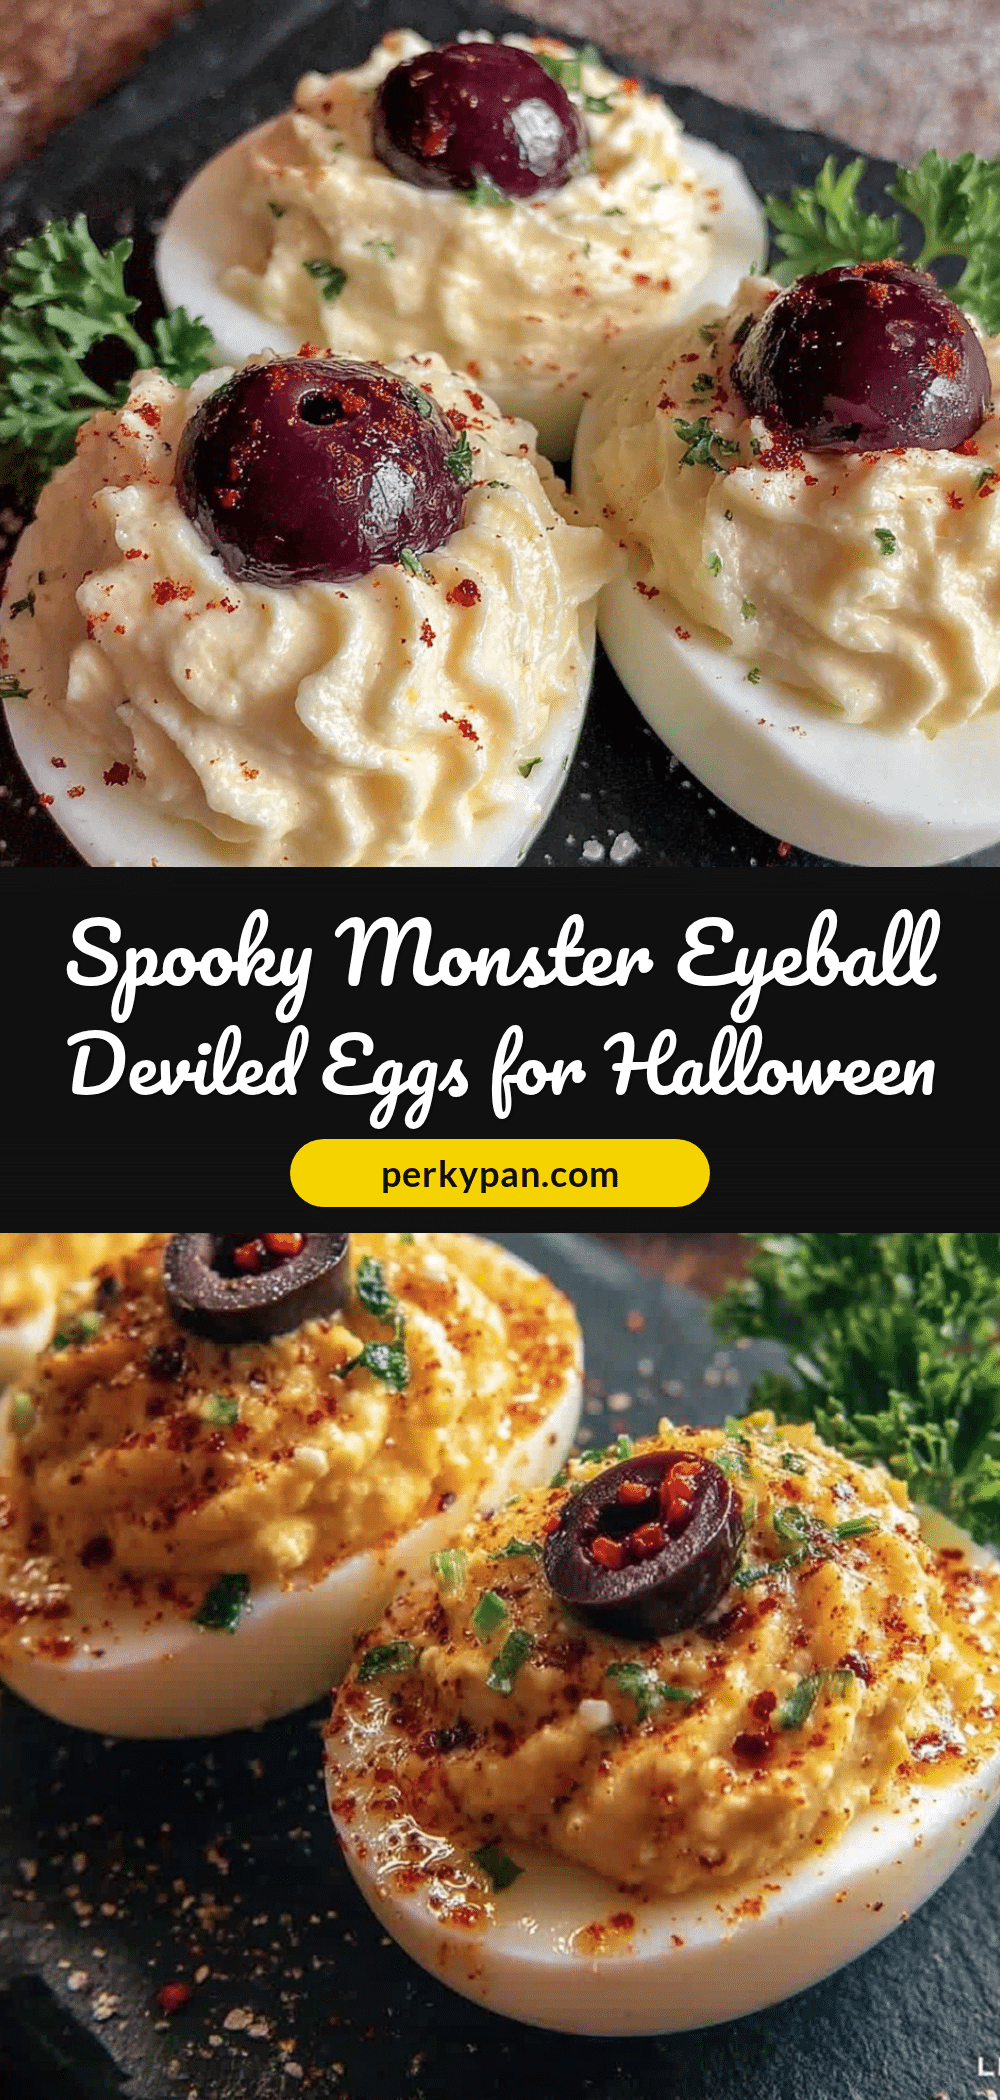
Spooky Monster Eyeball Deviled Eggs Halloween Recipe

These Spooky Monster Eyeball Deviled Eggs are the perfect Halloween appetizer—creamy, tangy deviled eggs topped with olive ‘pupils’ for a delightfully creepy look. Easy to make with simple ingredients, they’re a crowd-pleaser that disappears faster than the candy bowl.
- Prep Time: 15 minutes
- Cook Time: 12 minutes
- Total Time: 35 minutes
- Yield: 24 deviled egg halves (12 servings of 2 halves each) 1x
- Category: Appetizer
- Cuisine: American
Ingredients
- 12 large eggs (room temperature)
- 1/3 cup mayonnaise (Hellmann’s or Duke’s preferred)
- 2 tablespoons cream cheese, softened
- 1 teaspoon Dijon mustard
- 1/2 teaspoon smoked paprika, plus more for garnish
- 1/4 teaspoon fine sea salt
- 1/8 teaspoon freshly ground black pepper
- 1 tablespoon pickle juice or white vinegar (optional)
- 12 pitted black olives, sliced into rounds
- 12 small caper berries or green olive slices (optional)
- Red food coloring or beet juice (optional)
Instructions
- Boil the eggs: Place eggs in a single layer in a saucepan. Cover with cold water by 1 inch. Bring to a rolling boil over high heat. Cover, remove from heat, and let sit for exactly 12 minutes.
- Ice bath: While eggs sit, fill a large bowl with ice and cold water. Transfer eggs to ice bath using a slotted spoon. Chill for at least 10 minutes.
- Peel the eggs: Gently tap each egg on the counter to crack the shell, roll between palms to loosen, and peel starting from the wider end. Rinse under cold water and pat dry.
- Slice the eggs: Using a sharp knife, slice each egg in half lengthwise. Pop out yolks into a mixing bowl. Arrange egg white halves on a serving platter, cut-side up.
- Make the filling: Add mayonnaise, cream cheese, Dijon mustard, smoked paprika, salt, pepper, and pickle juice (if using) to the yolks. Mash with a fork until mostly smooth, then stir with a spatula until silky and uniform. Taste and adjust seasoning.
- Optional: tint the filling: Add 1-2 drops red food coloring or 1 teaspoon beet juice and stir until evenly distributed for a faint ‘bloodshot’ pink color.
- Fill the eggs: Spoon filling into a piping bag fitted with a star tip. Pipe a generous swirl into each egg white half, mounding slightly above the rim. Alternatively, use a zip-top bag with a 1/2-inch corner snipped off.
- Add the ‘pupils’: Press a slice of black olive into the center of each filling mound. For extra creepiness, place a tiny caper berry or green olive slice off-center on the black olive.
- Garnish and finish: Lightly dust filled eggs with smoked paprika. For a ‘bloodshot’ effect, use a toothpick to drag a tiny line of red food coloring from the olive outward. Refrigerate for at least 20 minutes before serving.
Notes
Use eggs that are at least a week old for easier peeling. Chill the egg whites for 10 minutes before filling to prevent slipping. The filling should be like thick frosting—firm enough to hold a peak but soft enough to pipe. For best flavor, make the filling a day ahead and assemble just before serving. Do not freeze deviled eggs.
Nutrition
- Serving Size: 2 deviled egg halves
- Calories: 150160
- Sugar: 1
- Sodium: 240300
- Fat: 10
- Saturated Fat: 3
- Carbohydrates: 2
- Protein: 12
Keywords: Halloween deviled eggs, monster eyeball deviled eggs, spooky appetizer, Halloween party food, deviled eggs recipe, easy Halloween snack


