Love this? Save it for later!
Share the inspiration with your friends
The street was almost empty last October 31st when a sudden whiff of sugary vanilla frosting caught me off guard — and just like that, I was eight years old again, perched on the edge of my kitchen stool at Mrs. Linetti’s apartment. She was the quirky neighbor with a penchant for all things spooky and sweet, and that night she was crafting what she called “monster eyeball cake pops.” The flickering orange candlelight and the soft hum of a Halloween playlist filled the room as I eagerly watched her dip each ball into glossy candy melts, then dot them with creepy little red veins and eerie green pupils.
I remember knocking over the glass of sprinkles halfway through — honestly, a mess I still laugh about — but the taste of those cake pops was unforgettable. It wasn’t just the sugar or the chocolate; it was the weirdly satisfying mix of creepy and cute, the kind of treat that made Halloween feel like a secret club you wanted to be part of. You know that feeling when something simple suddenly feels like magic? Maybe you’ve been there, chasing that little spark from childhood recipes that you swear you’ll never forget.
Years later, I found myself in a slightly chaotic kitchen with too many candy colors and a cracked mixing bowl, determined to recreate those Perfect Monster Eyeball Cake Pops for Halloween fun. This recipe isn’t just about the cake pops — it’s about capturing that exact moment of wonder and sticky fingers. And honestly, every year when I make them, I’m reminded how sometimes, the best treats are the ones that come with a little bit of nostalgia and a whole lot of fun.
Why You’ll Love This Recipe
Over countless Halloweens, I’ve tweaked this monster eyeball cake pops recipe until it’s just right — and let me tell you, it’s the kind of treat that wins over everyone from the skeptics to the sugar fiends. Here’s why you’ll want to make it your go-to for spooky season:
- Quick & Easy: Ready in under 45 minutes, perfect for last-minute party prep or if you’re juggling a million things on Halloween night.
- Simple Ingredients: No need for specialty stores — most are pantry staples or easy to find at your local market.
- Perfect for Halloween Parties: These cake pops bring the fun and the fright, making them a hit at classroom parties, family gatherings, or neighborhood trick-or-treat events.
- Crowd-Pleaser: Kids adore the creepy eyeball look, and adults appreciate the moist cake and smooth candy coating combo.
- Uniquely Delicious: The balance between a rich, moist cake center and the crunchy candy shell is just right — no sogginess, no cracking.
This recipe stands out because of the special technique I use to get the eyeball veins just right — a thin drizzle of colored candy melts, not too thick and not too faint, that gives these pops their eerie realism. Plus, I’ve found a foolproof way to keep the cake moist but firm enough to hold on the sticks without crumbling.
Honestly, it’s not just a recipe; it’s a Halloween tradition that brings a little extra thrill to your treats table. Plus, if you’ve ever tried those plain cake pops that just don’t look or taste quite right, you’ll appreciate how this one nails both the spooky vibe and the flavor.
What Ingredients You Will Need
This recipe uses straightforward ingredients that come together to create a fun, spooky treat without fuss. Most items are pantry staples, and there are easy swaps if you want to customize or accommodate allergies.
- For the Cake:
- 1 box of yellow or white cake mix (about 15.25 oz / 432 g) – I prefer Betty Crocker for consistent results
- Ingredients called for on the cake mix box (usually eggs, oil, and water)
- For the Frosting Mixture:
- 1/2 cup (115 g) unsalted butter, softened (adds richness and moisture)
- 1 1/2 cups (180 g) powdered sugar
- 1 tsp vanilla extract
- 2-3 tbsp milk or cream (to adjust frosting consistency)
- For the Coating & Decoration:
- 16 oz (450 g) white candy melts or white chocolate wafers (look for brands like Wilton or Merckens for smooth melting)
- Red, green, and black candy melts or food coloring gels for decorating eyeballs
- Black edible marker or black gel icing (for pupils)
- Optional: red piping gel for extra “bloodshot” effect
- 25-30 lollipop sticks
Ingredient tips: If you want gluten-free, just swap the cake mix for a gluten-free version. You can also swap butter with dairy-free margarine and use almond or oat milk for a dairy-free frosting. In summer, try adding a few fresh, finely chopped strawberries to the cake batter for a subtle fruity surprise. Just remember, too much moisture can make the cake pops harder to shape.
Equipment Needed
Making these monster eyeball cake pops calls for some basic kitchen tools, plus a few items that make the process much easier (and less messy!). Here’s what you’ll need:
- A large mixing bowl for the cake batter
- A stand mixer or hand mixer (totally worth borrowing if you don’t have one — it makes mixing the frosting a breeze)
- Baking pan (9×13 inch / 23×33 cm works perfectly)
- Cooling rack to let the cake cool evenly
- Large mixing bowl for crumbling the cake and mixing the frosting
- Baking sheet or tray lined with parchment paper (for placing the shaped cake balls before chilling)
- Microwave-safe bowls for melting candy melts (or a double boiler if you prefer)
- Lollipop sticks (choose sturdy ones; I’ve had flimsy sticks fail mid-dip — lesson learned!)
- Toothpicks or fine-tipped piping bags for decorating eyeball details
If you don’t have candy melts, white chocolate chips work but can be trickier to melt smoothly. A silicone baking mat can be a great budget-friendly alternative to parchment paper — I keep one handy for cake pops and other treats.
Preparation Method
- Bake the cake: Prepare the cake mix according to the package instructions (usually takes about 10 minutes prep and 25-30 minutes baking at 350°F / 175°C). Use a 9×13 inch (23×33 cm) pan for even thickness. Once baked, cool completely on a rack (about 1 hour). Tip: Don’t rush this step; warm cake crumbles messily.
- Crumble the cake: Once cool, crumble the cake finely into a large bowl using your hands or a fork — you want small, even crumbs for easy mixing.
- Make the frosting mixture: Beat softened butter, powdered sugar, vanilla extract, and milk together until smooth and creamy (about 3-4 minutes). Adjust milk to get a spreadable but firm frosting.
- Combine cake and frosting: Add frosting gradually to the cake crumbs and mix gently until the mixture holds together when pressed (about 1/4 cup or 60 ml of frosting is usually enough). If too dry, add a little more frosting, but don’t overdo it — too wet, and your pops won’t hold shape.
- Shape the cake balls: Roll the mixture into 1 1/4-inch (3 cm) balls and place on a parchment-lined baking sheet. Chill in the fridge for at least 30 minutes to firm up.
- Prepare candy melts: Melt white candy melts in microwave-safe bowls in 30-second bursts, stirring in between until smooth. Avoid overheating to prevent clumping.
- Insert sticks: Dip the tip of each lollipop stick into melted candy, then insert halfway into a chilled cake ball. This “glue” helps secure the stick. Chill again for about 15 minutes.
- Dip the cake pops: Holding the stick, dip each cake ball into the melted white candy, tapping off excess gently. Stand the pops upright in a styrofoam block or a prepared box to dry completely (about 15 minutes).
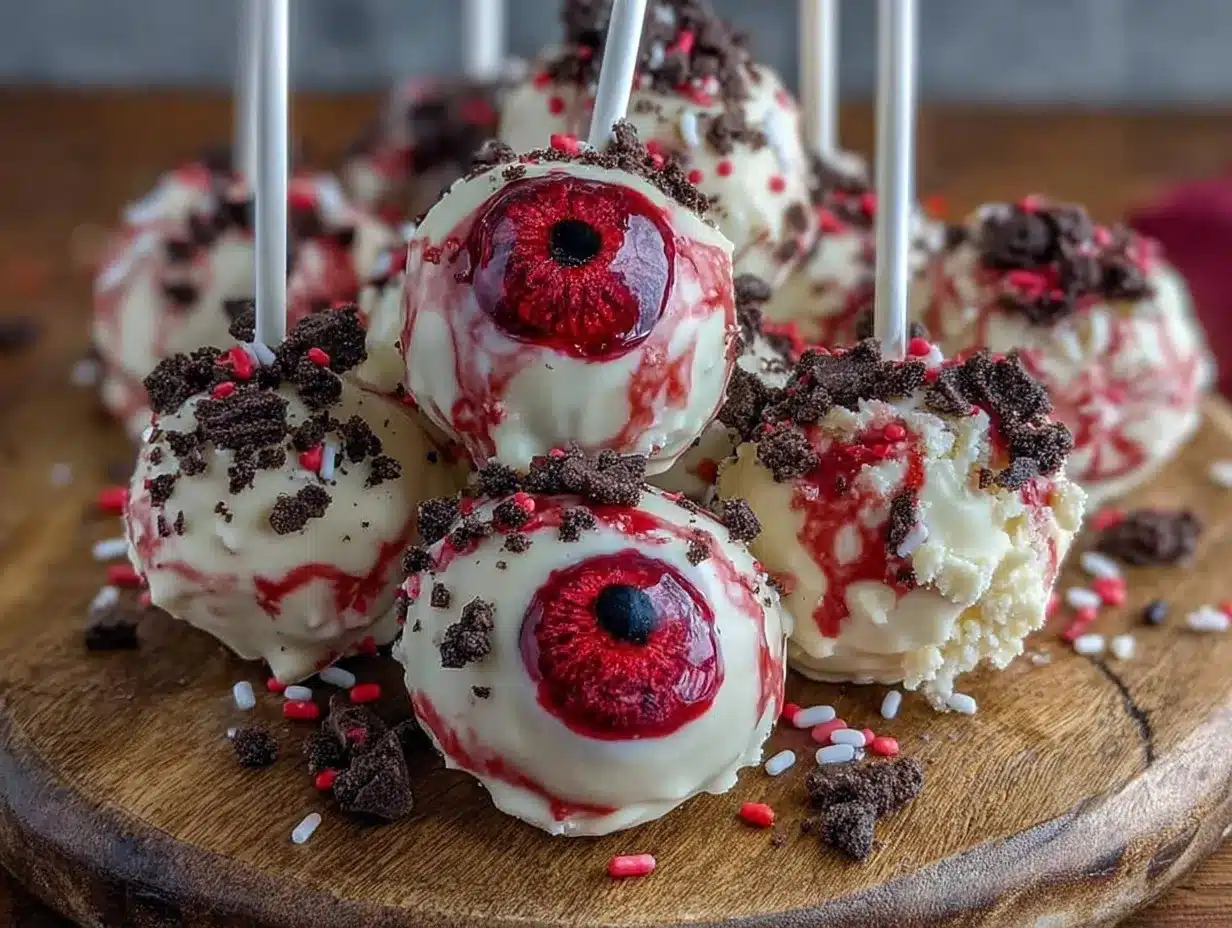
- Decorate the eyeballs: Use red candy melt thinly drizzled for veins, then add green or other colored candy melts for the iris. Finish with a black candy melt or edible marker dot for the pupil. Let dry fully (about 30 minutes).
- Final touches: Optionally, add a little red piping gel to create a “bloodshot” effect for extra creepiness. Let dry before serving or storing.
Pro tip: If the candy coating becomes too thick or starts hardening while dipping, just microwave it briefly to keep the texture smooth. Also, don’t skip chilling steps — they keep your pops from falling apart or cracking.
Cooking Tips & Techniques
Making monster eyeball cake pops can feel a bit fiddly at first, but with a few tricks, you’ll nail it every time. Here’s what I’ve learned:
- Keep everything cool: Warm cake or frosting mixture gets sticky and hard to shape. Chill your cake balls well before dipping.
- Use candy melts, not just chocolate: Candy melts have a thinner consistency when melted and harden with a nice smooth finish. Chocolate can be thicker and harder to work with for coating.
- Don’t overmix the cake-frosting combo: Too much frosting makes the texture pasty and heavy, too little and it falls apart. Aim for a dough-like consistency.
- Secure the sticks: Dipping the tip of the stick in candy melt before inserting gives a better hold — learned this the hard way when some pops lost their sticks mid-dip!
- Decorate with a light hand: Thin lines for veins look more realistic and less messy. Use a toothpick or fine tip for control.
- Work quickly but gently: Candy melts set fast. If you’re decorating multiple pops, prepare all decorations beforehand to avoid rushed mistakes.
Honestly, patience is key. I sometimes get impatient and skip chilling, and that’s when cracks and crumbles happen. Trust me, it’s worth the wait for neat, perfect pops.
Variations & Adaptations
Want to shake things up a bit? These monster eyeball cake pops are surprisingly adaptable:
- Flavor swaps: Use chocolate or red velvet cake mixes instead of yellow for spooky color and deeper flavor.
- Dietary adaptations: Gluten-free cake mix works well; for dairy-free, swap butter with coconut oil and use dairy-free candy melts.
- Eyeball colors: Play with different iris colors — purple, blue, or neon green — to make a whole monster army.
- Size adjustments: Make mini pops for bite-sized treats (about 3/4 inch / 2 cm balls) or jumbo pops for dramatic effect.
- Alternative coatings: Try crushed cookies or colored sugar sprinkles over the candy coating for texture variation.
One Halloween, I went all out with glow-in-the-dark edible paint — it was a hit at the party, and the kids were wide-eyed (pun intended!). Feel free to experiment to suit your crowd and occasion.
Serving & Storage Suggestions
These cake pops are best served at room temperature when the candy coating is firm but not cold and brittle. For parties, arrange them standing tall in a decorated vase or foam block — it makes for a fantastic spooky centerpiece.
Complement these monster eyeballs with a glass of cold milk or a warm cup of spiced cider to balance the sweetness. If you want to round out your Halloween spread, consider pairing with creepy spider web cupcakes for a full eerie effect.
Store leftover pops in an airtight container in the fridge for up to 5 days. Before serving, let them sit out for about 15 minutes to take the chill off and soften the candy shell slightly.
For longer storage, freeze them in a single layer on a baking sheet, then transfer to a freezer bag for up to 2 months. Thaw in the fridge overnight and bring to room temperature before serving.
Keep in mind that flavors deepen over time, so if you make them a day ahead, the cake pops will taste even better the next day — if they last that long!
Nutritional Information & Benefits
These monster eyeball cake pops are definitely a treat, but here’s a rough idea of what you’re getting per pop (assuming about 25 pops):
| Nutrient | Per Cake Pop |
|---|---|
| Calories | 120-140 kcal |
| Fat | 6-7 g |
| Sugar | 15-18 g |
| Protein | 1-2 g |
The cake provides carbohydrates for energy, while the butter and candy melts add fat for that rich texture. Using real butter also brings a nice dose of vitamin A. Of course, these are indulgent treats, so enjoy in moderation.
If you want a slightly healthier twist, consider swapping powdered sugar in the frosting for a blend of powdered erythritol and monk fruit sweetener, or use a reduced-fat cake mix. Just remember, the magic is in the balance of moist cake and sweet coating.
Allergens include gluten, dairy, and eggs, but as mentioned earlier, substitutions can be made to fit various dietary needs.
Conclusion
Honestly, Perfect Monster Eyeball Cake Pops are the kind of Halloween treat that turns making snacks into a memory-making event. They bring fun, a little bit of fright, and a whole lot of flavor to your holiday table. Whether you’re baking with kids, hosting a monster-themed party, or just craving a sweet that looks as good as it tastes, these pops hit the spot every time.
Feel free to tweak the colors, flavors, and sizes to make them truly your own — that’s part of what keeps me coming back to this recipe every year. Trust me, once you’ve got the technique down, you’ll find yourself looking forward to Halloween just to make these again!
Go ahead and give it a try — then come back and share your spooky creations and any cool twists you added. I’m always excited to hear how you bring these monster eyeballs to life!
Frequently Asked Questions
Can I make monster eyeball cake pops ahead of time?
Yes! You can prepare the cake balls a day in advance and store them in the fridge. The fully decorated cake pops also keep well in the fridge for up to 5 days.
What if I don’t have candy melts? Can I use chocolate?
You can use white chocolate chips, but candy melts are easier to work with since they melt smoothly and set quickly without tempering.
How do I prevent the cake pops from falling off the sticks?
Dipping the stick tip in melted candy before inserting it into the cake ball helps “glue” it in place. Chilling the cake balls after inserting sticks also secures them better.
Can I freeze these cake pops?
Absolutely. Freeze them on a baking sheet first, then transfer to an airtight container or bag. Thaw in the fridge overnight before serving.
How do I make the veins on the eyeballs look realistic?
Use a toothpick or fine-tipped piping bag with red candy melts to drizzle thin, uneven lines radially from the iris. Less is more for a creepy but neat effect.
Pin This Recipe!

Perfect Monster Eyeball Cake Pops

These spooky and fun monster eyeball cake pops are a perfect Halloween treat, combining moist cake centers with a smooth candy coating and eerie decorations.
- Prep Time: 15 minutes
- Cook Time: 30 minutes
- Total Time: 1 hour 45 minutes
- Yield: 25-30 cake pops 1x
- Category: Dessert
- Cuisine: American
Ingredients
- 1 box yellow or white cake mix (about 15.25 oz / 432 g)
- Ingredients called for on the cake mix box (usually eggs, oil, and water)
- 1/2 cup (115 g) unsalted butter, softened
- 1 1/2 cups (180 g) powdered sugar
- 1 tsp vanilla extract
- 2–3 tbsp milk or cream
- 16 oz (450 g) white candy melts or white chocolate wafers
- Red, green, and black candy melts or food coloring gels
- Black edible marker or black gel icing
- Optional: red piping gel
- 25–30 lollipop sticks
Instructions
- Prepare the cake mix according to package instructions (about 10 minutes prep and 25-30 minutes baking at 350°F / 175°C) in a 9×13 inch pan. Cool completely on a rack (about 1 hour).
- Crumble the cooled cake finely into a large bowl using hands or fork.
- Beat softened butter, powdered sugar, vanilla extract, and milk together until smooth and creamy (3-4 minutes). Adjust milk for spreadable but firm frosting.
- Gradually add frosting to cake crumbs and mix gently until mixture holds together when pressed (about 1/4 cup frosting).
- Roll mixture into 1 1/4-inch balls and place on parchment-lined baking sheet. Chill in fridge at least 30 minutes.
- Melt white candy melts in microwave-safe bowls in 30-second bursts, stirring until smooth.
- Dip tip of each lollipop stick into melted candy, then insert halfway into chilled cake ball. Chill again for 15 minutes.
- Dip each cake ball into melted white candy, tap off excess, and stand upright to dry completely (about 15 minutes).
- Decorate eyeballs with thin red candy melt drizzles for veins, add green or other colored candy melts for iris, and finish with black candy melt or edible marker dot for pupil. Let dry fully (about 30 minutes).
- Optionally add red piping gel for bloodshot effect. Let dry before serving or storing.
Notes
Keep cake balls well chilled before dipping to prevent crumbling. Dip stick tips in melted candy before inserting to secure sticks. Use thin lines for veins with a toothpick or fine piping tip. Work quickly with candy melts as they set fast. Store pops in airtight container in fridge up to 5 days or freeze up to 2 months.
Nutrition
- Serving Size: 1 cake pop
- Calories: 130
- Sugar: 16.5
- Fat: 6.5
- Protein: 1.5
Keywords: Halloween, cake pops, monster eyeball, spooky treats, candy melts, easy dessert, party snacks


