Love this? Save it for later!
Share the inspiration with your friends
“You ever get that moment where the sizzle of a burger hitting a hot griddle just stops you in your tracks?” That’s exactly what happened to me last summer at a neighborhood block party. I was chatting with Greg—yeah, the guy who usually talks about his vintage car collection—when he casually flipped a burger that looked like it belonged in a food magazine. The edges were crisp like little caramelized treasures, and the cheese stretched perfectly over the patty with that gooey “pull” everyone dreams about. I honestly thought it was some restaurant trick, but nope, Greg swore it was his own smash burger technique.
Well, I wasn’t planning on becoming the neighborhood grill master that day (I mean, I’d just forgotten the buns at home), but Greg’s method stuck with me. I tried it the next weekend, made a mess with grease splatters and uneven patties, but that crunch and melty cheese combo? Totally worth it. Since then, I’ve made this recipe countless times — sometimes for quick weeknight dinners, other times when friends drop by unexpectedly. Maybe you’ve been there too, craving a burger that’s juicy inside, crispy outside, and topped with cheese that melts just right without sliding off. Let me tell you, this Crispy Smash Burger recipe is exactly that.
What I love most is how simple it is, but it delivers that “wow” factor every single time. No need for fancy ingredients or a grill bigger than your kitchen. Just a hot pan, some good-quality beef, and a little know-how. If you’ve ever thought smash burgers were intimidating or messy, this recipe will change your mind — and probably your dinner plans for good.
Why You’ll Love This Recipe
After testing many burger recipes and chatting with fellow home cooks and pros, I’ve found this Crispy Smash Burger recipe to be a crowd favorite—and here’s why:
- Quick & Easy: Comes together in about 20 minutes, perfect for those spontaneous cookouts or busy weeknights.
- Simple Ingredients: No complicated sauces or hard-to-find stuff—just quality ground beef, cheese, and your favorite toppings.
- Perfect for Cookouts: Whether you’re firing up the grill or using a stovetop griddle, it’s ideal for outdoor gatherings or backyard barbecues.
- Crowd-Pleaser: Kids, adults, picky eaters—everyone loves the crispy edges and melty cheese combo.
- Unbelievably Delicious: The contrast of the crispy crust and juicy center makes every bite memorable.
This isn’t just another burger recipe. The secret lies in the smashing technique, which creates those golden, crispy edges that you just can’t get from a regular patty. Plus, melting the cheese under a lid for exactly the right amount of time gives you that perfect gooeyness that holds everything together. Honestly, it’s the kind of burger you’ll want to make again and again, and maybe even impress your grill-averse friends with.
What Ingredients You Will Need
This Crispy Smash Burger recipe uses straightforward ingredients that you probably have on hand or can easily grab at any grocery store. Each plays a key role in building flavor and texture without fuss.
- Ground Beef (80/20 blend): 1 lb (450g), fresh and preferably from a trusted butcher or brand like Pat LaFrieda for that perfect fat-to-meat ratio. The fat is essential for crisp edges and juicy bites.
- Salt and Pepper: Freshly ground black pepper and coarse salt to season the patties just before cooking.
- Cheese Slices: 4 slices of American cheese (classic choice for meltiness) or cheddar for a sharper flavor. Feel free to swap for pepper jack or Swiss.
- Burger Buns: 4 soft potato buns or brioche buns, lightly toasted for that extra texture. I like Martin’s Potato Rolls for their balance of softness and sturdiness.
- Butter: 2 tbsp, softened, for toasting the buns and adding richness.
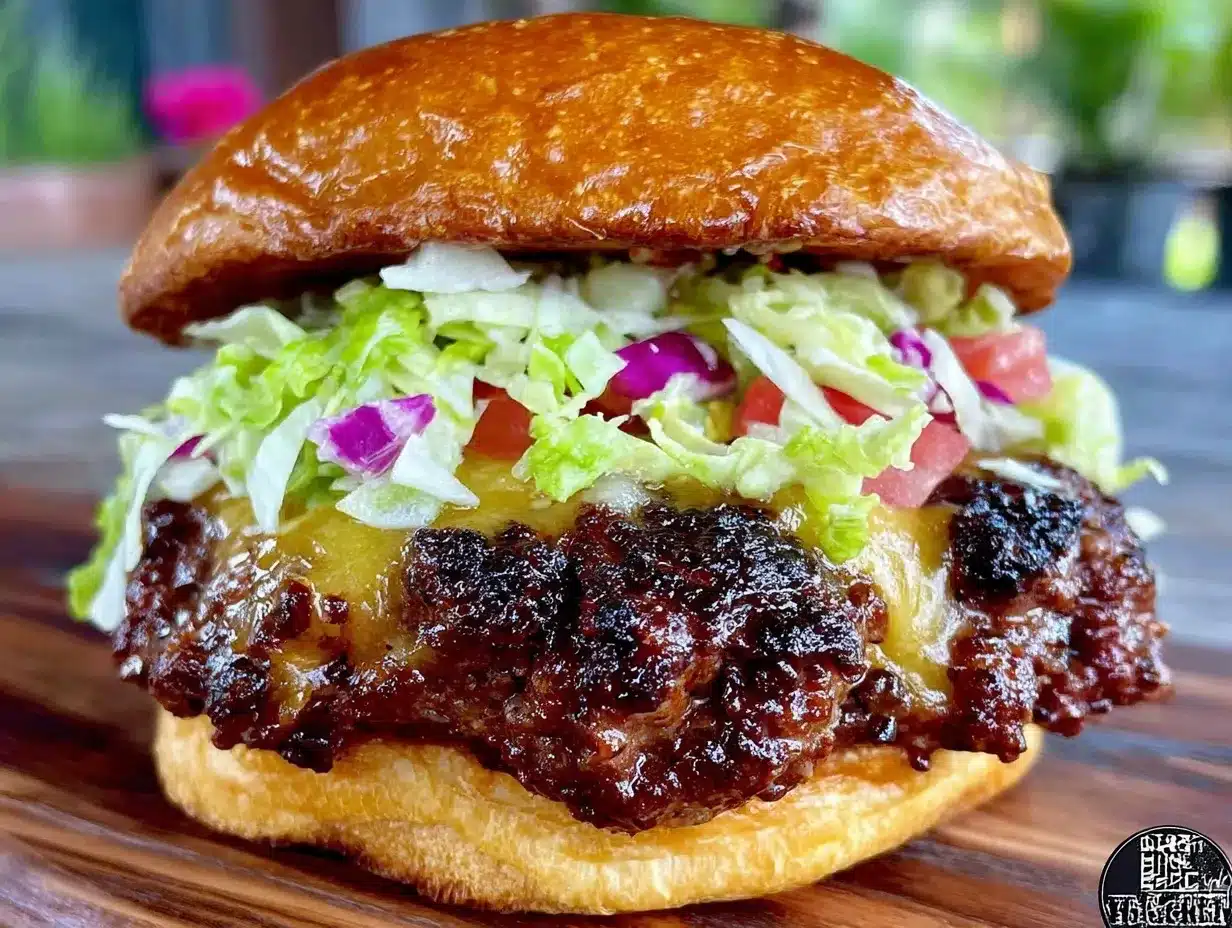
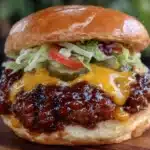
- Toppings: Crisp lettuce leaves, thinly sliced red onion, tomato slices, and pickles—fresh and crunchy balance to the rich burger.
- Condiments: Ketchup, mustard, or your favorite burger sauce (homemade or store-bought; I love a simple mix of mayo and a dash of smoked paprika).
Optional but recommended:
- Cooking Oil: A splash of neutral oil like canola or vegetable oil to help get that perfect sear on the pan.
- Garlic Powder or Onion Powder: Light seasoning to add depth to the beef if desired.
Substitutions:
- Use turkey or plant-based ground “beef” if you want a lighter or vegetarian option (adjust cooking times accordingly).
- Gluten-free buns or lettuce wraps work well for gluten-sensitive diets.
- Swap out cheese for vegan slices if needed.
Equipment Needed
- Cast Iron Skillet or Heavy-Duty Griddle: A sturdy pan is essential for getting that crispy crust. I’ve tried nonstick pans but they don’t give the same sear or texture.
- Sturdy Spatula or Burger Press: A wide, flat spatula (metal works best) to smash the patties evenly. I use a metal spatula with a slightly sharp edge for scraping and smashing.
- Butter Knife or Small Offset Spatula: For spreading butter on buns and flipping delicate toppings.
- Lid or Large Plate: For covering the burgers to help melt the cheese perfectly without losing heat.
- Kitchen Tongs: Handy for flipping buns and moving patties without breaking them.
If you don’t have a cast iron skillet, a heavy stainless steel pan can work, but avoid nonstick for this recipe because it won’t develop the crispy crust as well. For budget-friendly options, some hardware stores carry affordable cast iron skillets that last forever when cared for properly—seasoning them with oil regularly keeps them non-stick and rust-free.
Preparation Method
- Divide the ground beef: Portion the 1 lb (450g) of ground beef into 4 equal balls, about 4 oz (115g) each. Handle gently — overworking the meat can make the burger tough.
- Preheat your skillet: Heat your cast iron skillet or griddle over medium-high heat for about 5 minutes until it’s smoking hot. You want it seriously hot to get that crisp crust.
- Toast the buns: Spread softened butter on the cut sides of the potato buns. Place them butter-side down on the skillet until golden and crisp, about 1-2 minutes. Remove and set aside.
- Add a little oil: Pour a teaspoon of neutral oil into the pan and swirl to coat.
- Place the beef balls: Drop the beef balls onto the skillet, leaving space between them.
- Smash the patties: Using your spatula or burger press, firmly press down each ball into a thin patty about ¼ inch (6mm) thick. Hold the pressure for about 10 seconds to get good contact with the pan.
- Season: Immediately sprinkle salt and freshly ground pepper over each patty.
- Cook the first side: Let the patties cook undisturbed for 2-3 minutes until the edges are browned and crispy. You’ll hear that satisfying sizzle—the sound of real flavor developing.
- Flip carefully: Use your spatula to scrape under the patties and flip them over.
- Add cheese: Place a slice of American cheese on each patty right after flipping.
- Cover and melt: Immediately cover the pan with a lid or inverted large plate. Let the cheese melt and the burgers finish cooking for another 1-2 minutes. The cover traps the heat and steam for perfect melting.
- Assemble the burger: Place the patty on the toasted bun bottom. Add your preferred toppings—lettuce, tomato, pickles, onion—and condiments.
- Top and serve: Add the bun top, press lightly, and serve immediately for best texture and flavor.
Pro tip: If your skillet starts smoking too much, lower the heat slightly. It’s a balancing act to get the crust without burning. Also, don’t overcrowd the pan — cook in batches if needed to keep that sizzling sear.
Cooking Tips & Techniques
Smash burgers aren’t just about slapping meat on a pan; there’s a little technique that makes all the difference. Here’s what I’ve learned through trial, error, and a few messy kitchen moments:
- Meat temperature matters: Use cold ground beef straight from the fridge, but don’t freeze it solid. It helps hold shape and prevents overcooking.
- Don’t overwork the meat: Form the balls gently, or you’ll end up with tough burgers. Trust the smash to flatten them.
- Use a heavy spatula: A flimsy one won’t press evenly and might break the patties.
- Press firmly and quickly: Hold the press for a good 10 seconds to get a thin, even patty with a perfect crust.
- Season after smashing: Salt draws moisture out, so add it just after smashing for the best crust.
- Cover to melt cheese: Don’t skip this step! Leaving cheese uncovered often leads to uneven melting or drying out.
- Multitask by toasting buns during cooking: Toast those buns while the patties cook to save time and add crunch.
One time, I forgot to cover the cheese and ended up with dry, patchy melted cheese. Lesson learned the hard way! Also, if your pan isn’t hot enough, you won’t get that crispy edge, so be patient with preheating.
Variations & Adaptations
This Crispy Smash Burger recipe is a great base to customize. Here are some ways I’ve mixed it up or adapted it for different tastes and needs:
- Spicy Smash Burger: Add a pinch of cayenne or chipotle powder to the beef before forming balls. Top with pepper jack cheese and spicy mayo for a kick.
- Gluten-Free Version: Use gluten-free buns or lettuce wraps instead of traditional buns. Check your condiments for hidden gluten.
- Vegetarian Adaptation: Swap ground beef for a plant-based burger patty (like Beyond Meat), smash and cook similarly. Use vegan cheese for a dairy-free option.
- Seasonal Toppings: In summer, try fresh avocado slices and grilled corn salsa. In winter, caramelized onions and sautéed mushrooms add cozy flavors.
- Cheese Variations: Swiss, smoked gouda, or blue cheese crumble for a different flavor profile. Just melt under the lid as usual.
Personally, one lazy Tuesday, I swapped classic American cheese with sharp aged cheddar and added a smear of garlic aioli. It was a game changer—rich, tangy, and perfect for a quick comfort meal. Feel free to experiment and find your own favorite combo!
Serving & Storage Suggestions
This Crispy Smash Burger is best served hot and fresh off the pan when the edges are still golden and cheese is melty. Serve immediately with classic sides like crispy fries, coleslaw, or a simple green salad. A cold beer or iced tea pairs perfectly to balance the richness.
If you need to store leftovers, wrap each burger separately in foil or airtight containers and refrigerate for up to 2 days. To reheat, unwrap and warm in a skillet over medium heat for a few minutes to bring back some crispness. Microwaving tends to make the bun soggy and cheese rubbery, so avoid if possible.
Flavors can mellow if you refrigerate the assembled burger overnight, so I recommend storing patties and buns separately if you plan ahead. Reheat patties gently and toast buns fresh for the best experience.
Nutritional Information & Benefits
| Nutrient | Per Serving (1 burger) |
|---|---|
| Calories | ~550 kcal |
| Protein | 30g |
| Fat | 35g |
| Carbohydrates | 30g |
| Fiber | 2g |
| Sodium | 700mg |
This recipe packs a good protein punch from the beef, which supports muscle repair and keeps you full longer. Using an 80/20 beef blend provides enough fat for flavor and juiciness but not too much to feel heavy. The potato buns add carbs for energy and a soft texture that contrasts nicely with the crispy patty.
For those watching sodium or fat intake, consider leaner ground beef and low-sodium cheese options. Gluten-free buns make this suitable for gluten-sensitive folks. Overall, this recipe balances indulgence with straightforward nutrition, perfect for an occasional treat or cookout favorite.
Conclusion
This Crispy Smash Burger recipe is a keeper—simple, satisfying, and full of that crave-worthy combination of crunchy edges and perfectly melted cheese. Whether you’re feeding a crowd at a cookout or just craving a juicy burger at home, it delivers every time. I love it because it’s approachable yet impressive, and honestly, it’s one of those recipes that makes me smile every time I take a bite.
Feel free to mix and match toppings, cheeses, or buns to suit your taste. And hey, if you end up making a mess like I often do, that’s just part of the fun! Let me know how your burgers turn out, or if you’ve added your own twist—I’d love to hear about your kitchen adventures.
Now, grab your spatula and get smashing!
FAQs About Crispy Smash Burgers
What’s the best ground beef for smash burgers?
Look for an 80/20 blend (80% lean, 20% fat). The fat is crucial for juicy, flavorful burgers and helps create those crispy edges.
Can I make smash burgers on a grill?
You can, but a flat griddle or cast iron skillet on the grill works best to get the proper sear and smash effect. Avoid cooking directly over open flames for smashing.
How do I prevent the cheese from sliding off?
Cover the patties with a lid or inverted plate right after adding cheese. This traps heat and steam to melt the cheese evenly and helps it stick to the patty.
Can I prepare patties ahead of time?
Smash burgers are best cooked fresh to keep that crispy crust. You can pre-portion the beef balls and refrigerate briefly, but don’t smash until just before cooking.
What sides go well with crispy smash burgers?
Classic fries, onion rings, coleslaw, or a fresh green salad all pair beautifully. For drinks, iced tea, lemonade, or a cold beer complement the flavors nicely.
Pin This Recipe!

Crispy Smash Burger Recipe Easy Perfect Melted Cheese for Cookout
A quick and easy smash burger recipe delivering crispy edges, juicy inside, and perfectly melted cheese, ideal for cookouts and weeknight dinners.
- Prep Time: 5 minutes
- Cook Time: 15 minutes
- Total Time: 20 minutes
- Yield: 4 servings 1x
- Category: Main Course
- Cuisine: American
Ingredients
- 1 lb (450g) ground beef (80/20 blend)
- Salt and freshly ground black pepper, to taste
- 4 slices American cheese (or cheddar, pepper jack, Swiss)
- 4 soft potato buns or brioche buns, lightly toasted
- 2 tbsp softened butter
- Lettuce leaves, crisp
- Thinly sliced red onion
- Tomato slices
- Pickles
- Ketchup, mustard, or favorite burger sauce
- Optional: splash of neutral cooking oil (canola or vegetable)
- Optional: garlic powder or onion powder
Instructions
- Divide the ground beef into 4 equal balls, about 4 oz (115g) each, handling gently.
- Preheat a cast iron skillet or griddle over medium-high heat for about 5 minutes until smoking hot.
- Spread softened butter on the cut sides of the buns and toast butter-side down on the skillet until golden and crisp, about 1-2 minutes. Remove and set aside.
- Add a teaspoon of neutral oil to the pan and swirl to coat.
- Place the beef balls onto the skillet, leaving space between them.
- Using a sturdy spatula or burger press, firmly press down each ball into a thin patty about 1/4 inch (6mm) thick. Hold pressure for about 10 seconds.
- Immediately season each patty with salt and freshly ground black pepper.
- Cook the patties undisturbed for 2-3 minutes until edges are browned and crispy.
- Flip the patties carefully using the spatula.
- Place a slice of cheese on each patty right after flipping.
- Cover the pan with a lid or inverted large plate and let the cheese melt and burgers finish cooking for another 1-2 minutes.
- Assemble the burger by placing the patty on the toasted bun bottom, adding preferred toppings and condiments.
- Top with the bun top, press lightly, and serve immediately.
Notes
Use cold ground beef but not frozen solid to hold shape. Do not overwork the meat to avoid tough burgers. Press firmly and quickly for a thin, even patty. Season immediately after smashing. Cover patties after adding cheese to melt evenly. Toast buns while patties cook to save time. Avoid overcrowding the pan; cook in batches if needed. If skillet smokes too much, lower heat slightly.
Nutrition
- Serving Size: 1 burger
- Calories: 550
- Sodium: 700
- Fat: 35
- Carbohydrates: 30
- Fiber: 2
- Protein: 30
Keywords: smash burger, crispy burger, cheeseburger, cookout recipe, easy burger, quick dinner, melted cheese burger