Love this? Save it for later!
Share the inspiration with your friends
My friend Jenna asked me why I couldn’t just skip the pie plate and wrap the filling in the dough instead. We were standing in her tiny apartment kitchen, apples everywhere, and I had just spent ten minutes explaining my elaborate method for a traditional double-crust pie. She shrugged, wiped flour on her jeans, and said, “Seems like extra work.” I started to explain why that wouldn’t work—then stopped. Honestly, I had no good reason. I just assumed pie needed a plate.
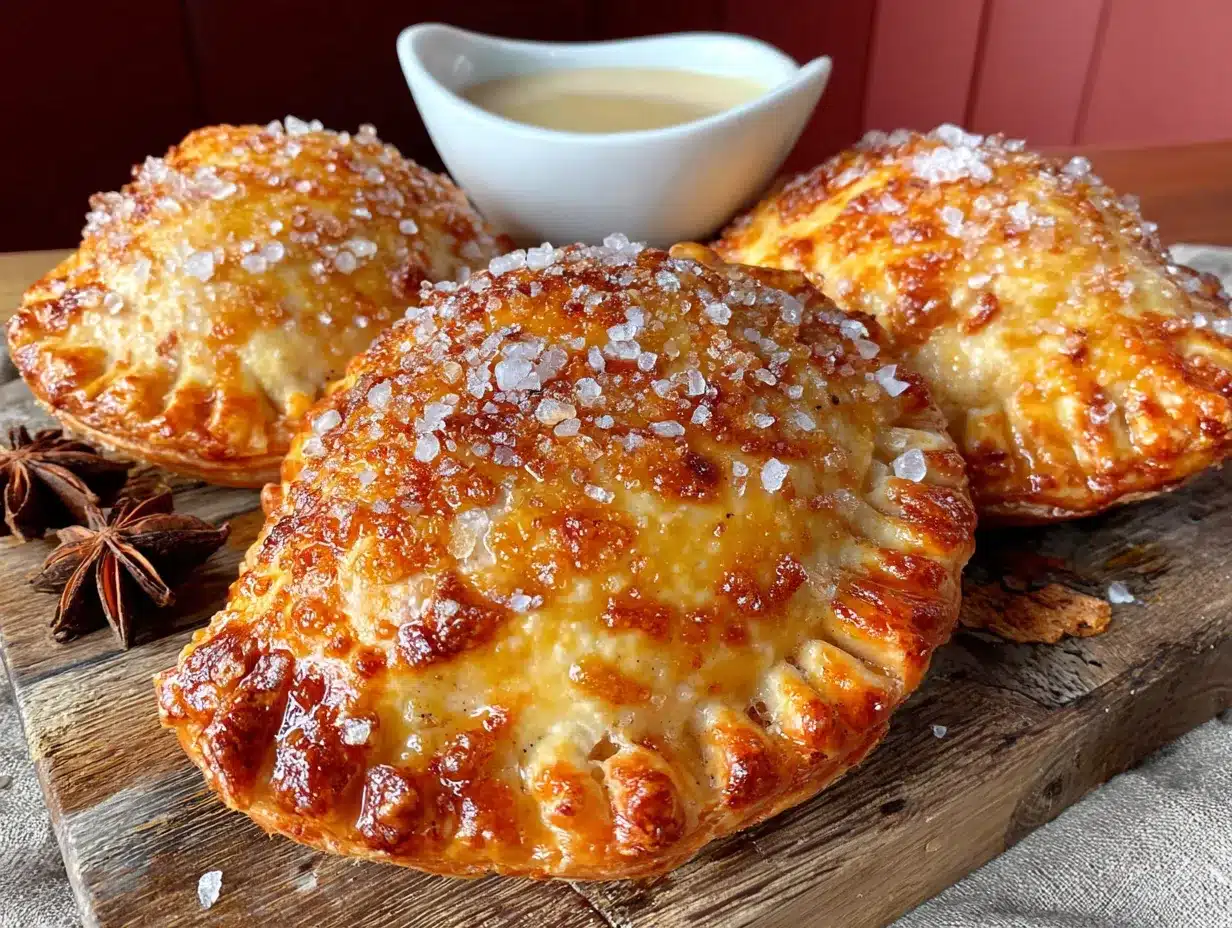
So we tried it her way. We cut the dough into rough squares, spooned the warm cinnamon apples onto one half, folded the other half over, and crimped the edges with a fork. Twenty minutes later, we were standing at her counter, biting into these golden, flaky little parcels, and I had to admit it—she was right. The filling stayed perfectly contained. The crust-to-filling ratio was ideal. And the best part? No wrestling with a rolling pin over a glass dish, no worrying about a soggy bottom, no drama.
That was three autumns ago, and I haven’t made a traditional apple pie since. These cozy mini apple pie hand pies have become my go-to for everything—fall gatherings, lazy Sunday afternoons, and those moments when you just want something warm and sweet without committing to a whole pie. Maybe you’ve been there, staring at a bag of apples and thinking, “I want pie, but I don’t want the hassle.” Let me tell you, these hand pies are the answer. They’re forgiving, they’re fast, and they taste like pure comfort. The no-fuss crust comes together in minutes, and the filling is simple enough that you can throw it together on a Tuesday night. I keep coming back to this recipe because it’s the kind of thing that makes you feel like a genius in the kitchen, even when you’re just following a friend’s offhand suggestion.
Why You’ll Love This Recipe
Let me be honest with you—I’ve tested a lot of apple pie recipes over the years. Some were fussy. Some were dry. Some required equipment I don’t even own. These cozy mini apple pie hand pies are different. They’re the recipe I actually make, not just the one I write about. Here’s why they’ll earn a permanent spot in your rotation:
- Quick & Easy: From start to finish, these hand pies come together in about 45 minutes. That’s less time than it takes to watch a single episode of your favorite show. The no-fuss crust uses just five ingredients and doesn’t require chilling.
- Simple Ingredients: You probably have everything in your kitchen right now. Apples, butter, flour, sugar, cinnamon—that’s it. No special trips to the store for obscure ingredients.
- Perfect for Fall Gatherings: These hand pies are ideal for apple picking season, Thanksgiving dessert tables, or cozy weekend baking with kids. They’re portable, which means you can take them to potlucks without worrying about cutting slices.
- Crowd-Pleaser: I’ve served these to everyone from picky toddlers to my grandmother, who claims she’s “not a dessert person.” They disappear every single time. The individual portions make everyone feel special.
- Unbelievably Delicious: The texture is what gets me every time. The crust stays tender and flaky, while the filling gets jammy and concentrated. It’s next-level comfort food that tastes like you spent hours in the kitchen.
What makes these hand pies different from other recipes is the crust. Most hand pie recipes use puff pastry or require a complicated folding technique. My no-fuss crust uses a simple method that produces layers without the stress. The secret is in how you handle the butter—more on that in a minute. The filling is also perfectly balanced, not too sweet, with just enough spice to let the apples shine.
These hand pies are the kind of recipe that makes you close your eyes after the first bite. They’re comfort food reimagined—simpler, faster, but with the same soul-soothing satisfaction. Perfect for impressing guests without stress, or turning a random Wednesday into something memorable.
What Ingredients You Will Need
This recipe uses simple, wholesome ingredients to deliver bold flavor and satisfying texture without the fuss. Most of these are pantry staples, which makes these hand pies perfect for spontaneous baking sessions. Here’s what you’ll need:
For the No-Fuss Crust
- All-purpose flour, 2 ½ cups (300g) – I prefer King Arthur Flour for consistent results, but any brand works. The protein content gives the crust structure without making it tough.
- Unsalted butter, 1 cup (226g), very cold and cut into small cubes – Cold butter is non-negotiable here. It creates steam pockets that make the crust flaky. I stick mine in the freezer for 15 minutes before cubing.
- Ice water, 6-8 tablespoons (90-120ml) – The exact amount depends on humidity. Start with 6 tablespoons and add more if needed. The dough should just hold together when squeezed.
- Granulated sugar, 1 tablespoon (12g) – Just a touch of sweetness in the crust. It also helps with browning.
- Salt, ½ teaspoon (3g) – Balances the sweetness and enhances the buttery flavor. Use fine sea salt for even distribution.
For the Apple Filling
- Apples, 4 medium (about 500g), peeled, cored, and diced small – I recommend a mix of Granny Smith and Honeycrisp. The Granny Smith holds its shape and adds tartness, while Honeycrisp brings natural sweetness. You want the pieces about ¼-inch, so they cook quickly and fit neatly inside the hand pies.
- Brown sugar, ⅓ cup (70g), packed – Adds deep caramel notes. Light or dark both work; dark gives a richer flavor.
- Ground cinnamon, 1 teaspoon (2g) – The backbone of any apple pie filling. I use Vietnamese cinnamon for its bold, warm flavor.
- Ground nutmeg, ¼ teaspoon (0.5g) – Freshly grated if you have it. It adds a subtle warmth that complements the cinnamon.
- Lemon juice, 1 tablespoon (15ml) – Prevents the apples from browning and brightens the overall flavor. Fresh is best.
- Cornstarch, 1 tablespoon (8g) – Thickens the filling so it doesn’t make the crust soggy. Arrowroot powder works as a substitute.
- Unsalted butter, 1 tablespoon (14g) – Cooked with the apples for richness and depth.
For Assembly and Topping
- Egg, 1 large – For the egg wash. It gives the hand pies that gorgeous golden-brown finish.
- Water, 1 tablespoon (15ml) – Mixed with the egg for a wash that’s easy to brush.
- Coarse sugar, 2 tablespoons (25g), like turbinado or demerara – Sprinkled on top for sparkle and a slight crunch. Regular granulated sugar works in a pinch.
Ingredient Selection Tips: For the best texture, use firm apples that won’t turn to mush during cooking. If you only have soft varieties like McIntosh, reduce the cooking time by a couple of minutes. For a dairy-free version, substitute the butter in the crust with cold coconut oil or vegan butter sticks. The filling butter can be replaced with coconut oil too.
Equipment Needed
You don’t need fancy equipment for these cozy mini apple pie hand pies, which is part of their charm. Here’s what I use:
- Large mixing bowl – For the dough. A stainless steel or glass bowl works well.
- Pastry cutter or two forks – To cut the butter into the flour. I’ve used both, and honestly, a pastry cutter is faster, but forks get the job done.
- Rolling pin – A standard one is fine. If you don’t have one, a clean wine bottle works in a pinch. I’ve done it.
- Medium skillet – For cooking the apple filling. A non-stick skillet makes cleanup easier.
- Baking sheet – Line it with parchment paper for easy removal.
- Pastry brush – For the egg wash. A silicone brush is my favorite—it doesn’t shed bristles.
- Sharp knife or pizza cutter – For cutting the dough into squares or circles.
- Ruler or straight edge – Optional, but helpful for cutting even pieces.
Budget-Friendly Options: If you’re just starting out, skip the pastry cutter and use two knives. Skip the rolling pin and use a smooth-sided bottle. The hand pies will still turn out beautifully. I made my first batch with a wine bottle and a butter knife, and they were perfect.
Preparation Method
Let’s get to the fun part. I’ll walk you through every step so these hand pies turn out perfect, even if it’s your first time making them.
Step 1: Make the No-Fuss Crust
In a large bowl, whisk together the flour, sugar, and salt. Add the cold butter cubes. Using a pastry cutter or two forks, cut the butter into the flour until the mixture looks like coarse meal with some pea-sized butter pieces remaining. This takes about 2 minutes. Don’t overwork it—those butter pieces are what create flaky layers.
Sprinkle 6 tablespoons of ice water over the mixture. Toss gently with a fork until the dough starts to come together. It should look shaggy and hold together when you squeeze a handful. If it’s too dry, add the remaining water, one tablespoon at a time. Turn the dough onto a lightly floured surface and bring it together with your hands. Divide in half, flatten each half into a disc, wrap in plastic wrap, and refrigerate for 20 minutes. This resting time relaxes the gluten and makes the dough easier to roll.
Step 2: Prepare the Apple Filling
While the dough chills, make the filling. Peel, core, and dice the apples into ¼-inch pieces. In a medium skillet over medium heat, melt 1 tablespoon of butter. Add the diced apples, brown sugar, cinnamon, nutmeg, and lemon juice. Cook for about 5-7 minutes, stirring occasionally, until the apples are tender but still hold their shape. The mixture will look juicy at first—that’s normal.
Sprinkle the cornstarch over the apples and stir quickly. Cook for another minute, until the juices thicken and become glossy. Remove from heat and let the filling cool completely. This is important—warm filling will melt the butter in the dough and make the crust tough. I usually spread the filling on a plate to speed up cooling.
Step 3: Roll and Cut the Dough
Preheat your oven to 375°F (190°C). Line a baking sheet with parchment paper. Remove one disc of dough from the refrigerator. On a lightly floured surface, roll it out to about ⅛-inch thickness. Try to keep it as even as possible—thick spots will be doughy, thin spots might tear. If the dough sticks, dust a little more flour underneath.
Cut the dough into 4-inch squares or circles. I use a ruler and a pizza cutter for clean edges, but a knife works fine. If you’re using a round cutter, a 4-inch biscuit cutter is perfect. Gather the scraps, re-roll them once, and cut more shapes. Repeat with the second disc of dough. You should get about 12 hand pies total.
Step 4: Assemble the Hand Pies
Place about 1 ½ tablespoons of cooled filling in the center of each dough piece. Don’t overfill—the filling will leak during baking if you stuff them too full. Lightly brush the edges of the dough with water. This acts as glue to seal the hand pies.
Fold the dough over the filling to create a half-moon shape (for circles) or a rectangle (for squares). Press the edges firmly to seal. Use a fork to crimp the edges—this creates a decorative border and reinforces the seal. Place the hand pies on the prepared baking sheet, leaving about an inch between them. Cut 2-3 small slits on top of each hand pie to let steam escape. This prevents them from bursting open in the oven.
Step 5: Bake to Golden Perfection
In a small bowl, whisk the egg with 1 tablespoon of water to make the egg wash. Brush the tops of the hand pies lightly with the egg wash. Sprinkle coarse sugar over each one. Bake for 18-22 minutes, until the crust is golden brown and the filling is bubbling through the slits. The kitchen will smell incredible at this point.
Let the hand pies cool on the baking sheet for 5 minutes, then transfer to a wire rack. They need to cool completely before serving, or the filling will be lava-hot. I know it’s tempting, but trust me on this one.
Cooking Tips & Techniques
After making these hand pies more times than I can count, I’ve picked up a few tricks that make a real difference. Here are the things I wish someone had told me:
Keep everything cold. The biggest mistake I made early on was letting the dough warm up. If the butter softens before baking, you lose the flaky texture. If the dough feels sticky or soft at any point, pop it back in the fridge for 10 minutes. I once left my dough on the counter while I answered the phone, and the resulting crust was dense and greasy. Learn from my mistake.
Don’t skip cooling the filling. I know it adds time, but warm filling will melt the butter in the dough before it hits the oven. The result is a soggy, tough crust. I usually make the filling first and let it cool while I roll the dough. Sometimes I even make it the day before and refrigerate it overnight.
Seal the edges well. The first time I made these, I didn’t press firmly enough, and three of my hand pies burst open in the oven. The filling leaked onto the baking sheet and burned. Now I use a fork to crimp, and I make sure the edges are completely sealed. The steam vents on top also help prevent bursting.
Rotate the baking sheet halfway through. Ovens have hot spots, and rotating ensures even browning. I set a timer for 10 minutes, rotate the sheet, and check again at 18 minutes. This simple step makes a big difference in the final appearance.
Make extra dough. The no-fuss crust freezes beautifully. I often double the recipe and freeze half for later. When I’m craving hand pies but don’t have time to make dough from scratch, I just thaw it in the fridge overnight. It’s a game-changer for spontaneous baking.
Variations & Adaptations
One of the best things about these cozy mini apple pie hand pies is how adaptable they are. Here are some variations I’ve tried and loved:
Spiced Pear Hand Pies: Swap the apples for ripe but firm pears. Reduce the sugar to ¼ cup since pears are sweeter. Add ½ teaspoon of ground ginger and ¼ teaspoon of cardamom. The flavor is delicate and elegant—perfect for a fall brunch.
Savory Apple and Cheddar Hand Pies: This one surprised me, but it works. Reduce the sugar to 2 tablespoons and omit the cinnamon and nutmeg. Add ½ cup of sharp cheddar cheese, shredded, to the filling. Sprinkle a little flaky sea salt on top before baking. The combination of sweet apples and salty cheese is addictive. I serve these with a side salad for a light dinner.
Gluten-Free Version: Substitute the all-purpose flour with a 1:1 gluten-free baking flour blend that contains xanthan gum. I’ve had good results with Bob’s Red Mill. The dough will be more delicate, so handle it gently. Chill it for an extra 10 minutes before rolling. The texture won’t be exactly the same, but it’s still delicious.
Vegan Adaptation: Use cold coconut oil or vegan butter sticks in place of the butter in the crust. Replace the egg wash with a mixture of 1 tablespoon of maple syrup and 1 tablespoon of non-dairy milk. The crust will be slightly less flaky but still very good.
Miniature Version: For bite-sized hand pies perfect for parties, use a 2-inch round cutter and reduce the filling to 1 teaspoon each. Bake for 12-14 minutes. These are adorable and disappear fast.
Serving & Storage Suggestions
These hand pies are best served warm, but not straight-from-the-oven hot. Let them rest for about 15 minutes after baking. The filling will still be warm and the crust will be perfectly flaky. A light dusting of powdered sugar makes them look extra special.
Serving Ideas: I love serving these with a scoop of vanilla bean ice cream or a drizzle of salted caramel sauce. For a breakfast treat, skip the ice cream and serve them alongside a cup of hot coffee or spiced apple cider. They’re also wonderful on a dessert board with fresh fruit, nuts, and wedges of aged cheddar.
Storage Instructions: Store leftover hand pies in an airtight container at room temperature for up to 2 days. After that, move them to the refrigerator for up to 5 days. The crust will soften slightly over time, but they’re still delicious.
Freezing Instructions: These freeze beautifully. Place the baked and completely cooled hand pies in a single layer on a baking sheet and freeze until firm, about 2 hours. Transfer to a freezer-safe bag or container for up to 3 months. To reheat, place frozen hand pies on a baking sheet and warm in a 350°F (175°C) oven for 10-12 minutes. The crust will crisp right back up.
Reheating Tips: The oven is your best friend for reheating. The microwave will make the crust soggy. If you’re in a hurry, an air fryer at 350°F for 3-4 minutes works wonderfully. I’ve also reheated them in a toaster oven with great results.
Flavor Development: Interestingly, these hand pies taste even better the next day. The flavors meld together, and the filling becomes more cohesive. If you can resist eating them all immediately, you’re in for a treat.
Nutritional Information & Benefits
While these hand pies are certainly a treat, they do offer some nutritional benefits worth noting. Here’s a rough estimate per hand pie (based on 12 servings):
| Nutrient | Amount per Hand Pie |
|---|---|
| Calories | 245 |
| Total Fat | 14g |
| Saturated Fat | 9g |
| Carbohydrates | 28g |
| Fiber | 2g |
| Sugar | 14g |
| Protein | 3g |
Health Benefits: Apples are a great source of dietary fiber and vitamin C. The fiber content helps with digestion and keeps you feeling satisfied. Cinnamon has anti-inflammatory properties and may help regulate blood sugar. Using unsalted butter allows you to control the sodium content.
Dietary Considerations: This recipe is vegetarian. For a gluten-free version, use the flour substitution mentioned in the variations section. For a lower-sugar option, reduce the brown sugar to ¼ cup and skip the coarse sugar topping. The filling will still be plenty sweet from the apples.
Potential Allergens: This recipe contains wheat (gluten), dairy (butter), and eggs. Adjust as needed for your dietary needs.
I believe in balance—these hand pies are a special treat, not an everyday food. But when you do indulge, you’re getting real ingredients and real flavor, not processed shortcuts. That counts for something.
Conclusion
These cozy mini apple pie hand pies with no-fuss crust have become a staple in my kitchen for good reason. They’re everything I want in a fall dessert—warm, spiced, buttery, and deeply satisfying. The fact that they come together in under an hour with simple ingredients is just the cherry on top.
I hope you give them a try and make them your own. Maybe you’ll add a pinch of cardamom or swap the apples for pears. Maybe you’ll make them with your kids on a rainy Saturday. Maybe you’ll bring them to a gathering and watch them disappear. That’s the beauty of a recipe like this—it’s a starting point for your own kitchen adventures.
If you make these hand pies, I’d love to hear about it. Drop a comment below and let me know how they turned out. Did you try a variation? Did you burn the first batch like I did? (No judgment here.) Share your photos and tag me—I love seeing what you create. Until next time, happy baking, and remember: sometimes the best recipes come from letting go of the rules.
Frequently Asked Questions
Can I use pre-made pie crust for these hand pies?
Absolutely. If you’re short on time, store-bought pie crust works perfectly. Just roll it out slightly thinner than usual and cut into your desired shapes. The no-fuss crust is still worth trying when you have the time, though.
Why did my hand pies burst open in the oven?
This usually happens for one of two reasons: overfilling or not sealing the edges properly. Make sure you’re using about 1 ½ tablespoons of filling per hand pie and press the edges firmly with a fork. The steam vents on top also help prevent bursting.
Can I make the dough ahead of time?
Yes! The dough can be refrigerated for up to 3 days or frozen for up to 3 months. If freezing, wrap it tightly in plastic wrap and then foil. Thaw overnight in the refrigerator before using.
What are the best apples for hand pies?
I recommend a mix of firm, tart apples like Granny Smith and sweet apples like Honeycrisp or Fuji. This combination gives you a balanced flavor and a texture that holds up during baking. Avoid soft apples like McIntosh, which can turn mushy.
Can I bake these in an air fryer?
Yes! Preheat your air fryer to 350°F (175°C). Place the hand pies in a single layer in the basket (you may need to work in batches). Air fry for 10-12 minutes, flipping halfway through, until golden brown. The crust will be extra crispy.
Pin This Recipe!

Cozy Mini Apple Pie Hand Pies with Perfect No-Fuss Crust

These cozy mini apple pie hand pies are the perfect fall treat—quick, easy, and made with a no-fuss crust that comes together in minutes. They’re portable, crowd-pleasing, and taste like pure comfort.
- Prep Time: 20 minutes
- Cook Time: 22 minutes
- Total Time: 45 minutes
- Yield: 12 hand pies 1x
- Category: Dessert
- Cuisine: American
Ingredients
- 2 ½ cups (300g) all-purpose flour
- 1 cup (226g) unsalted butter, very cold and cut into small cubes
- 6–8 tablespoons (90-120ml) ice water
- 1 tablespoon (12g) granulated sugar
- ½ teaspoon (3g) salt
- 4 medium apples (about 500g), peeled, cored, and diced small
- ⅓ cup (70g) packed brown sugar
- 1 teaspoon (2g) ground cinnamon
- ¼ teaspoon (0.5g) ground nutmeg
- 1 tablespoon (15ml) lemon juice
- 1 tablespoon (8g) cornstarch
- 1 tablespoon (14g) unsalted butter
- 1 large egg
- 1 tablespoon (15ml) water
- 2 tablespoons (25g) coarse sugar (turbinado or demerara)
Instructions
- Make the crust: In a large bowl, whisk together flour, sugar, and salt. Add cold butter cubes. Using a pastry cutter or two forks, cut the butter into the flour until the mixture looks like coarse meal with some pea-sized butter pieces remaining. Sprinkle 6 tablespoons of ice water over the mixture and toss gently with a fork until the dough starts to come together. If too dry, add remaining water one tablespoon at a time. Turn dough onto a lightly floured surface, bring together with hands, div…
- Prepare the filling: While dough chills, peel, core, and dice apples into ¼-inch pieces. In a medium skillet over medium heat, melt 1 tablespoon butter. Add diced apples, brown sugar, cinnamon, nutmeg, and lemon juice. Cook for 5-7 minutes, stirring occasionally, until apples are tender but still hold their shape. Sprinkle cornstarch over apples and stir quickly. Cook for another minute until juices thicken. Remove from heat and let cool completely.
- Roll and cut the dough: Preheat oven to 375°F (190°C). Line a baking sheet with parchment paper. Remove one disc of dough from refrigerator. On a lightly floured surface, roll out to about ⅛-inch thickness. Cut into 4-inch squares or circles. Gather scraps, re-roll once, and cut more shapes. Repeat with second disc. You should get about 12 hand pies.
- Assemble the hand pies: Place about 1 ½ tablespoons of cooled filling in the center of each dough piece. Lightly brush edges with water. Fold dough over filling to create a half-moon or rectangle. Press edges firmly to seal. Use a fork to crimp edges. Place on prepared baking sheet, leaving about an inch between them. Cut 2-3 small slits on top of each hand pie.
- Bake: In a small bowl, whisk egg with 1 tablespoon water to make egg wash. Brush tops of hand pies lightly with egg wash. Sprinkle coarse sugar over each. Bake for 18-22 minutes, until crust is golden brown and filling is bubbling through slits. Let cool on baking sheet for 5 minutes, then transfer to a wire rack. Cool completely before serving.
Notes
Keep everything cold for a flaky crust. Don’t skip cooling the filling—warm filling will melt the butter in the dough. Seal edges well to prevent bursting. Rotate the baking sheet halfway through for even browning. The dough can be made ahead and refrigerated for up to 3 days or frozen for up to 3 months.
Nutrition
- Serving Size: 1 hand pie
- Calories: 245
- Sugar: 14
- Sodium: 95
- Fat: 14
- Saturated Fat: 9
- Carbohydrates: 28
- Fiber: 2
- Protein: 3
Keywords: apple pie hand pies, mini apple pies, hand pies, no-fuss crust, fall dessert, apple dessert, portable pie