Love this? Save it for later!
Share the inspiration with your friends
It was 11:47 PM on a random Tuesday in October, and I had an overwhelming urge for pumpkin pie. Not the kind you bring to a family dinner and pretend you didn’t eat a slice for breakfast—the kind you eat alone in your kitchen at midnight with zero judgment. The problem? I didn’t have a single pie crust in the freezer, and the idea of making one from scratch felt like a punchline. But I had a can of pumpkin puree, a stick of butter that was begging to be browned, and a wild idea that maybe—just maybe—I could skip the fuss and still get that deep, nutty, caramelized flavor everyone loves.
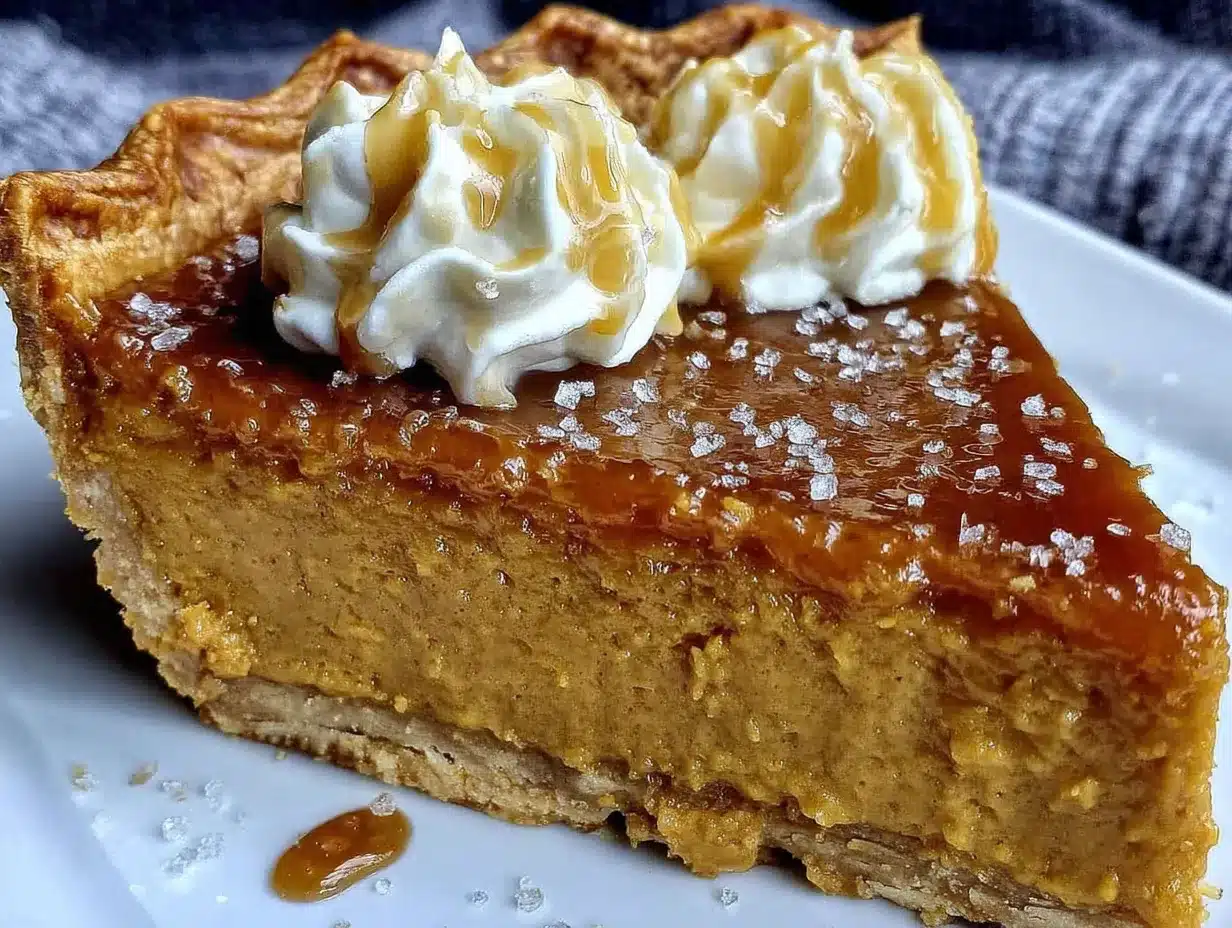
So I did something slightly unhinged. I browned the butter in a saucepan while the pumpkin puree warmed on the stove, and I thought, “What if I just… combine everything in one bowl and pour it into a store-bought crust?” I mean, I wasn’t about to roll out dough at midnight. That’s where sanity draws the line. The result was a pie that tasted like I’d spent hours on it—rich, toasty, with this maple cream that made me close my eyes after the first bite. I honestly didn’t expect it to work that well. But sometimes the best recipes come from being too tired to overcomplicate things.
That pie became my go-to for every fall gathering since. It’s the one people ask for by name—”You’re bringing that brown butter thing, right?” And honestly, I love that it started as a late-night experiment born from a craving and a lack of proper ingredients. Maybe you’ve been there—standing in your kitchen at an unreasonable hour, wanting something that feels like a hug, and realizing you have just enough to make it work. This is that recipe. And it’s about to become your new favorite shortcut to something that tastes anything but.
Why You’ll Love This Recipe
Let me tell you why this brown butter pumpkin pie with maple cream is going to be your new fall obsession. I’ve tested this recipe at least a dozen times—burned a few batches of butter, oversweetened a cream or two—so you don’t have to. This is the version that works every single time.
- Quick & Easy: From start to finish, this pie comes together in under an hour. The filling takes about 10 minutes to mix, and the oven does the rest. Perfect for those weeknights when you want dessert but don’t want to spend hours in the kitchen.
- Simple Ingredients: You probably have most of these in your pantry right now. Butter, pumpkin puree, eggs, sugar, and a few spices. No hunting down obscure ingredients at three different stores.
- Perfect for Fall Gatherings: Whether it’s Thanksgiving, a Friendsgiving potluck, or just a cozy Tuesday, this pie fits right in. It’s impressive enough for company but easy enough for a random weeknight.
- Crowd-Pleaser: I’ve served this to kids who swear they don’t like pumpkin pie, and they asked for seconds. The brown butter adds a nutty depth that even pumpkin skeptics can’t resist.
- Unbelievably Delicious: The combination of toasted brown butter, warm pumpkin spices, and that silky maple cream is next-level comfort food. It’s the kind of dessert that makes you close your eyes after the first bite.
What makes this recipe different from the rest? It’s the brown butter. Most pumpkin pies use melted butter or oil, but browning the butter first unlocks this incredible nutty, caramel flavor that transforms the whole pie. Plus, the maple cream isn’t just a drizzle—it’s a fluffy, cloud-like topping that adds sweetness without being heavy. This isn’t just another pumpkin pie. It’s your new best version.
What Ingredients You Will Need
This recipe uses simple, wholesome ingredients to deliver bold flavor and satisfying texture without the fuss. Most of these are pantry staples, so you can whip this up anytime the craving hits.
For the Brown Butter Pumpkin Filling
- Unsalted butter – 1/2 cup (1 stick, 113g) – You’ll brown this until it smells nutty and turns golden amber. I prefer using unsalted so I can control the salt level.
- Pumpkin puree – 1 can (15 oz, 425g) – Not pumpkin pie filling! Make sure it’s 100% pure pumpkin. I like Libby’s for consistent texture.
- Granulated sugar – 3/4 cup (150g) – Adds sweetness and helps with texture.
- Light brown sugar, packed – 1/4 cup (50g) – Adds molasses notes that pair beautifully with the brown butter.
- Large eggs – 2, at room temperature – Helps bind the filling and gives it a silky texture.
- Heavy cream – 1/2 cup (120ml) – Adds richness. You can substitute half-and-half if needed.
- Vanilla extract – 1 teaspoon – Pure vanilla makes a difference here.
- Ground cinnamon – 1 1/2 teaspoons – The backbone of pumpkin spice.
- Ground ginger – 1/2 teaspoon – Adds warmth and a little kick.
- Ground nutmeg – 1/4 teaspoon – Freshly grated if you have it.
- Ground cloves – 1/8 teaspoon – A little goes a long way.
- Salt – 1/2 teaspoon – Balances the sweetness and enhances flavors.
For the Maple Cream
- Heavy cream – 1 cup (240ml) – Cold, for whipping into soft peaks.
- Pure maple syrup – 3 tablespoons – Use the real stuff, not pancake syrup. Grade A dark amber is perfect.
- Powdered sugar – 1 tablespoon (optional) – Helps stabilize the cream if you want it stiffer.
For the Crust
- One 9-inch deep-dish pie crust – Store-bought or homemade, par-baked. I’ve used Pillsbury in a pinch and it works great. If you’re feeling ambitious, a buttery homemade crust takes it over the top.
Ingredient Tips: For the best brown butter, use a light-colored saucepan so you can see the color change. When browning, swirl the pan constantly—those milk solids burn fast. And for the maple cream, make sure your cream is very cold. Pop it in the freezer for 10 minutes before whipping if you’re in a warm kitchen.
Equipment Needed
You don’t need a fancy kitchen to pull this off. Here’s what you’ll need:
- 9-inch deep-dish pie pan – Glass or ceramic works best for even baking. I’ve got a Pyrex one that’s been with me for years.
- Medium saucepan – For browning the butter. A light-colored one helps you see the color change.
- Large mixing bowl – For whisking the filling ingredients together.
- Whisk – A sturdy balloon whisk is perfect for smoothing out the filling.
- Measuring cups and spoons – Accuracy matters in baking.
- Electric mixer or whisk – For whipping the maple cream. A hand mixer works great, but a stand mixer is fine too. You can even do it by hand if you’re up for a workout.
- Pie crust weights or dried beans – For par-baking the crust if you’re using a homemade one.
- Parchment paper or foil – To line the crust during par-baking.
- Cooling rack – Lets air circulate so the pie cools evenly.
Budget-Friendly Tip: Don’t have a pie pan? Use a 9-inch cake pan or even a cast-iron skillet. Just adjust the baking time slightly. And if you don’t have a mixer, a whisk and some elbow grease will get you fluffy cream in about 3-4 minutes.
Preparation Method
Alright, let’s make this pie. I’ll walk you through every step so you don’t miss a thing. Set a timer for each part—it helps keep you on track.
- Preheat your oven to 375°F (190°C). If you’re using a store-bought crust, place it on a baking sheet. If you’re using homemade, roll it out and fit it into your pie pan, crimp the edges, and pop it in the freezer for 15 minutes while you prep the filling.
- Brown the butter. In a medium saucepan over medium heat, melt the butter. Stir constantly with a heatproof spatula or whisk. After about 3-4 minutes, the butter will start to foam. Keep stirring. You’ll see little brown specks forming at the bottom—that’s the milk solids toasting. When it smells nutty and turns a deep amber color (about 5-6 minutes total), remove it from the heat immediately. Pour it into a heatproof bowl to stop the cooking. Let it cool for 5 minutes.
- Mix the wet ingredients. In a large mixing bowl, whisk together the pumpkin puree, granulated sugar, and brown sugar until smooth. Add the eggs one at a time, whisking well after each. Pour in the heavy cream, vanilla extract, and the cooled brown butter. Whisk until everything is combined and silky. Don’t overmix—you don’t want to incorporate too much air.
- Add the dry spices. Sprinkle the cinnamon, ginger, nutmeg, cloves, and salt over the wet mixture. Whisk gently until evenly distributed. Give it a taste—yes, it’s safe to eat raw at this point. Adjust the spices if you like things more or less spiced.
- Par-bake the crust. If you’re using a store-bought crust, check the package—some come pre-baked. If not, line your crust with parchment paper and fill with pie weights or dried beans. Bake for 10 minutes, then remove the weights and parchment and bake for another 5 minutes. The crust should look dry and lightly golden. Let it cool for 5 minutes.
- Pour and bake. Pour the pumpkin filling into the warm par-baked crust. Smooth the top with a spatula. Bake at 375°F (190°C) for 45-50 minutes. The pie is done when the edges are set and the center jiggles slightly when you gently shake the pan. A knife inserted near the center should come out mostly clean.
- Cool completely. Transfer the pie to a cooling rack and let it cool to room temperature, about 2 hours. Don’t rush this—a warm pie will make the maple cream melt. Once cool, refrigerate for at least 2 hours or overnight. Chilled pie slices much cleaner.
- Make the maple cream. Just before serving, pour the cold heavy cream into a chilled bowl. Add the maple syrup and powdered sugar if using. Whip with an electric mixer on medium-high speed until soft peaks form—about 2-3 minutes. Don’t overwhip or it’ll turn into butter. You want it light and fluffy, like a cloud.
- Serve. Slice the chilled pie, dollop a generous spoonful of maple cream on top, and maybe drizzle a little extra maple syrup if you’re feeling fancy. Serve cold or at room temperature.
Pro Tip: If the edges of your crust are browning too fast, tent them with aluminum foil strips halfway through baking. I learned that the hard way after a few burnt crusts.
Cooking Tips & Techniques
I’ve made this pie enough times to know where things can go sideways. Here are the lessons I learned the hard way so you don’t have to.
Brown Butter Basics: The biggest mistake people make is walking away from the pan. Seriously, don’t. Brown butter goes from perfect to burnt in about 30 seconds. Keep the heat at medium, not high, and swirl constantly. When you see those brown specks and smell that nutty aroma, pull it off the heat immediately. Pour it into a cool bowl to stop the cooking process.
Room Temperature Eggs: Cold eggs can cause the butter to seize up and create a lumpy filling. Take your eggs out of the fridge 30 minutes before you start, or place them in a bowl of warm water for 5 minutes. It makes a difference in the texture.
Don’t Overmix the Filling: Whisk just until everything is combined. Overmixing incorporates too much air, which can cause cracks on the surface of your baked pie. You want a smooth, dense filling, not a foamy one.
The Jiggle Test: Your pie is done when the edges are set and the center has a slight wobble—like Jell-O, not like soup. If the whole pie is liquid, it needs more time. If it’s completely firm, it might be overbaked. That gentle jiggle is your sweet spot.
Chill Before Slicing: I know it’s tempting to cut into a warm pie, but trust me—let it chill. A fully cooled and refrigerated pie slices into clean, beautiful pieces. Warm pie filling will ooze everywhere and your crust will crumble. Patience pays off here.
Maple Cream Consistency: If your cream isn’t whipping up, check that your bowl and beaters are cold. Warm cream won’t whip. And if you accidentally overwhip it into butter, don’t panic—just add a splash of cold cream and whisk gently to bring it back.
Variations & Adaptations
This recipe is flexible, so feel free to make it your own. Here are some variations I’ve tried and loved.
Gluten-Free Version: Use a gluten-free pie crust. Most store-bought gluten-free crusts work well. Just make sure to par-bake it according to the package directions. The filling itself is naturally gluten-free, so you’re good there.
Dairy-Free Option: Substitute the butter with a high-quality vegan butter (I like Miyoko’s) and use full-fat coconut cream instead of heavy cream in both the filling and the maple cream. The texture will be slightly different, but still delicious. For the maple cream, chill the coconut cream overnight and whip it cold.
Spice It Up: If you like a bolder spice profile, add 1/4 teaspoon of cardamom or allspice. I’ve done a version with a pinch of cayenne pepper for a subtle heat that cuts through the sweetness—it’s surprisingly good.
No-Bake Version: For a no-bake twist, skip the crust entirely and pour the filling into a graham cracker crust. Bake as directed, but reduce the baking time by 5-10 minutes since the crust is already set. The texture will be slightly softer, but it’s perfect for summer.
Mini Pies: Use a muffin tin and pre-made mini pie shells. Bake for 20-25 minutes instead of 45-50. These are great for parties or portion control—or both, honestly.
Personal Variation: Last Thanksgiving, I added a tablespoon of bourbon to the filling and swapped the maple cream for a bourbon whipped cream. It was a hit. Just sayin’—if you’re feeling adventurous, a little whiskey never hurt a pumpkin pie.
Serving & Storage Suggestions
This pie is best served cold or at room temperature, with a generous dollop of maple cream on top. The cream adds a lightness that balances the rich, nutty filling. Here’s how to make the most of it.
Serving Temperature: Pull the pie out of the fridge about 15 minutes before serving to take the chill off. It should be firm but not rock hard. The maple cream should be whipped fresh—it doesn’t hold up well overnight.
Presentation: Slice the pie with a sharp, thin-bladed knife, wiping the blade clean between cuts for neat slices. Arrange on a platter and top each slice with a spoonful of maple cream. Drizzle a little extra maple syrup on top and sprinkle with cinnamon or chopped pecans for crunch.
Pairings: This pie pairs beautifully with a hot cup of coffee, a spiced chai latte, or even a glass of bourbon or apple cider. For a full fall dessert spread, serve it alongside a warm apple crisp or a slice of pecan pie.
Storage: Cover the pie loosely with plastic wrap or foil and store it in the refrigerator for up to 4 days. The maple cream should be stored separately in an airtight container in the fridge—it’ll keep for 2 days, but it’s best fresh. You can also freeze the pie (without the cream) for up to 3 months. Wrap it tightly in plastic wrap and then foil. Thaw overnight in the fridge before serving.
Reheating: If you prefer warm pie, reheat individual slices in the microwave for 15-20 seconds. For a whole pie, place it in a 300°F (150°C) oven for 10-15 minutes. Just don’t overheat it or the filling can become runny.
Flavor Development: Here’s a secret—this pie actually tastes better the next day. The spices meld together and the brown butter flavor deepens overnight. So if you can, make it a day ahead. Your future self will thank you.
Nutritional Information & Benefits
This pie is a treat, so let’s be real—it’s not health food. But it does have some redeeming qualities worth noting.
Estimated Nutritional Values (per slice, 1/8 of pie with cream):
- Calories: 420
- Fat: 28g
- Saturated Fat: 17g
- Carbohydrates: 38g
- Sugar: 28g
- Protein: 5g
- Fiber: 2g
- Sodium: 290mg
Health Benefits of Key Ingredients: Pumpkin is packed with vitamin A, which supports eye health and immune function. It’s also high in fiber, which aids digestion. The cinnamon and ginger have anti-inflammatory properties and can help regulate blood sugar. And while butter gets a bad rap, it does contain butyrate, a fatty acid that supports gut health. So there’s that.
Dietary Considerations: This recipe is vegetarian. For a gluten-free version, use a gluten-free crust. For a dairy-free version, see the variation above. It’s not low-carb or keto-friendly due to the sugar content, but you could experiment with a sugar substitute if you’re adventurous.
Allergens: Contains dairy, eggs, and gluten (from the crust). If you have nut allergies, this recipe is nut-free as written.
My personal take? I believe in balance. This pie is a celebration of fall flavors, and I don’t stress about the numbers when I’m enjoying a slice with people I love. Life’s too short for guilt-free desserts.
Conclusion
This brown butter pumpkin pie with maple cream is proof that you don’t need a complicated recipe to create something truly memorable. It started as a late-night experiment born from a craving and a shortage of proper ingredients, and it turned into the pie everyone asks for by name. That’s the kind of recipe you hold onto.
I love how forgiving this pie is—it works with store-bought crusts, it comes together in under an hour, and it actually tastes better the next day. Whether you’re making it for Thanksgiving, a potluck, or just because it’s Tuesday and you deserve something good, this recipe delivers every single time.
So go ahead—brown that butter, whip that cream, and take a moment to enjoy the fruits of your labor. And when you do, I’d love to hear about it. Leave a comment below, share your photos, or tell me how you made it your own. Did you add bourbon? Swap the spices? Use a gluten-free crust? I want to know. Because the best recipes are the ones we make our own.
Happy baking, friends. You’ve got this.
Frequently Asked Questions
Can I use pumpkin pie filling instead of pure pumpkin?
I wouldn’t recommend it. Pumpkin pie filling already has sugar and spices added, so it would throw off the balance of this recipe. Stick with 100% pure pumpkin puree so you can control the sweetness and spice levels yourself.
Can I make this pie ahead of time?
Absolutely! In fact, I prefer it that way. Make the pie a day ahead, let it cool completely, and refrigerate it overnight. The flavors meld together beautifully. Just wait to whip the maple cream until right before serving.
What if I don’t have a deep-dish pie pan?
No problem. Use a standard 9-inch pie pan, but reduce the filling slightly—you might have a little leftover. Alternatively, you can use a 9-inch cake pan or even a cast-iron skillet. Just adjust the baking time as needed.
Why did my pie crack on top?
Cracks usually happen from overbaking or overmixing the filling. Make sure you’re not whisking too vigorously, and pull the pie out when the center still has a slight jiggle. If it still cracks, don’t worry—the maple cream covers it beautifully.
Can I freeze this pie?
Yes, but without the maple cream. Wrap the cooled pie tightly in plastic wrap and then foil, and freeze for up to 3 months. Thaw overnight in the fridge before serving. Whip up fresh cream when you’re ready to eat.
Pin This Recipe!
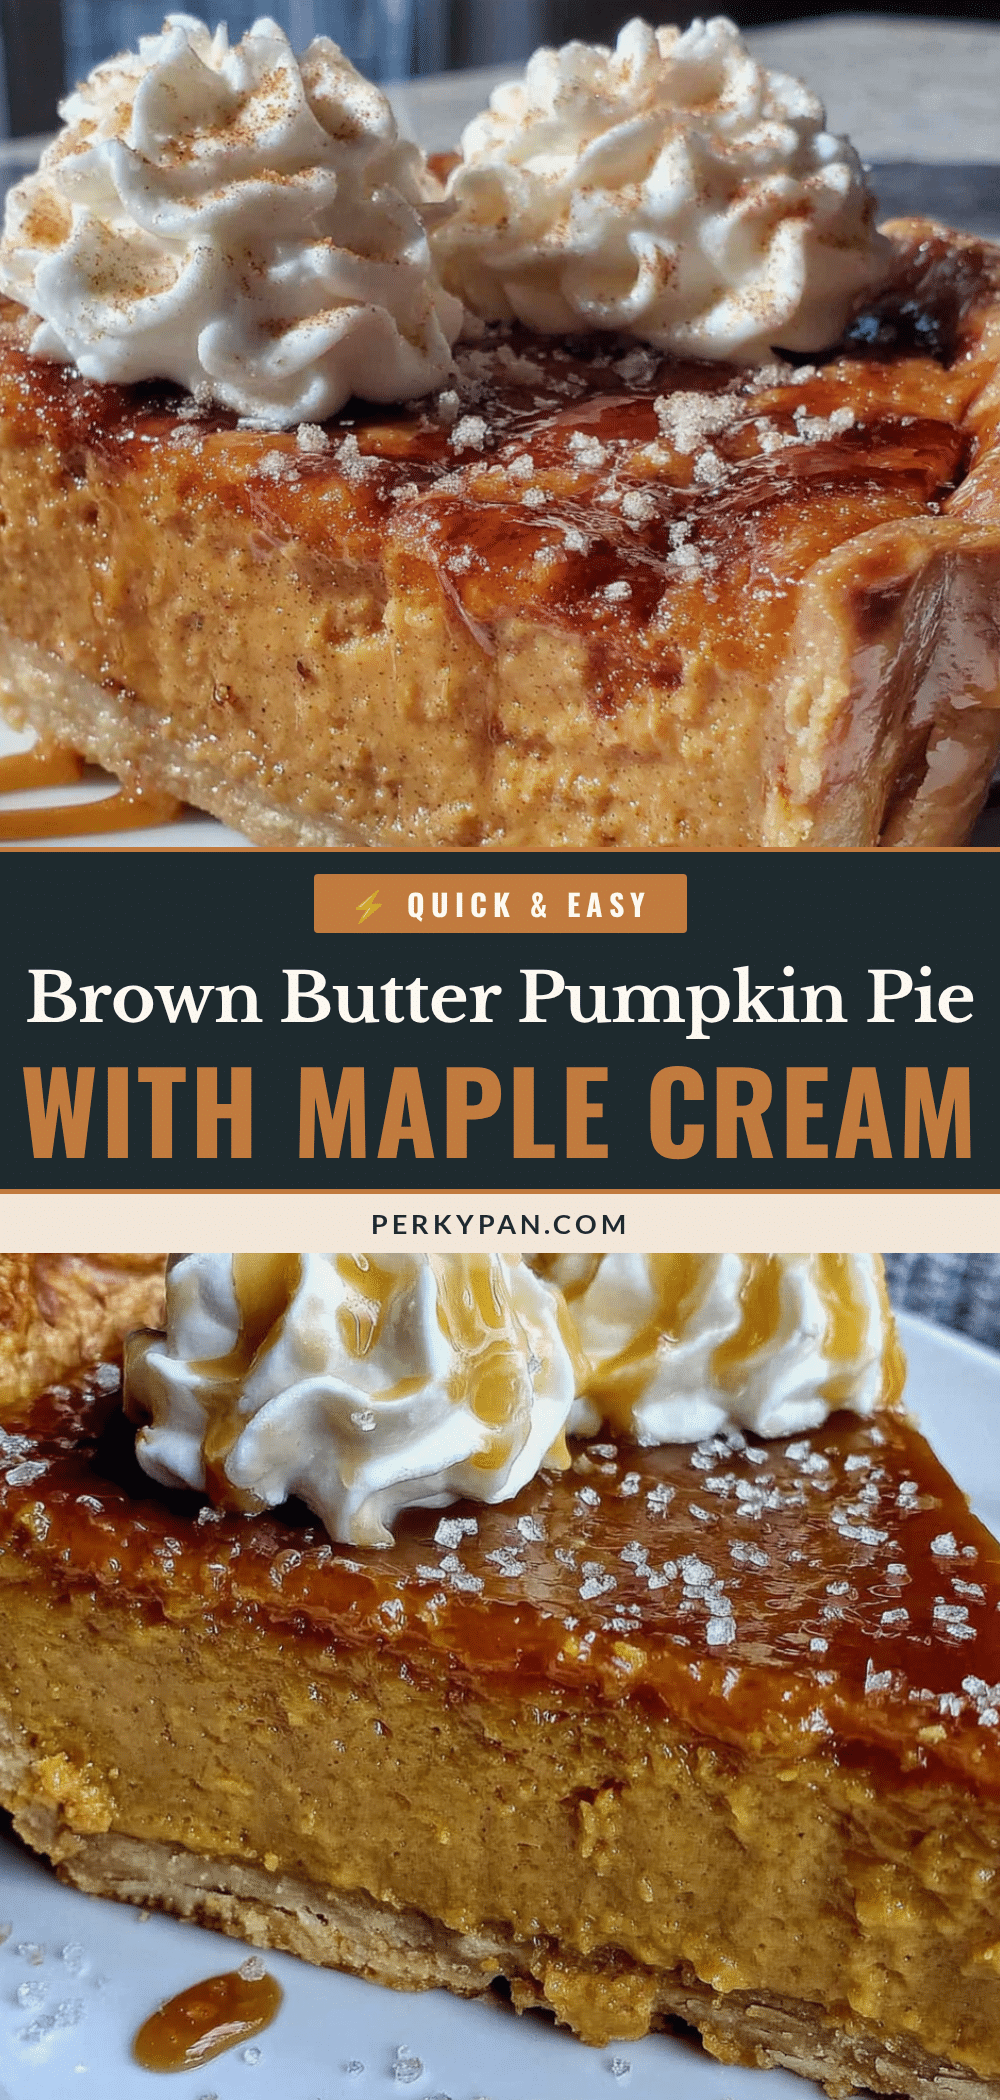
Easy Brown Butter Pumpkin Pie with Maple Cream
A quick and easy pumpkin pie with nutty brown butter and a fluffy maple cream topping, perfect for fall gatherings or a cozy weeknight dessert.
- Prep Time: 15 minutes
- Cook Time: 50 minutes
- Total Time: 1 hour 5 minutes (plus cooling and chilling time)
- Yield: 8 servings 1x
- Category: Dessert
- Cuisine: American
Ingredients
- 1/2 cup (1 stick, 113g) unsalted butter
- 1 can (15 oz, 425g) pumpkin puree (not pumpkin pie filling)
- 3/4 cup (150g) granulated sugar
- 1/4 cup (50g) light brown sugar, packed
- 2 large eggs, at room temperature
- 1/2 cup (120ml) heavy cream
- 1 teaspoon vanilla extract
- 1 1/2 teaspoons ground cinnamon
- 1/2 teaspoon ground ginger
- 1/4 teaspoon ground nutmeg
- 1/8 teaspoon ground cloves
- 1/2 teaspoon salt
- 1 cup (240ml) heavy cream (for maple cream)
- 3 tablespoons pure maple syrup
- 1 tablespoon powdered sugar (optional)
- One 9-inch deep-dish pie crust (store-bought or homemade, par-baked)
Instructions
- Preheat your oven to 375°F (190°C). If using a store-bought crust, place it on a baking sheet. If using homemade, roll it out, fit into pie pan, crimp edges, and freeze for 15 minutes.
- Brown the butter: In a medium saucepan over medium heat, melt the butter, stirring constantly. After 3-4 minutes, it will foam. Continue stirring until brown specks form and it smells nutty (about 5-6 minutes total). Remove from heat and pour into a heatproof bowl to cool for 5 minutes.
- Mix the wet ingredients: In a large mixing bowl, whisk together pumpkin puree, granulated sugar, and brown sugar until smooth. Add eggs one at a time, whisking well after each. Pour in heavy cream, vanilla extract, and cooled brown butter. Whisk until combined and silky.
- Add the dry spices: Sprinkle cinnamon, ginger, nutmeg, cloves, and salt over the wet mixture. Whisk gently until evenly distributed.
- Par-bake the crust: If needed, line crust with parchment paper and fill with pie weights or dried beans. Bake for 10 minutes, then remove weights and parchment and bake for another 5 minutes. Let cool for 5 minutes.
- Pour and bake: Pour pumpkin filling into warm par-baked crust. Smooth the top. Bake at 375°F (190°C) for 45-50 minutes, until edges are set and center jiggles slightly.
- Cool completely: Transfer pie to a cooling rack and cool to room temperature (about 2 hours). Then refrigerate for at least 2 hours or overnight.
- Make the maple cream: Just before serving, pour cold heavy cream into a chilled bowl. Add maple syrup and powdered sugar (if using). Whip with an electric mixer on medium-high speed until soft peaks form (about 2-3 minutes).
- Serve: Slice chilled pie, dollop with maple cream, and drizzle extra maple syrup if desired. Serve cold or at room temperature.
Notes
For best results, use a light-colored saucepan to brown the butter so you can see the color change. Make sure eggs are at room temperature to prevent the butter from seizing. Don’t overmix the filling to avoid cracks. The pie tastes even better the next day as flavors meld. Store pie loosely covered in the refrigerator for up to 4 days; maple cream is best fresh.
Nutrition
- Serving Size: 1 slice (1/8 of pie
- Calories: 420
- Sugar: 28
- Sodium: 290
- Fat: 28
- Saturated Fat: 17
- Carbohydrates: 38
- Fiber: 2
- Protein: 5
Keywords: pumpkin pie, brown butter, maple cream, fall dessert, Thanksgiving, easy pumpkin pie