Love this? Save it for later!
Share the inspiration with your friends
I was standing in the frozen foods aisle last Tuesday, staring at the rows of premium ice cream tubs, when a woman next to me picked up a pint of salted caramel and sighed. “I wish I could make this at home,” she said to no one in particular. And just like that, I was twelve years old again, sitting on the cracked linoleum floor of my aunt Delia’s kitchen, watching her pour a ribbon of homemade caramel into a bowl of whipped cream. She never measured anything—just a pinch of salt here, a splash of vanilla there—and somehow it always came out perfect. She’s been gone six years now, and I still can’t walk past a freezer case without thinking about that sticky, sweet, salty magic she made look so effortless.
Honestly, for the longest time, I thought homemade ice cream required one of those bulky machines and a degree in patience. I was wrong, let me tell you. After a few disastrous attempts (including one that turned into a rock-solid block of icy sadness), I cracked the code. This creamy no-churn salted caramel ice cream is the result of trial, error, and a lot of taste-testing. Maybe you’ve been there, standing in your kitchen with a whisk in hand, wondering if you can actually pull this off without fancy equipment.
The secret is simpler than you’d think. No ice cream maker, no constant churning, no complicated custard. Just four main ingredients, a bit of arm work, and a whole lot of patience while it freezes. This recipe has become my go-to for those slow evenings when the weather turns cold and I need something that tastes like a hug in a bowl. It’s the kind of dessert that makes you close your eyes after the first bite, chasing that perfect balance of sweet and salty that hits every single time.
Why You’ll Love This Recipe
This isn’t just another ice cream recipe you’ll find buried on the internet. I’ve tested this version at least a dozen times, tweaking the salt level, the caramel consistency, and the whipping time until it felt just right. My neighbor, a pastry chef who usually scoffs at “shortcut” desserts, actually asked for the recipe after sneaking a spoonful from my freezer. That’s the kind of approval that tells you you’ve got something special.
- No Ice Cream Maker Required: You don’t need a single piece of specialty equipment. Just a mixing bowl, a whisk or hand mixer, and a loaf pan. That’s it.
- Simple Pantry Ingredients: Chances are you already have heavy cream, sweetened condensed milk, vanilla extract, and salt in your kitchen. The caramel sauce comes together with sugar, butter, and a little more cream.
- Perfect for Cozy Nights In: When the rain is tapping against the window or you’ve had one of those days that just needs fixing, this ice cream delivers pure comfort.
- Crowd-Pleasing Flavor: Kids love the sweetness, adults appreciate the saltiness, and everyone goes back for seconds. I’ve never seen a bowl of this last longer than twenty minutes at a gathering.
- Unbelievably Creamy Texture: The no-churn method, when done right, produces a texture so smooth and velvety you’d swear it came from a fancy gelato shop. The secret is whipping the cream to stiff peaks and folding it gently.
What makes this recipe different from the rest? It’s the double caramel method. Instead of just swirling store-bought sauce into the base, I make a homemade salted caramel that gets folded in two ways—some mixed directly into the cream mixture for even flavor, and some swirled on top for those gooey pockets you’ll discover as you scoop. It’s a small extra step that makes a world of difference.
What Ingredients You Will Need
This recipe relies on a handful of quality ingredients to create that rich, indulgent flavor. Most of these are probably already sitting in your pantry or fridge, which makes this perfect for spontaneous dessert cravings.
For the Ice Cream Base
- 2 cups (480 ml) heavy whipping cream – Make sure it’s cold straight from the fridge. I prefer brands like Organic Valley or Horizon for their higher butterfat content, which gives you a creamier texture.
- 1 can (14 oz / 397 g) sweetened condensed milk – This is the magic ingredient that makes no-churn ice cream possible. It adds sweetness and prevents ice crystals from forming. I’ve tried both Eagle Brand and Nestlé, and they both work beautifully.
- 1 teaspoon vanilla extract – Pure vanilla extract, not imitation, makes a noticeable difference in depth of flavor. If you’re feeling fancy, scrape half a vanilla bean pod into the mixture instead.
- 1/2 teaspoon flaky sea salt – I use Maldon sea salt flakes for the best texture and burst of saltiness. Regular table salt will work in a pinch, but reduce the amount to 1/4 teaspoon since it’s more concentrated.
For the Salted Caramel Sauce
- 1 cup (200 g) granulated sugar – Regular white sugar works best here. Don’t substitute brown sugar, as it changes the caramelization process.
- 6 tablespoons (85 g) unsalted butter – Cut into small cubes and softened to room temperature. I recommend using a European-style butter like Kerrygold for its richer flavor.
- 1/2 cup (120 ml) heavy cream – Room temperature is important here. Cold cream will cause the caramel to seize and splatter.
- 1 teaspoon flaky sea salt – Plus more for sprinkling on top before serving.
Ingredient Selection Tip: When buying heavy cream, look for cartons that say “heavy whipping cream” or “heavy cream” with at least 36% milk fat. Anything labeled “light cream” or “half-and-half” won’t whip properly and will result in a icy, thin ice cream.
Substitution Guidance: If you’re dairy-sensitive, you can try using full-fat coconut cream in place of the heavy cream, though the texture will be slightly different and more coconut-forward in flavor. For a vegan version, use coconut cream and a dairy-free sweetened condensed milk alternative, but note that the caramel sauce will need to be made with vegan butter.
Equipment Needed
You don’t need much to make this recipe, which is honestly one of my favorite things about it. Here’s what you’ll want to have on hand:
- Large mixing bowl – A stainless steel or glass bowl works best. Make sure it’s thoroughly chilled if you’re working in a warm kitchen; cold bowls help the cream whip faster.
- Hand mixer or stand mixer – While you can whip the cream by hand with a whisk, it’ll take about 8-10 minutes of vigorous effort. A hand mixer cuts that down to 3-4 minutes. I’ve used my old KitchenAid hand mixer for years and it’s never let me down.
- Medium saucepan – For making the caramel sauce. A light-colored pan is ideal because it lets you see the color of the caramel as it cooks, preventing burning.
- Loaf pan (9×5 inch) – Standard size works perfectly. If you don’t have one, an 8×8 square baking dish will also work, though the ice cream will be shallower.
- Rubber spatula – For folding the mixtures together gently. A flexible silicone spatula is your best friend here.
- Parchment paper or plastic wrap – To line the pan and cover the surface of the ice cream, preventing freezer burn.
- Candy thermometer (optional but helpful) – If you’re nervous about making caramel, a thermometer takes the guesswork out. You’re aiming for 340-350°F (170-177°C), or a deep amber color.
Budget-Friendly Tip: Don’t have a hand mixer? You can absolutely whip the cream by hand. Chill the bowl and beaters in the freezer for 10 minutes first, then whisk vigorously. It’s a great arm workout, honestly!
Preparation Method
Let’s walk through this step by step. I’ll include all the little details I wish someone had told me the first time I tried making no-churn ice cream.
Step 1: Make the Salted Caramel Sauce
Start by making your caramel sauce first so it has time to cool slightly. Place the 1 cup of granulated sugar in an even layer in your medium saucepan over medium heat. Don’t stir it yet—just let it sit and start melting around the edges. After about 3-4 minutes, you’ll see the edges turning golden. At this point, gently swirl the pan (don’t use a spoon) to help the sugar melt evenly. Keep cooking until the sugar turns a deep amber color, about 6-8 minutes total. Watch closely—caramel can go from perfect to burnt in seconds.
Once you have that beautiful amber color, remove the pan from heat and immediately add the 6 tablespoons of cubed butter. The mixture will bubble up violently—that’s normal, don’t panic! Whisk vigorously until the butter is fully melted and incorporated. Slowly drizzle in the 1/2 cup of room-temperature cream while whisking constantly. The mixture will steam and bubble again. Keep whisking until smooth, then stir in 1 teaspoon of flaky sea salt. Set the caramel aside to cool for about 20 minutes. It will thicken as it cools.
Troubleshooting Tip: If your caramel seizes up or forms lumps when you add the cream, don’t throw it away. Return the pan to low heat and whisk gently until it smooths out. This happens to everyone at least once, I promise.
Step 2: Whip the Cream
Pour the 2 cups of cold heavy cream into your large mixing bowl. Using a hand mixer or stand mixer fitted with the whisk attachment, beat the cream on medium-high speed until stiff peaks form. This usually takes about 3-4 minutes with a mixer. You’re looking for peaks that stand straight up when you lift the beaters, not flop over. Be careful not to over-whip, or you’ll end up with butter. Trust me, I’ve done it, and it’s not a pretty sight.
Step 3: Fold in the Sweetened Condensed Milk
Add the entire can of sweetened condensed milk and 1 teaspoon of vanilla extract to the whipped cream. Using your rubber spatula, gently fold everything together. The key word here is gently. You want to cut through the center of the mixture, scrape along the bottom, and fold over the top. Repeat this motion about 15-20 times until no white streaks remain. Don’t stir vigorously or you’ll deflate all that air you just whipped into the cream.
Step 4: Incorporate the Caramel
Reserve about 1/3 cup of your cooled salted caramel sauce for swirling on top. Pour the remaining caramel into the cream mixture and fold gently again, just 5-6 times. You want ribbons of caramel running through the base, not a fully uniform mixture. Those pockets of pure caramel are what make every scoop exciting.
Step 5: Layer and Swirl
Line your loaf pan with parchment paper, leaving some overhang on the long sides for easy removal later. Pour half of the ice cream mixture into the pan and spread it evenly. Drizzle half of the reserved caramel sauce over the top in a zigzag pattern. Add the remaining ice cream mixture, spread gently, then drizzle the rest of the caramel on top. Use a butter knife or skewer to swirl the caramel into the top layer, creating those beautiful marbled patterns.
Step 6: Freeze
Sprinkle a pinch of flaky sea salt over the top for that final salty hit. Press a piece of plastic wrap directly onto the surface of the ice cream (this prevents ice crystals from forming), then cover the pan with foil or more plastic wrap. Place it in the coldest part of your freezer and let it freeze for at least 6 hours, but overnight is better. The longer it freezes, the firmer and creamier it gets.
Patience Warning: I know it’s hard to wait, but don’t sneak a taste after just 3 hours. The texture won’t be right, and you’ll be disappointed. Give it the full time, and you’ll be rewarded with scoopable, creamy perfection.
Cooking Tips & Techniques
After making this recipe more times than I can count, I’ve collected a few tricks that make the process smoother and the results more consistent. Let me share what I’ve learned the hard way.
Keep Everything Cold: The single biggest mistake people make with no-churn ice cream is letting the cream get too warm. Chill your bowl and beaters in the freezer for 10 minutes before whipping. Work in a cool kitchen if possible. Warm cream won’t whip properly, and you’ll end up with a soupy mess that freezes into an icy block.
Don’t Skip the Salt: I know it sounds strange to add salt to a sweet dessert, but trust me on this. Salt doesn’t just add saltiness—it enhances the sweetness of the caramel and balances the richness of the cream. Without it, the ice cream tastes flat and one-dimensional. That flaky sea salt on top before serving? Non-negotiable in my book.
Watch the Caramel Like a Hawk: Caramel making requires your full attention. I once tried to answer a text while my sugar was melting, and within thirty seconds it went from golden to black. The smoke alarm went off, my kitchen smelled like a campfire, and I had to start over. Set a timer, stay by the stove, and don’t multitask during this step.
Room Temperature Ingredients Matter: When making the caramel sauce, your butter and cream need to be at room temperature. Cold butter will cause the caramel to seize, and cold cream will make it splatter dangerously. Take them out of the fridge about 30 minutes before you start cooking.
Fold, Don’t Stir: This is the golden rule of no-churn ice cream. Folding preserves the air bubbles you worked so hard to create. If you stir vigorously, you deflate the mixture and end up with a dense, icy texture. Be patient and gentle—it’s worth it.
My Biggest Failure: The first time I made this, I got impatient and used a whisk to mix the caramel into the cream base. Big mistake. The mixture deflated immediately, and the ice cream came out more like a frozen pudding than the light, creamy texture I was after. I ate it anyway (I’m not wasteful), but I learned my lesson.
Variations & Adaptations
One of the best things about this recipe is how easily it adapts to different tastes and dietary needs. Here are a few variations I’ve tried and loved.
Salted Caramel Chocolate Chip
Fold in 1/2 cup of dark chocolate chips or chopped chocolate chunks along with the caramel. The bitterness of the dark chocolate cuts through the sweetness beautifully. I recommend using 60-70% cacao chocolate for the best balance. Add the chips just before you pour the mixture into the pan, folding them in with just 3-4 gentle strokes.
Vegan Coconut Caramel Ice Cream
Replace the heavy cream with two cans of full-fat coconut cream (chilled overnight and scooped from the top, leaving the watery liquid behind). Use a dairy-free sweetened condensed coconut milk and vegan butter for the caramel. The coconut flavor pairs surprisingly well with the salted caramel, giving it a tropical twist. The texture will be slightly different—a bit more icy than creamy—but it’s still delicious.
Boozy Salted Caramel
Add 2 tablespoons of bourbon, dark rum, or whiskey to the cream mixture before folding in the caramel. The alcohol lowers the freezing point of the ice cream, making it slightly softer and scoopable straight from the freezer. Plus, the warmth of the bourbon complements the caramel flavor in a way that feels incredibly grown-up and indulgent.
Peanut Butter Salted Caramel Swirl
Warm 1/3 cup of creamy peanut butter until it’s runny, then swirl it into the ice cream along with the caramel. The peanut butter adds a savory, nutty element that makes this taste like a frozen candy bar. I made this version for a summer barbecue last year, and it disappeared before the burgers were even off the grill.
Serving & Storage Suggestions
This ice cream is best served straight from the freezer, but let it sit at room temperature for about 5-10 minutes before scooping. This softens it just enough to make scooping easy without turning it into soup. Use a metal ice cream scoop dipped in hot water for the cleanest, prettiest scoops.
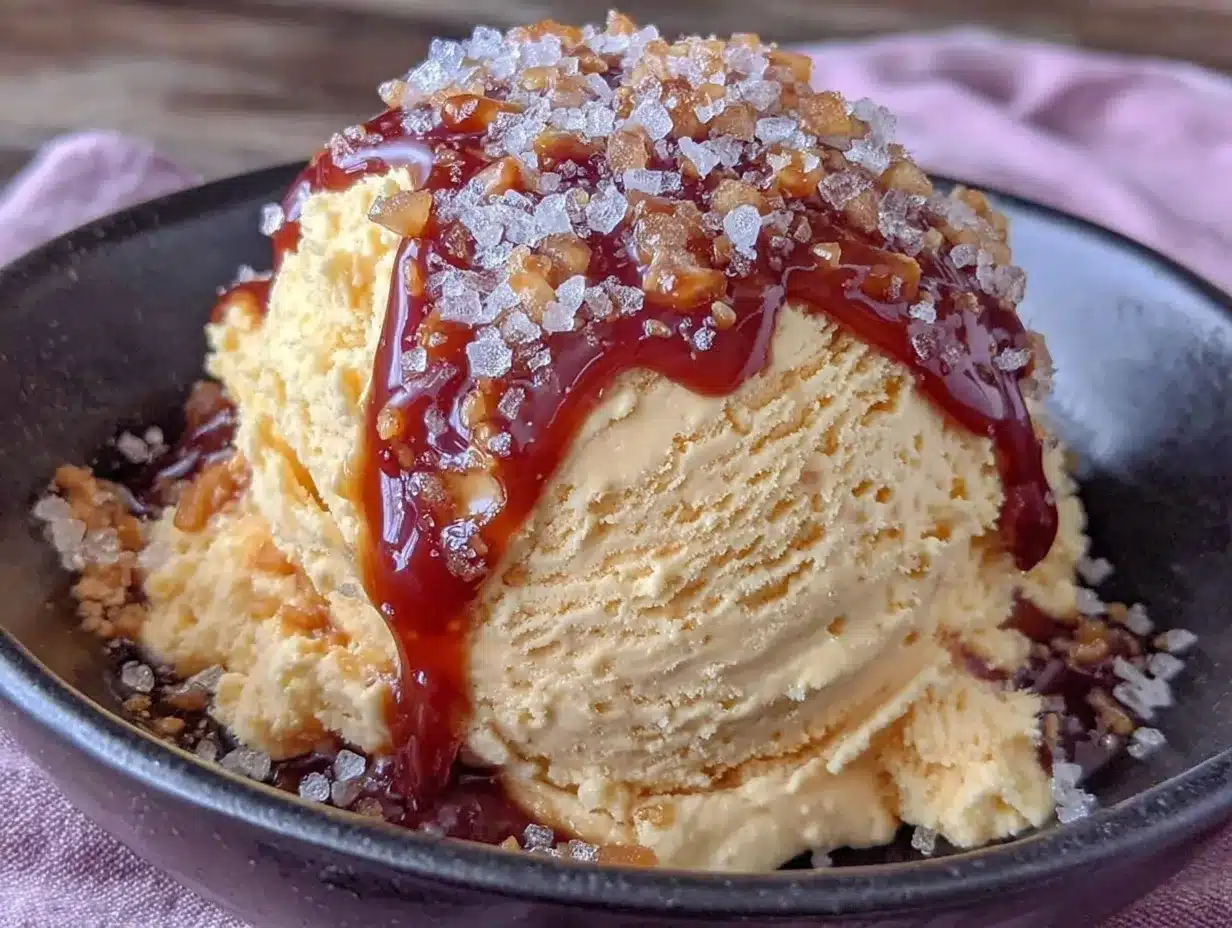
Presentation Ideas: Serve in chilled glass bowls or vintage-style sundae dishes. Drizzle a little extra warmed caramel sauce on top, sprinkle with more flaky sea salt, and add a dollop of freshly whipped cream if you’re feeling extra. A few chocolate shavings or crushed pretzels on top add wonderful texture and visual appeal.
Perfect Pairings: This ice cream is incredible alongside a warm brownie or chocolate chip cookie. The hot-and-cold contrast is pure magic. It also pairs beautifully with fresh berries—the tartness of raspberries or blackberries cuts through the richness. For drinks, a strong cup of black coffee or an espresso martini complements the caramel notes perfectly.
Storage Instructions: Keep the ice cream in your loaf pan, covered tightly with plastic wrap pressed directly onto the surface and then foil on top. It will stay fresh for up to 2 weeks in the freezer. After that, it may start to develop ice crystals, though it’s still perfectly safe to eat. The flavors actually deepen after the first 24 hours, so don’t be afraid to make it a day ahead.
Reheating the Caramel: If your reserved caramel sauce thickens too much in the fridge, simply microwave it in 10-second bursts, stirring between each, until it’s pourable again. Don’t overheat it or it will separate.
Nutritional Information & Benefits
Let’s be honest—this is an indulgent dessert, not a health food. But knowing what’s in it can help you enjoy it mindfully. Here’s the estimated nutritional breakdown per serving (based on 12 servings):
| Nutrient | Amount Per Serving |
|---|---|
| Calories | 385 |
| Total Fat | 26g |
| Saturated Fat | 16g |
| Cholesterol | 95mg |
| Sodium | 310mg |
| Total Carbohydrates | 35g |
| Sugars | 32g |
| Protein | 4g |
| Calcium | 12% DV |
Health Benefits of Key Ingredients: Despite its decadent nature, this dessert does offer some surprising benefits. Heavy cream contains fat-soluble vitamins A, D, E, and K, along with conjugated linoleic acid, which has been linked to various health benefits. The sea salt provides essential electrolytes, and if you use high-quality vanilla extract, it contains small amounts of antioxidants. Of course, these benefits come in the context of a treat, not a daily staple.
Dietary Considerations: This recipe contains dairy and gluten-free (as written, since none of the ingredients contain gluten). It is not suitable for vegans, though the coconut variation above offers a plant-based option. If you’re watching your sugar intake, this is definitely a once-in-a-while dessert rather than an everyday indulgence.
Allergen Warning: Contains milk and dairy products. May contain traces of tree nuts if you add the peanut butter variation.
Conclusion
There’s something deeply satisfying about making your own ice cream from scratch, especially when it turns out this good. This creamy no-churn salted caramel ice cream has become my go-to for so many occasions—rainy Sunday afternoons, dinner parties where I want to impress without stress, and those quiet evenings when I just need something sweet to end the day on a high note.
I love that this recipe doesn’t require any fancy equipment or hard-to-find ingredients. It’s accessible, forgiving, and absolutely delicious. The combination of rich caramel, flaky salt, and velvety cream is timeless for a reason. Every time I make it, I think of my aunt Delia and her messy, beautiful kitchen, and I feel like I’m carrying a little piece of her with me.
Now I’d love to hear from you. Have you tried making no-churn ice cream before? Did you add your own twist to this recipe? Drop a comment below and let me know how it turned out. And if you loved it, share this post with a friend who needs a little sweetness in their life. Happy scooping!
Frequently Asked Questions
Can I use store-bought caramel sauce instead of making my own?
You absolutely can, but the flavor won’t be quite as rich or complex. Homemade caramel has a deeper, more buttery taste that really elevates the ice cream. If you’re short on time, look for a high-quality jarred caramel sauce—preferably one that lists cream and butter as ingredients rather than corn syrup and artificial flavors.
Why did my ice cream turn out icy instead of creamy?
This usually happens for one of two reasons: either the cream wasn’t whipped to stiff peaks, or the mixture wasn’t folded gently enough. When you whip the cream properly, you create millions of tiny air bubbles that prevent large ice crystals from forming. The sweetened condensed milk also helps by adding sugar and fat, which lower the freezing point. If your ice cream is icy, try whipping the cream a little longer next time and folding more gently.
How long does this ice cream keep in the freezer?
Properly stored, this ice cream will stay fresh and creamy for up to 2 weeks. After that, it may start to develop ice crystals on the surface, though it’s still safe to eat. The key is pressing plastic wrap directly onto the surface of the ice cream before sealing the container, which prevents air from reaching it.
Can I double this recipe?
Yes! This recipe doubles beautifully. Use a larger mixing bowl and a 9×13 inch baking dish instead of a loaf pan. The freezing time may increase slightly—give it a full 8-10 hours or overnight to ensure it’s firm all the way through. Just make sure your mixer can handle the volume of cream.
Is it safe to eat raw eggs in no-churn ice cream?
Traditional ice cream recipes often use a cooked custard base with eggs, but this no-churn version doesn’t contain any eggs at all. It relies on whipped cream and sweetened condensed milk for its creamy texture, so there are no concerns about raw eggs. It’s perfectly safe for everyone, including pregnant women and young children.
PrintCreamy No-Churn Salted Caramel Ice Cream: Easy Homemade Recipe

This creamy no-churn salted caramel ice cream requires no ice cream maker and just a handful of simple ingredients. With a double caramel method for gooey pockets of flavor, it’s the perfect indulgent treat for cozy nights in.
- Prep Time: 20 minutes
- Cook Time: 10 minutes
- Total Time: 6 hours 30 minutes (includes freezing)
- Yield: 12 servings 1x
- Category: Dessert
- Cuisine: American
Ingredients
- 2 cups (480 ml) heavy whipping cream
- 1 can (14 oz / 397 g) sweetened condensed milk
- 1 teaspoon vanilla extract
- 1/2 teaspoon flaky sea salt
- 1 cup (200 g) granulated sugar
- 6 tablespoons (85 g) unsalted butter, cubed and softened
- 1/2 cup (120 ml) heavy cream, room temperature
- 1 teaspoon flaky sea salt
Instructions
- Make the salted caramel sauce: Place 1 cup granulated sugar in an even layer in a medium saucepan over medium heat. Let it melt without stirring for 3-4 minutes until edges turn golden. Gently swirl the pan until sugar turns deep amber (6-8 minutes total). Remove from heat, add 6 tablespoons cubed butter (mixture will bubble), whisk until melted. Slowly drizzle in 1/2 cup room-temperature cream while whisking constantly. Stir in 1 teaspoon flaky sea salt. Set aside to cool for 20 minutes.
- Whip the cream: Pour 2 cups cold heavy cream into a large mixing bowl. Beat with a hand mixer or stand mixer on medium-high speed until stiff peaks form (3-4 minutes).
- Fold in sweetened condensed milk: Add the entire can of sweetened condensed milk and 1 teaspoon vanilla extract to the whipped cream. Gently fold with a rubber spatula until no white streaks remain (15-20 folds).
- Incorporate the caramel: Reserve 1/3 cup of cooled caramel sauce for swirling. Pour remaining caramel into the cream mixture and fold gently 5-6 times, leaving ribbons of caramel.
- Layer and swirl: Line a 9×5 inch loaf pan with parchment paper. Pour half the ice cream mixture into the pan, spread evenly. Drizzle half the reserved caramel in a zigzag pattern. Add remaining mixture, spread gently, then drizzle remaining caramel on top. Use a butter knife to swirl the caramel into the top layer.
- Freeze: Sprinkle a pinch of flaky sea salt over the top. Press plastic wrap directly onto the surface, cover with foil, and freeze for at least 6 hours or overnight.
Notes
Keep everything cold for best results. Don’t skip the salt—it enhances sweetness. Watch caramel closely to avoid burning. Fold gently to preserve air bubbles. Let ice cream sit at room temperature 5-10 minutes before scooping. Store up to 2 weeks with plastic wrap pressed directly onto surface.
Nutrition
- Serving Size: 1 serving (1/12 of r
- Calories: 385
- Sugar: 32
- Sodium: 310
- Fat: 26
- Saturated Fat: 16
- Carbohydrates: 35
- Protein: 4
Keywords: no-churn ice cream, salted caramel, homemade ice cream, easy dessert, no ice cream maker


