Love this? Save it for later!
Share the inspiration with your friends
The neighborhood potluck was in six hours and I’d completely forgotten. Everyone else would be bringing their signature dishes—the kind that take all weekend to prepare. My neighbor Karen was famous for her slow-simmered brisket, and across the street, the Johnsons always brought a three-layer cake that looked like it came from a bakery. I had a pack of chicken breasts in the fridge, a crockpot I’d barely used, and honestly, I was one wrong move away from ordering pizza and showing up with a store-bought salad.
But here’s the thing about pressure—sometimes it forces you to keep things simple. I threw those chicken breasts into the crockpot with a few pantry staples, crossed my fingers, and went to help my kid with homework. When I lifted that lid hours later, I almost couldn’t believe it. The chicken was tender, juicy, and actually had flavor. Cut to that potluck, where the empty dish came back with people asking for the recipe. I mean, I was sheepish when Karen asked if she could have the leftovers. “There are no leftovers,” I admitted. She laughed, but I think she was serious.
That night taught me something important. You don’t need a complicated recipe or hours of hands-on work to make chicken that tastes like you actually tried. Maybe you’ve been there—standing in front of the fridge, wondering how to pull off dinner without a meltdown. This easy crockpot chicken breast recipe is the answer. It’s the recipe I keep coming back to because it works, every single time, and it makes me look like I have my life together when I absolutely do not.
Why You’ll Love This Recipe
Let me tell you why this easy crockpot chicken breast recipe is about to become your weeknight hero. I’ve tested this method more times than I can count, tweaking the timing and the liquid ratios until I got it just right. This isn’t just another recipe you’ll find online—this is the version that actually delivers on its promise.
- Quick & Easy: You need about 5 minutes of hands-on prep. That’s it. The crockpot does the rest while you handle the chaos of your evening.
- Simple Ingredients: No fancy grocery trips needed. You likely already have everything in your kitchen—chicken, broth, some basic seasonings.
- Perfect for Busy Weeknights: This is the definition of set-it-and-forget-it. Great for meal prep, busy parents, or anyone who just wants dinner handled.
- Crowd-Pleaser: I’ve served this to picky kids, health-conscious friends, and meat-and-potatoes types. Everyone loves it. The texture is that good.
- Unbelievably Delicious: The secret is in the method—low and slow with just enough liquid to keep things moist without turning your chicken into soup. The flavor is clean, versatile, and absolutely satisfying.
This recipe is different because it tackles the biggest problem people have with crockpot chicken: dryness. Most recipes either overcook the chicken or don’t use enough liquid. I’ve cracked the code, and I’m sharing every detail. It’s comfort food that fits into your real life—healthier than takeout, faster than a complicated meal, and with the same soul-soothing satisfaction. Perfect for impressing guests without stress, or turning a simple Tuesday into something memorable.
What Ingredients You Will Need
This recipe uses simple, wholesome ingredients to deliver bold flavor and satisfying texture without the fuss. Most of these are pantry staples, which is exactly what you want on a busy weeknight.
- Boneless, skinless chicken breasts (about 1.5 to 2 pounds, or 4-6 breasts) — Look for breasts that are similar in size so they cook evenly. I prefer organic when I can find it, but any quality chicken works.
- Chicken broth (1/2 cup, low-sodium) — This is the key to moisture. Don’t skip it! I use Swanson or Kitchen Basics for consistent flavor. You can also use vegetable broth in a pinch.
- Olive oil (1 tablespoon) — Helps the seasoning stick and adds a little richness. Use extra-virgin for better flavor if you have it.
- Garlic powder (1 teaspoon) — Adds savory depth without being overpowering. Fresh garlic works too, but powder is more convenient and won’t burn.
- Onion powder (1 teaspoon) — Complements the garlic and rounds out the flavor profile.
- Paprika (1 teaspoon) — I use smoked paprika for a subtle, smoky warmth. Regular paprika works fine too.
- Dried thyme (1/2 teaspoon) — Adds an earthy, slightly floral note. You can substitute with dried oregano or rosemary if that’s what you have.
- Salt (1 teaspoon, or to taste) — Don’t skimp here. Salt brings out the natural flavor of the chicken.
- Black pepper (1/2 teaspoon, freshly ground) — A little goes a long way. Freshly ground tastes noticeably better.
- Optional: Fresh herbs for garnish (parsley, thyme, or chives) — Adds a pop of color and freshness at the end.
Ingredient Tips: If your chicken breasts are very thick (over 1 inch), consider slicing them in half horizontally so they cook faster and more evenly. For a richer flavor, you can substitute half the broth with white wine or apple cider vinegar—just a tablespoon or two. And if you’re dairy-free or avoiding certain ingredients, this recipe is naturally free of milk, eggs, and gluten as written. Always check your broth label for gluten if that’s a concern.
Equipment Needed
You don’t need a fancy kitchen to make this work. Here’s what you’ll need:
- Crockpot or slow cooker (4 to 6 quart size) — This is the star of the show. I use a Cuisinart 6-quart model, and it’s been reliable for years. Any brand works as long as it has a low and high setting.
- Measuring cups and spoons — For the broth and seasonings. Nothing fancy needed.
- Small bowl — For mixing the seasoning blend. You can also mix it directly on the chicken if you’re in a hurry.
- Tongs — For placing the chicken in the crockpot and removing it later. A fork works too, but tongs are gentler on the meat.
- Instant-read thermometer (optional but recommended) — Takes the guesswork out of doneness. Chicken is safe at 165°F, but I pull it at 160°F because it continues cooking as it rests.
- Cutting board and knife — For shredding or slicing the chicken after it’s cooked.
If you don’t have a crockpot, you can use a Dutch oven in the oven at 300°F for about 2-3 hours. But honestly, the crockpot is the easiest route. Budget-friendly options from Hamilton Beach or Crock-Pot brand work great and cost under $30.
Preparation Method
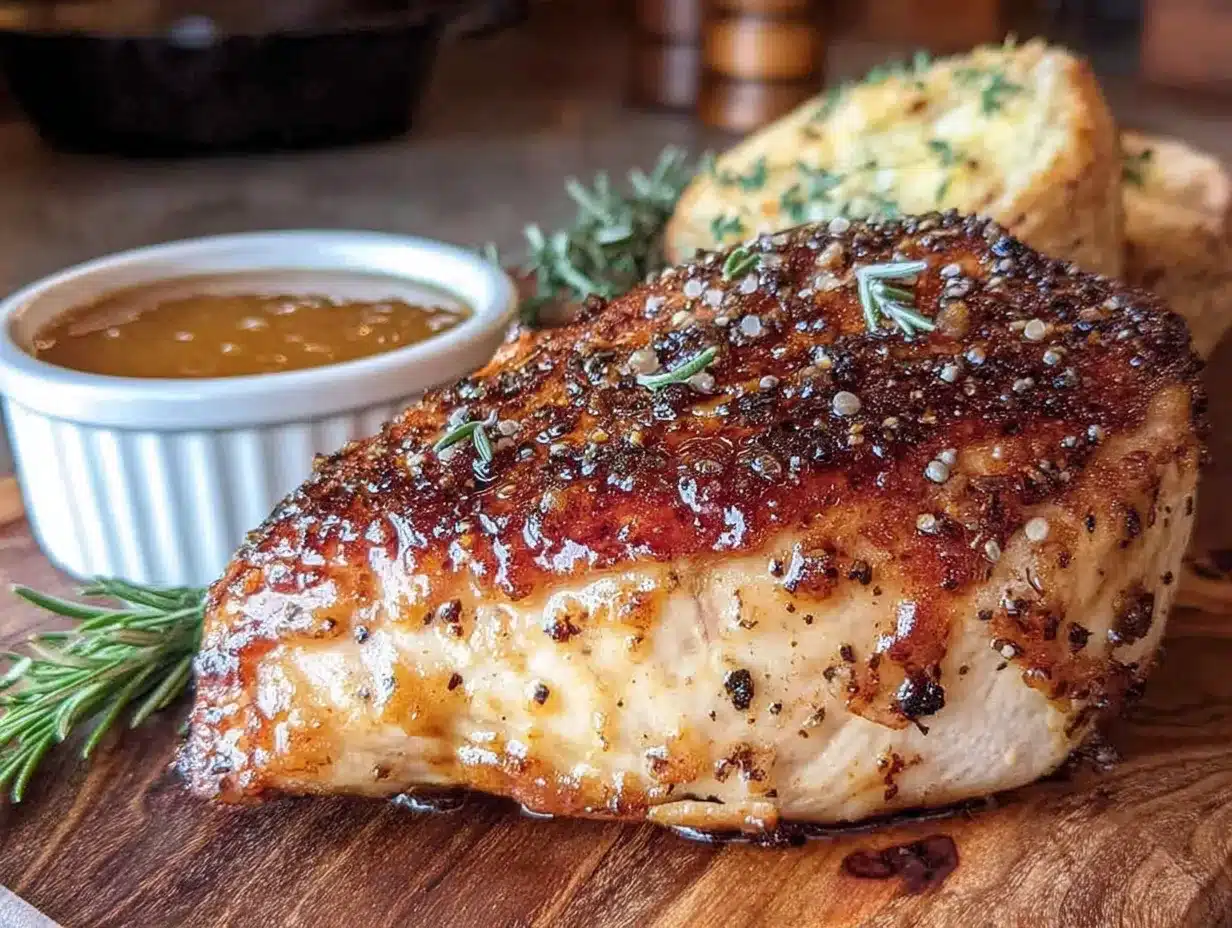
Follow these steps carefully, and I promise you’ll end up with the juiciest crockpot chicken of your life.
- Pat the chicken dry. Use paper towels to remove excess moisture from the chicken breasts. This helps the seasoning stick better and prevents the chicken from steaming instead of cooking. Don’t skip this step—it makes a difference.
- Mix the seasoning. In a small bowl, combine the garlic powder, onion powder, paprika, dried thyme, salt, and black pepper. Stir until evenly blended. This takes about 30 seconds.
- Season the chicken. Drizzle the olive oil over the chicken breasts and rub it in with your hands. Then sprinkle the seasoning mixture evenly over all sides of the chicken. Use your fingers to massage it in a little—this ensures every bite is flavorful.
- Prepare the crockpot. Lightly spray the inside of your crockpot with non-stick cooking spray or brush with a little oil. This makes cleanup much easier later.
- Add the broth. Pour the 1/2 cup of chicken broth into the bottom of the crockpot. Don’t add more than this—you want enough moisture to create steam, but not so much that the chicken boils. Trust me on this.
- Place the chicken in the crockpot. Arrange the seasoned chicken breasts in a single layer at the bottom of the crockpot. Try not to overlap them too much. If they don’t all fit in one layer, it’s okay—just do your best.
- Cook on low. Cover the crockpot with the lid and cook on LOW for 2.5 to 3.5 hours. The exact time depends on the size and thickness of your chicken breasts. For average-sized breasts (about 6-8 ounces each), 3 hours is usually perfect. Do not cook on high—high heat can make the chicken tough and dry. Low and slow is the way to go.
- Check for doneness. After 2.5 hours, start checking the internal temperature with an instant-read thermometer. Insert it into the thickest part of a breast. You’re looking for 160°F to 165°F. If it’s not there yet, check again every 15 minutes. Once it hits 160°F, remove the chicken immediately.
- Rest the chicken. Transfer the cooked chicken to a cutting board and let it rest for 5 minutes. This allows the juices to redistribute throughout the meat. If you cut into it right away, all those delicious juices will run out and you’ll end up with dry chicken.
- Slice or shred. After resting, slice the chicken against the grain for tender pieces, or use two forks to shred it. If you’re shredding, you can add a splash of the cooking liquid back in for extra moisture.
Pro tip from my kitchen: The first time I made this, I got distracted by a phone call and left the chicken in for almost 5 hours. It was dry and sad. Now I set a timer on my phone for 2.5 hours and check it religiously. Learn from my mistake!
Cooking Tips & Techniques
I’ve made every mistake in the book so you don’t have to. Here’s what I’ve learned the hard way:
The biggest mistake is overcooking. Chicken breasts are lean, which means they dry out fast. Even in a crockpot, they can go from perfect to sawdust in 30 minutes. That’s why checking the temperature early is so important. I once left chicken in for 4 hours because I thought “low and slow” meant I could ignore it. I was wrong.
Don’t lift the lid. Every time you lift that lid, you release heat and steam, which adds 15-20 minutes to your cooking time. Resist the urge to peek! I know it’s tempting, but trust the process.
Layer flavors wisely. If you want to add aromatics like garlic cloves, onion wedges, or lemon slices, place them under the chicken. This way, they infuse the meat without burning or becoming bitter. I’ve tried putting garlic on top, and it just ends up dry and papery.
Timing is everything. If you’re meal prepping for the week, cook the chicken on Sunday and store it in the fridge. It reheats beautifully. But don’t cook it on low for 8 hours while you’re at work—that’s too long for chicken breasts. Thighs can handle that, but breasts can’t.
Use a thermometer. Honestly, this is the best investment you can make for your kitchen. It takes the guesswork out of cooking meat. I use a ThermoPro digital thermometer, and it’s been a game-changer. No more cutting into chicken to see if it’s done—just a quick temp check and you’re good.
Variations & Adaptations
This recipe is incredibly versatile. Here are some of my favorite ways to change it up:
1. Spicy Southwest Version: Add 1 teaspoon of chili powder, 1/2 teaspoon of cumin, and a pinch of cayenne pepper to the seasoning mix. After cooking, shred the chicken and toss it with a little lime juice and chopped cilantro. Perfect for tacos or burrito bowls.
2. Lemon Herb Version: Add the zest of one lemon and 2 tablespoons of fresh lemon juice to the broth. Throw in a few sprigs of fresh rosemary and thyme. The citrus brightens everything up and makes the chicken taste lighter. I made this for a spring dinner party, and everyone asked for the recipe.
3. Creamy Mushroom Version: After cooking, remove the chicken and whisk a can of cream of mushroom soup into the remaining liquid. Add the chicken back in and cook on low for another 15 minutes. This creates a rich, creamy sauce that’s amazing over rice or egg noodles.
4. Dairy-Free Adaptation: This recipe is naturally dairy-free, but if you’re making the creamy version, use a can of full-fat coconut milk instead of cream of mushroom soup. It sounds weird, but it works—I promise.
5. Gluten-Free Adaptation: As written, this recipe is gluten-free. Just double-check your broth label. Some brands add wheat-based ingredients. I use Pacific Foods or Imagine for guaranteed gluten-free broth.
6. BBQ Chicken Version: After cooking, shred the chicken and toss it with your favorite barbecue sauce. Serve on buns with coleslaw for an easy pulled chicken sandwich. This is my go-to for game day.
Serving & Storage Suggestions
This chicken is incredibly versatile. Here’s how to serve it and keep it fresh:
Serving Temperature: Serve the chicken warm, right after it’s rested. If you’re shredding it, the residual heat will keep it warm for a few minutes. For cold dishes like salads, let it cool completely before chopping.
Presentation Ideas: Slice the chicken and fan it out on a platter with a drizzle of the cooking liquid. Garnish with fresh parsley or thyme. For a casual dinner, serve it straight from the crockpot with a side of roasted vegetables and rice.
Complementary Dishes: This chicken pairs beautifully with roasted potatoes, steamed broccoli, a simple green salad, or garlic bread. For a complete meal, try serving it over a bed of creamy parmesan risotto or alongside garlic butter green beans. The mild flavor of the chicken lets the sides shine.
Storage Instructions: Store leftover chicken in an airtight container in the refrigerator for up to 4 days. For longer storage, freeze it for up to 3 months. I like to shred the chicken before freezing so it’s ready to use in soups, casseroles, or salads.
Reheating Methods: The best way to reheat is in a covered skillet over low heat with a splash of broth or water. This prevents the chicken from drying out. You can also microwave it in 30-second bursts with a damp paper towel over the top. Avoid reheating at high power—it will toughen the meat.
Flavor Development: The flavors actually deepen after a day in the fridge. I often make this chicken on purpose the day before I plan to serve it because it tastes even better. The herbs and spices meld together beautifully overnight.
Nutritional Information & Benefits
Here’s the nutritional breakdown for a standard serving (about 4 ounces of cooked chicken):
- Calories: Approximately 180-200
- Protein: 30-35 grams
- Fat: 4-6 grams
- Carbohydrates: 1-2 grams
- Sodium: 400-500 mg (varies based on broth and seasoning)
Health Benefits: Chicken breast is an excellent source of lean protein, which is essential for muscle repair and overall health. It’s also rich in B vitamins, particularly B6 and niacin, which support energy metabolism. The simple seasoning adds antioxidants from paprika and thyme without extra calories or sodium.
Dietary Considerations: This recipe is naturally low-carb, keto-friendly, and gluten-free. It’s also Whole30-compliant if you use a compliant broth. For a lower-sodium option, use unsalted broth and reduce the added salt to 1/2 teaspoon.
Potential Allergens: This recipe is free of the top eight allergens (dairy, eggs, peanuts, tree nuts, fish, shellfish, soy, and wheat) as written. However, always check your broth label for any hidden ingredients.
My Personal Take: I love that this recipe fits into a balanced lifestyle without feeling restrictive. It’s real food, made simply, that nourishes both body and soul. No guilt, no fuss—just good, honest cooking.
Conclusion
This easy crockpot chicken breast recipe is proof that you don’t need to be a professional chef to make amazing food. It’s simple, it’s reliable, and it honestly works every single time. Whether you’re feeding a family, meal-prepping for the week, or just trying to get dinner on the table without losing your mind, this recipe has your back.
I love this recipe because it reminds me that cooking doesn’t have to be complicated to be good. Sometimes the best meals come from the simplest methods, made with a little patience and a lot of heart. And honestly, the fact that it makes me look like I have my act together—even on days when I absolutely don’t—is just a bonus.
Now I want to hear from you! Have you tried this recipe? Did you add your own twist? Drop a comment below and let me know how it turned out. And if you loved it, share it with a friend who needs a win in the kitchen. Happy cooking!
Frequently Asked Questions
Can I use frozen chicken breasts in the crockpot?
I don’t recommend it. Frozen chicken takes much longer to reach a safe temperature, which means the outside can overcook while the inside stays raw. For best results, thaw your chicken completely before cooking. If you’re in a hurry, you can cook frozen chicken in the oven or on the stovetop, but the crockpot method really works best with fresh or fully thawed chicken.
How do I keep chicken from drying out in the crockpot?
The secret is threefold: use enough liquid (but not too much), cook on LOW, and don’t overcook it. The 1/2 cup of broth creates steam that keeps the chicken moist without boiling it. Cooking on low for 2.5 to 3.5 hours is the sweet spot. And using an instant-read thermometer ensures you pull the chicken at the perfect moment—160°F to 165°F.
Can I add vegetables to the crockpot with the chicken?
Absolutely! But add them wisely. Root vegetables like carrots, potatoes, and onions can go in at the same time as the chicken. Softer vegetables like zucchini, bell peppers, or mushrooms should be added in the last 30-45 minutes of cooking so they don’t turn to mush. I love adding baby carrots and quartered red potatoes for a complete one-pot meal.
What can I do with leftover crockpot chicken?
The options are endless! Use it in chicken salad sandwiches, toss it into a Caesar salad, add it to soups or casseroles, make chicken tacos or enchiladas, or simply reheat it with some rice and steamed veggies. I often double the recipe just to have leftovers for the week. It’s a meal prep superstar.
Why did my chicken turn out dry even though I followed the recipe?
A few possibilities: Your chicken breasts were very thin or very thick, which affects cooking time. Your crockpot might run hot—some models do. Or you might have lifted the lid too often, releasing steam. Next time, check the temperature earlier (around 2 hours) and use a thermometer to be precise. Also, make sure you’re using enough broth—1/2 cup is the minimum, but if your crockpot is larger, you might need a bit more.
PrintEasy Crockpot Chicken Breast Recipe That Never Gets Dry
This easy crockpot chicken breast recipe is the answer to busy weeknights. With just 5 minutes of prep and simple pantry ingredients, you get tender, juicy chicken every time.
- Prep Time: 5 minutes
- Cook Time: 3 hours
- Total Time: 3 hours 5 minutes
- Yield: 4 servings 1x
- Category: Main Course
- Cuisine: American
Ingredients
- 1.5 to 2 pounds boneless, skinless chicken breasts (4–6 breasts)
- 1/2 cup low-sodium chicken broth
- 1 tablespoon olive oil
- 1 teaspoon garlic powder
- 1 teaspoon onion powder
- 1 teaspoon paprika (smoked or regular)
- 1/2 teaspoon dried thyme
- 1 teaspoon salt
- 1/2 teaspoon black pepper, freshly ground
- Fresh herbs for garnish (optional: parsley, thyme, or chives)
Instructions
- Pat the chicken dry with paper towels.
- In a small bowl, mix garlic powder, onion powder, paprika, dried thyme, salt, and black pepper.
- Drizzle olive oil over the chicken and rub it in. Sprinkle the seasoning mixture evenly over all sides of the chicken.
- Lightly spray the inside of the crockpot with non-stick cooking spray or brush with oil.
- Pour 1/2 cup chicken broth into the bottom of the crockpot.
- Place the seasoned chicken breasts in a single layer in the crockpot.
- Cover and cook on LOW for 2.5 to 3.5 hours. Do not cook on high.
- Check internal temperature with an instant-read thermometer; it should reach 160°F to 165°F.
- Transfer chicken to a cutting board and let rest for 5 minutes.
- Slice against the grain or shred with two forks. Add a splash of cooking liquid if shredding.
Notes
Do not cook on high; low and slow is key. Avoid lifting the lid during cooking. For thicker breasts, slice in half horizontally for even cooking. Use a thermometer to prevent overcooking.
Nutrition
- Serving Size: 4 ounces cooked chic
- Calories: 190
- Sodium: 450
- Fat: 5
- Saturated Fat: 1
- Carbohydrates: 1
- Protein: 33
Keywords: crockpot chicken, slow cooker chicken, easy chicken breast, juicy chicken, weeknight dinner, meal prep


