Love this? Save it for later!
Share the inspiration with your friends
I was at the county fair last October, wedged between a funnel cake stand and a lady selling crocheted dish towels, when the woman running the pickle booth—yes, the pickle booth—started talking to me about cookies. Her name was Margie, she was maybe seventy, and she had this no-nonsense way of holding a clipboard that made you want to listen. I wasn’t expecting baking advice from a woman whose main business was brined cucumbers, but there I was, holding a bag of dill spears, watching her describe exactly how to make these little pumpkin pie sugar cookies that her grandkids went crazy for every fall. She said the secret was in the butter temperature and that most people overcomplicate a perfectly simple thing. I honestly scribbled her directions on a napkin because my phone was dead, and that napkin sat in my purse for three days before I tried it. Let me tell you—Margie knew what she was talking about. These cookies have become the thing my kids ask for the second the leaves start changing, and they’re so easy that I’ve made them on a Tuesday night after soccer practice, still in my car keys. Maybe you’ve been there, standing in your kitchen wondering if you can pull off a seasonal treat without losing your mind. This is that recipe.
Why You’ll Love This Recipe
I have tested this recipe more times than I care to count, and every single batch has disappeared within twenty-four hours. That is not an exaggeration—my neighbor’s teenage son once ate eight of them standing at my counter. These cookies hit that sweet spot between a soft sugar cookie and a mini pumpkin pie, and they do it without any complicated steps or hard-to-find ingredients.
- Quick & Easy : From start to finish, you are looking at about thirty minutes. That includes chilling time, which I know sounds like a lot, but I promise the dough comes together in under ten minutes.
- Simple Ingredients : You probably have most of this in your pantry right now. Canned pumpkin, butter, sugar, flour, and pumpkin pie spice. No trips to a specialty store required.
- Perfect for Fall Baking with Kids : The dough is forgiving, the rolling is fun, and the little cookie cutter shapes make everyone smile. My five-year-old helps me press the tops into the sugar mixture, and she feels like a real baker.
- Crowd-Pleaser : I brought these to a school bake sale and they sold out in the first twenty minutes. Adults love them, kids devour them, and they look impressive without any fancy piping skills.
- Unbelievably Delicious : The texture is what gets people—crispy on the outside, soft and almost cake-like in the center, with that warm pumpkin pie flavor that tastes like autumn in cookie form.
What makes this recipe different from every other pumpkin cookie out there is the technique. Instead of making a separate pie filling and a separate cookie dough, we combine them into one cohesive dough that bakes up perfectly every time. The butter is cold, not softened, which gives the cookies a slight flakiness that reminds me of pie crust. And the sugar coating on top adds that little crunch that makes people think you did something fancy when really you just rolled a ball of dough in sugar. Honestly, that is my favorite kind of cooking—the kind that looks harder than it actually is.
This recipe is not just good—it is the kind that makes you close your eyes after the first bite. It is comfort food reimagined for a busy weeknight, healthier than a full slice of pie, faster than a complicated dessert, but with the same soul-soothing satisfaction. Perfect for impressing your kid’s teachers without stress, or turning a regular Tuesday into something memorable.
What Ingredients You Will Need
This recipe uses simple, wholesome ingredients to deliver bold pumpkin flavor and a soft, tender texture without any fuss. Most of these are pantry staples, especially if you do any fall baking at all.
For the Cookie Dough
- 1/2 cup unsalted butter, cold and cubed (cold butter is key here—it gives the cookies that slight flakiness. I use Kerrygold when I can find it on sale)
- 1/2 cup granulated sugar (plus extra for rolling, about 1/4 cup more)
- 1/4 cup packed light brown sugar (adds moisture and a tiny bit of molasses depth)
- 1/2 cup canned pumpkin puree (not pumpkin pie filling—make sure it says 100% pumpkin on the label. Libby’s is my go-to)
- 1 large egg yolk (room temperature if you remember, but straight from the fridge works too)
- 1 teaspoon vanilla extract (pure, not imitation, if you have it)
- 1 1/2 cups all-purpose flour (spoon and level it—don’t scoop straight from the bag)
- 1/2 teaspoon baking powder
- 1/2 teaspoon baking soda
- 1/4 teaspoon salt
- 2 teaspoons pumpkin pie spice (or make your own: 1 teaspoon cinnamon, 1/2 teaspoon ginger, 1/4 teaspoon nutmeg, 1/4 teaspoon cloves)
For the Topping
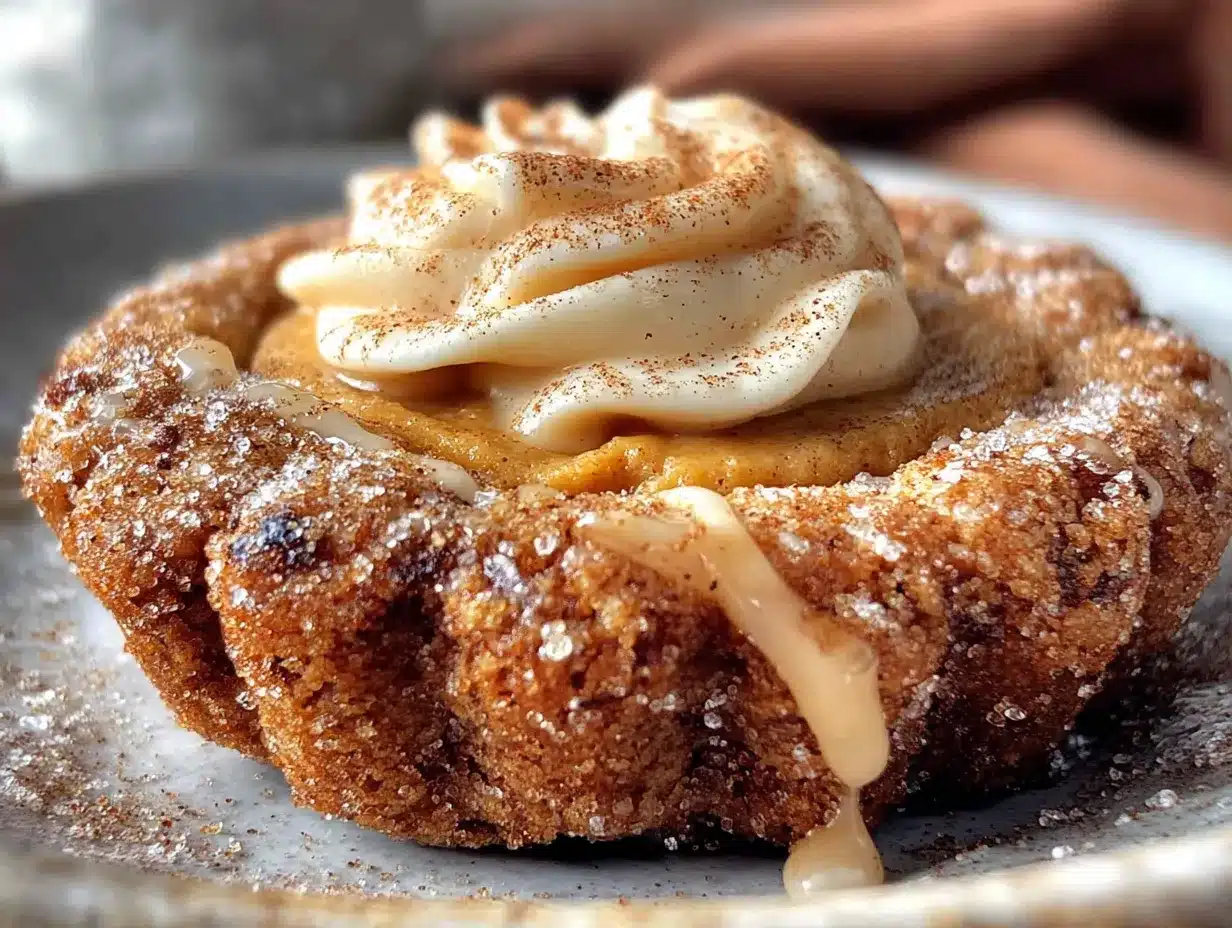
- 1/4 cup granulated sugar (for rolling the dough balls before baking)
- 1 teaspoon pumpkin pie spice (mix this into the sugar for extra flavor—trust me on this one)
I recommend using a good quality pumpkin pie spice blend here. The store brand works fine, but if you have the time, mixing your own gives you more control over the flavor. Look for pumpkin puree that is thick and not watery—if your pumpkin seems loose, blot it with a paper towel before adding it to the dough. For a dairy-free option, use cold vegan butter sticks, not the spreadable kind in a tub. I have tested this with Miyoko’s and it worked beautifully.
Equipment Needed
- Large mixing bowl (any bowl works, but a wide one makes mixing easier)
- Hand mixer or stand mixer (you can do this by hand with a wooden spoon, but a mixer makes it faster)
- Measuring cups and spoons
- Baking sheet (I use a light-colored metal sheet for even browning)
- Parchment paper or silicone baking mat
- Small bowl (for the sugar topping mixture)
- Cookie scoop or tablespoon (a 1.5 tablespoon scoop gives the perfect size)
- Cooling rack
- Plastic wrap (for chilling the dough)
If you don’t have a cookie scoop, just use a regular tablespoon and your hands. The dough is a bit sticky, so lightly wet your fingers if needed. I bought my scoop at a dollar store three years ago and it still works perfectly, so don’t feel like you need fancy equipment.
Preparation Method
- Cream the butter and sugars : In your large mixing bowl, beat the cold cubed butter with the granulated sugar and brown sugar for about 2 minutes until it looks sandy and slightly lighter in color. Don’t expect it to get fluffy like softened butter—cold butter stays a bit chunky, and that is exactly what we want. Scrape the sides of the bowl once during mixing.
- Add the wet ingredients : Beat in the pumpkin puree, egg yolk, and vanilla extract. Mix on medium speed for about 1 minute until everything is combined. The mixture will look a little separated at first, but keep mixing and it will come together into a smooth, orange-tinted batter. It should smell like fall at this point.
- Mix the dry ingredients separately : In a separate medium bowl, whisk together the flour, baking powder, baking soda, salt, and pumpkin pie spice. Whisking ensures the spices are evenly distributed so you don’t get one cookie that tastes like cloves and another that tastes like nothing.
- Combine wet and dry : Gradually add the dry ingredients to the wet mixture, mixing on low speed or stirring by hand. Stop as soon as the flour disappears—overmixing will make the cookies tough. The dough will be soft and slightly sticky, like a thick sugar cookie dough. If it feels too sticky to handle, refrigerate it for 15 minutes before scooping.
- Chill the dough : Cover the bowl with plastic wrap and refrigerate for at least 30 minutes. This step is not optional—chilling solidifies the butter and prevents the cookies from spreading into flat discs. I once skipped this because I was in a hurry, and I ended up with pumpkin-flavored pancakes. Learn from my mistake.
- Preheat the oven : About 10 minutes before you are ready to bake, preheat your oven to 350°F (175°C). Line your baking sheet with parchment paper or a silicone mat.
- Prepare the sugar coating : In a small bowl, mix the 1/4 cup granulated sugar with the 1 teaspoon pumpkin pie spice. Stir it with a fork so the spice is evenly distributed.
- Scoop and roll : Using your cookie scoop or a tablespoon, scoop out rounded balls of dough about 1.5 tablespoons each. Roll each ball between your palms until smooth, then roll it in the spiced sugar mixture until completely coated. Place the sugared dough balls on the prepared baking sheet, spacing them about 2 inches apart. I fit 12 cookies on a standard half-sheet pan.
- Flatten slightly : Using the bottom of a glass or your palm, gently press each dough ball down to about 1/2 inch thickness. Don’t flatten them too much—they will spread a little in the oven, and you want them to stay thick and soft in the center.
- Bake : Bake for 10 to 12 minutes, or until the edges are set and lightly golden. The centers will still look slightly soft and puffy—that is perfect. They will continue to set as they cool. I usually check at the 10-minute mark and go from there.
- Cool : Let the cookies cool on the baking sheet for 5 minutes. This is important because they are fragile right out of the oven. After 5 minutes, transfer them to a wire cooling rack to cool completely. If you try to move them too soon, they will crumble in your hands. I have been there, and it is heartbreaking.
The kitchen will smell like a pumpkin spice candle factory, and your family will start hovering. That is normal.
Cooking Tips & Techniques
I learned the hard way that not all pumpkin puree is created equal. Some brands are much wetter than others, and that extra moisture will make your cookies spread into thin, crispy discs. If your pumpkin puree looks watery, spoon it onto a paper towel-lined plate and let it sit for 5 minutes before using. Pat the top gently with another paper towel. This one step changed my cookie game completely.
Another thing I messed up early on was not chilling the dough long enough. I was impatient, I wanted cookies now, and I paid the price with a batch that looked like sad orange blobs. The dough needs that 30 minutes in the fridge to firm up the butter. If you have the time, an hour is even better. You can also make the dough the night before and keep it covered in the fridge—it actually develops more flavor overnight.
When rolling the dough balls, make sure they are uniform in size. I use a cookie scoop for this reason. If one ball is twice as big as the others, it will bake unevenly and throw off the whole batch. Consistency matters here more than perfection.
If you want extra crispy edges, bake them for the full 12 minutes. If you prefer them softer and more cake-like, pull them out at 10 minutes. My family likes them somewhere in the middle, so I do 11 minutes and they come out perfect every time.
One more thing—don’t skip the sugar coating. That little crunchy shell on the outside is what makes these cookies feel special. It also helps them keep their shape during baking. I once forgot to roll them in sugar and they spread way more than usual. So roll them well, and don’t be shy with the sugar.
Variations & Adaptations
Over the years, I have played around with this recipe more than I care to admit. Here are some variations that actually worked:
- Gluten-Free Version : Substitute the all-purpose flour with a 1:1 gluten-free baking flour blend that contains xanthan gum. I have used King Arthur Measure for Measure and Bob’s Red Mill with great results. The texture is slightly more delicate, so handle them gently after baking.
- Dairy-Free Version : Use cold vegan butter sticks instead of regular butter. I tested this with Earth Balance and it worked fine, though the cookies were slightly less flaky. Still delicious, just different.
- Add Chocolate Chips : Fold in 1/2 cup of mini chocolate chips after mixing the dough. The chocolate and pumpkin spice combination is surprisingly good—my kids call these “pumpkin chocolate chip clouds.”
- Make Them Larger : Use a 3-tablespoon scoop and bake for 14 to 16 minutes. You will get about 12 larger cookies instead of 24 small ones. Great for when you want a more substantial treat.
- Pumpkin Cream Cheese Frosting : If you want to go all out, mix 4 ounces of softened cream cheese with 2 tablespoons of pumpkin puree, 1 cup of powdered sugar, and 1/2 teaspoon of vanilla. Spread it on cooled cookies and prepare for compliments.
I tried a version with maple syrup instead of brown sugar once, and it made the cookies too soft and sticky. Stick with the brown sugar—it gives the right texture and flavor.
Serving & Storage Suggestions
These cookies are best served at room temperature, right after they have cooled completely. The sugar coating stays slightly crunchy for the first day, which is my favorite texture. If you want to dress them up for a party, dust them with a little extra powdered sugar or drizzle with a simple glaze made from powdered sugar and milk.
They pair beautifully with a hot cup of coffee, a glass of cold milk, or even a scoop of vanilla ice cream sandwiched between two cookies. I have also crumbled them over yogurt for a quick breakfast that feels indulgent but isn’t.
For storage, keep them in an airtight container at room temperature for up to 5 days. Place a piece of bread in the container to keep them soft—the bread absorbs excess air and releases moisture. Replace the bread slice every other day. I learned this trick from my grandmother and it works like magic.
You can also freeze these cookies for up to 3 months. Layer them between sheets of parchment paper in a freezer-safe container. To thaw, leave them at room temperature for about 30 minutes. The sugar coating might lose a bit of its crunch, but the flavor stays perfect. I usually make a double batch and freeze half for those days when I need a quick treat without any effort.
The flavors actually deepen after a day or two, so don’t be surprised if they taste even better on day three. That is, if they last that long. In my house, they rarely make it past day one.
Nutritional Information & Benefits
Per cookie (based on 24 cookies): approximately 110 calories, 5g fat, 15g carbohydrates, 1g fiber, 8g sugar, 1g protein. These numbers are estimates and will vary based on exact ingredients and portion sizes.
Pumpkin is packed with vitamin A, which supports eye health and immune function. It also provides fiber, which helps with digestion and keeps you feeling full. The pumpkin pie spice blend contains cinnamon, which may help regulate blood sugar levels. While these are still cookies and should be enjoyed as a treat, they do offer a tiny nutritional boost compared to a standard sugar cookie.
This recipe is vegetarian and can be made gluten-free and dairy-free with the substitutions listed above. It contains wheat, dairy, and eggs in its standard form. If you have allergies, please adjust accordingly.
I feel good about serving these to my kids because they are getting a little bit of vegetable in their dessert, and honestly, any mom who can sneak pumpkin into a cookie deserves a medal. Or at least another cookie.
Conclusion
These mini pumpkin pie sugar cookies have earned a permanent spot in my fall baking rotation, and I think they deserve one in yours too. They are simple enough for a Tuesday night, special enough for a holiday party, and so kid-friendly that even the pickiest eaters ask for seconds. The recipe came from a pickle booth lady at a county fair, of all places, and that is the kind of story that makes cooking feel connected to real life.
I hope you make these and customize them to fit your family. Add chocolate chips if that makes your kids happy. Double the spice if you love that warm fall flavor. Make them gluten-free for your neighbor who always brings you soup when you are sick. That is the beauty of a good recipe—it adapts to the people you love.
When you make them, come back and tell me how they turned out. Did your kids help roll the dough balls? Did your husband eat six before dinner? Did you burn the first batch like I did and have to start over? I want to hear it all. Leave a comment below and share your version of this recipe. And if you loved it, share it with a friend who needs a little fall happiness in their kitchen. Happy baking, friend.
Frequently Asked Questions
Can I use fresh pumpkin instead of canned?
You can, but you need to make sure it is very dry. Fresh pumpkin puree has more water than canned, so spread it on a baking sheet lined with paper towels and let it sit for 10 minutes before using. Even then, the texture might be slightly different. I recommend sticking with canned for the most consistent results.
Why did my cookies spread too much?
This usually happens for one of three reasons: the dough wasn’t chilled long enough, the butter was too warm, or the pumpkin puree was too watery. Make sure you chill the dough for at least 30 minutes and blot your pumpkin if it looks loose. Also, check that your baking soda and baking powder are fresh—expired leavening agents can cause spreading.
Can I make the dough ahead of time?
Absolutely. You can make the dough up to 3 days in advance and keep it covered in the refrigerator. Let it sit at room temperature for about 10 minutes before scooping if it feels too hard. You can also freeze the dough balls for up to 3 months—just scoop, roll in sugar, and freeze on a baking sheet before transferring to a freezer bag. Bake from frozen, adding 2 to 3 minutes to the baking time.
How do I know when the cookies are done?
Look for set edges that are lightly golden. The centers will still look slightly soft and puffy—that is exactly what you want. They will continue to bake on the hot baking sheet as they cool. If the edges are brown, they have been in too long. If the centers look wet and raw, give them another minute.
Can I double this recipe?
Yes, this recipe doubles beautifully. Just make sure you have enough space in your refrigerator to chill all the dough. You might need to bake in batches, and that is fine—the dough keeps well in the fridge between batches. I often make a double batch and freeze half for later. It saves time and means I always have homemade cookies ready to go.
PrintBest Mini Pumpkin Pie Sugar Cookies – Easy & Kid-Approved
These soft, cake-like sugar cookies are packed with warm pumpkin pie spice and coated in a crunchy sugar shell. They come together in about 30 minutes with simple pantry ingredients and are perfect for fall baking with kids.
- Prep Time: 15 minutes
- Cook Time: 12 minutes
- Total Time: 30 minutes
- Yield: 24 cookies 1x
- Category: Dessert
- Cuisine: American
Ingredients
- 1/2 cup unsalted butter, cold and cubed
- 1/2 cup granulated sugar (plus 1/4 cup for rolling)
- 1/4 cup packed light brown sugar
- 1/2 cup canned pumpkin puree (100% pumpkin)
- 1 large egg yolk
- 1 teaspoon vanilla extract
- 1 1/2 cups all-purpose flour
- 1/2 teaspoon baking powder
- 1/2 teaspoon baking soda
- 1/4 teaspoon salt
- 2 teaspoons pumpkin pie spice
- 1/4 cup granulated sugar (for topping)
- 1 teaspoon pumpkin pie spice (for topping)
Instructions
- Cream the butter and sugars: In a large mixing bowl, beat the cold cubed butter with granulated sugar and brown sugar for about 2 minutes until sandy and slightly lighter in color. Scrape the sides once.
- Add the wet ingredients: Beat in pumpkin puree, egg yolk, and vanilla extract on medium speed for about 1 minute until combined and smooth.
- Mix the dry ingredients separately: In a separate bowl, whisk together flour, baking powder, baking soda, salt, and pumpkin pie spice.
- Combine wet and dry: Gradually add dry ingredients to wet mixture, mixing on low or by hand until just combined. Dough will be soft and slightly sticky.
- Chill the dough: Cover bowl with plastic wrap and refrigerate for at least 30 minutes.
- Preheat oven to 350°F (175°C). Line a baking sheet with parchment paper or a silicone mat.
- Prepare the sugar coating: In a small bowl, mix 1/4 cup granulated sugar with 1 teaspoon pumpkin pie spice.
- Scoop and roll: Using a 1.5-tablespoon cookie scoop, scoop dough balls. Roll each ball between palms until smooth, then roll in spiced sugar mixture until coated. Place 2 inches apart on prepared baking sheet.
- Flatten slightly: Gently press each dough ball to about 1/2-inch thickness using the bottom of a glass or your palm.
- Bake for 10 to 12 minutes, until edges are set and lightly golden. Centers will still look soft.
- Cool on baking sheet for 5 minutes, then transfer to a wire rack to cool completely.
Notes
Chill dough for at least 30 minutes to prevent spreading. If pumpkin puree is watery, blot with paper towels before using. For extra crispy edges, bake 12 minutes; for softer cookies, bake 10 minutes. Dough can be made up to 3 days ahead or frozen for up to 3 months.
Nutrition
- Serving Size: 1 cookie
- Calories: 110
- Sugar: 8
- Sodium: 85
- Fat: 5
- Saturated Fat: 3
- Carbohydrates: 15
- Fiber: 1
- Protein: 1
Keywords: pumpkin cookies, sugar cookies, fall baking, kid-friendly, easy cookies, pumpkin pie cookies